
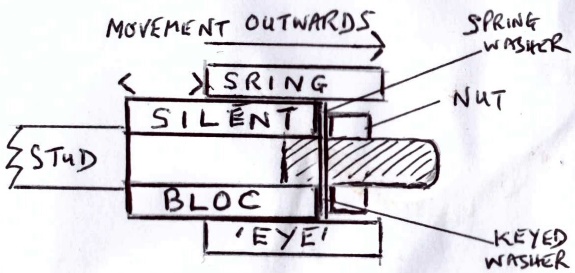
As mentioned by Steve Cameron in his article A Tale of Two TCs in this issue, the front of the rear spring has been known to move sideways with the silentbloc (metallastic) bush fitted. Location relies on the friction between the outer diameter of the bush and the inside diameter of the spring ‘eye’.
The ravages of time may in fact act as a deterrent to this condition due to rust build up! However, it is well worth checking to ensure that the spring eye on each side of the car has not slid along the silentbloc bush.
Derry Dickson (to whom I spoke recently) discovered this during a routine safety check on his TC a number of years ago. On close inspection he noticed that the front ‘eye’ of the N/S rear spring had travelled 3/4″ outwards, leaving the silentboc bush firmly held in place on the stud by the nut and the thick keyed washer. Because this washer is the same diameter as the internal diameter of the spring’s ‘eye’, the spring could slide outwards on the silentbloc bush and over the washer. Examination of the O/S spring showed a compensatory move of the spring towards the N/S.
Here is a sketch to illustrate the problem:
…and here is a photo which shows the standard set up:

Any sideways movement obviously changes the rear axle alignment, which in turn impacts on the steering geometry.
As suggested in TCs Forever! large washers can be placed either side of the silentbloc bush, but according to the late Tony Smith, this is not a true fix, as it will still allow the spring to move 8 mm either way.
However, Derry used this fix (albeit only one large washer was positioned between the keyed washer and the bush) and as far as I know he has not experienced any movement since.
That said, the use of large washers may still not be the answer for TC owners who like to corner enthusiastically and Tony, who was certainly one of these, especially when competing in hill climbs, decided to design a set up using a large polyurethane bush to replace the silentbloc bush.
A photo of the modified set up follows:

The kit comprises of:
2 Polyurethane bushes – 90 Shore ‘A’ hardness
(Here’s one pictured below – the other is in Australia!)

4 large spring eye locating washers – A2 stainless steel
2 large 1⁄2 inch flat washers – A2 stainless steel
2 regular 1⁄2 inch flat washers – A2 stainless steel 2 regular 1⁄2 inch spring washers – BZP
2 full 1⁄2 inch BSF nuts – BZP
1 sachet of installation lubricant
An information sheet containing the following:
Fitting instructions
1. Remove the original metallastic bushes from the rear spring front eyes
2. Clean inside of the spring eye and the chassis mounting
3. Press the polyurethane bushes into the spring eyes using a vice and a piece of flat material to avoid damage to the bush. Make sure the bush is central in the ‘eye’, it should protrude slightly each side to provide ‘pinch’ in the final assembly. Tapping with a rubber/hide mallet will help centralise the bush. Do not use the lubricant at this stage.
4. Place one spring eye locating washer on the chassis mounting so that the slightly convex face is facing the bush.
5. Fit the spring/bush assembly to the chassis mounting, this is a tight fit and the lubricant or soapy water and a rubber/hide mallet will help locate the spring/bush against the spring eye retaining washer.
6. Locate the outer spring eye locating washer, convex side to the bush, on the chassis mount.
7. Locate a large 1⁄2 inch flat washer over the threaded portion of the chassis mount and a 1⁄2 inch spring washer.
8. Fit the 1⁄2 inch BSF nut and tighten to 40 ft lbs. It may be necessary to support the outer spring eye locating washer central to the mount as the nut is tightened to ensure correct alignment.
9. Once the car is standing on its tyres again, back off the 1⁄2 inch BSF nut one turn, then re-tighten the nut back to 40 ft lbs. Check all fasteners for security after approximately 100 miles.
Originally, the 1⁄2 inch BSF nut was locked using a tab washer or split pin, Examples of both have been seen, but the spring washer described has always proven secure on the cars which were owned by Tony.
If you have a TA or TB then you should have checked the rear trunnions or with a TC the rear shackles to make sure they are serviceable. It is no use having a superior front of spring mount with poor rear of spring mount.
Benefits of Polyurethane
• Oil Resistant
• Tough
• Durable
• Non-Perishing
• Self-Lubricating
• Resilient 90 Shore ‘A’ hardness
Disadvantages of Polyurethane
• Cost, as a raw material it is about 4 times the price of rubber
• Bushes must not come into contact with alcohol-based solvents such as MEK, methanol, or methylated spirit.
Ed’s note:
If there were to be sufficient demand I could probably get some of these kits made up on a non- profit making basis. The expensive item is the polyurethane which comes in 30 cm lengths and has to be machined. Cost of the kits would probably be around 40 GBP.
By the way, if anybody wants to retain the original set up but is short of the thick keyed washers, I had some made a while ago and if I can find them they are yours for a nominal 2 GBP each.
JOHN JAMES
John very interesting article.If you can find the original thick keyed washers I would like to purchase a set as mine need replacement.
I will visit the MG Stoneleigh event and if ok will purchase and collect.
Best regards,
John
John,
Yes, I have found them. I have five (5) sets and will reserve a set for you. They are £2 each (£4 the set). When they are gone, they are gone!
Kind Regards,
JOHN
I fitted a similar, if somewhat more agricultural, interpretation in the 1990s when movement was apparent after trialling and autotesting . I only fitted on the outside of each spring on the grounds that there would be enough structural rigidity afford by the axle fixing and it was easier !
I cut my own out of a large bar ‘off cut’ purlioned from a local stele stock holder’s skip–very hard work with only a vice, a hack saw and a Black and Decker to hand.
They are both still in place today having done many years of yeoman service and suffering much ill treatment.