I am now in my sixth calendar year of production of TTT 2 and I really do wonder where the time has gone!
Much water has ‘flowed under the bridge’ since my foray into magazine production with the Octagon Car Club ‘Bulletin’ in 1998 (until 2001) then ‘Totally T-Type’ (TTT) from 2004 to 2010 and ‘Totally T- Type 2’ (TTT 2) from 2010 and continuing.
I seem to remember saying in one of the editorials (probably in TTT) that I would re-assess the situation when I reached 65, but at 68 ‘not out’ and hopefully getting to 69 by this coming October, I don’t even want to give it a second thought. So, enough of this navel-gazing and let’s get on with the job!
2014 has been another successful year for TTT 2 and www.ttypes.org The highlight of my year was the TTT 2 Tour of the Isle of Wight. To see so many T-Types in beautiful surroundings and to experience the camaraderie of the crews made it all worthwhile. An added bonus is that we have somehow managed to accrue a healthy balance to put towards this year’s Tour of the Lancashire Lanes and Yorkshire Dales. More on this Tour and the 2016 Tour in the next issue.
Donations in 2014 came in at £1209.35 for which I thank you. The printed copies of TTT 2 almost broke even; this was achieved by changing the printing company (for which I thank Brian Rainbow) and lower mailing costs due to using a mailing house. On the expense side we incurred £568.22 as a result of purchasing 100,000 email credits (approximately five year’s worth) to be used for sending out TTT 2 notifications. It was also necessary to purchase a printer/scanner as the old one ‘gave up the ghost’. We are currently reviewing our web hosting arrangements with the objective of speeding up the site. This is likely to be the only major expense item in 2015.
What’s shaping up to be the major 2015 T-Series and MMM event in the US is featured on our front cover. GOF Central 2015 is being held in Carmel Indiana (an Indianapolis suburb) July 15-19th. The event kicks off with a trip to the Indianapolis Motor Speedway, where our MGs will take to the track – the famous Brickyard of racing. Tours, a rally, workshops, movie nights, and other activities are on the agenda. Mike Sherrell, noted TC specialist and author of TCs Forever! is the special guest of this GOF, and will be giving a presentation, doling out advice, and enjoying the company of all. There will be two car shows – a First Timers for newcomers, and Wheels & Wings, the big car show. Wheels & Wings will be at a nearby airfield, combining MGs with a vintage airplane fly-in. Thirty to eighty vintage planes are expected to be on the field, including biplanes, warbirds, and early post-war small planes.
Registration is filling up rapidly – already there are more cars registered for GOF Central than the past several years. The committee’s push to bring new enthusiasts is paying off, as 20% of registrants are new to our events.
Be sure to watch the promotional video of the event on the GOF Central website http://www.hoosiermgs.com/promo.html – turn the sound up loud!
More information and registration details at http://www.hoosiermgs.com/gof.html or GOFCentral.com. Interested in attending and need some help with agendas or logistics? Contact Tom Wilson on the GOF Committee at GOF2015Central(at)gmail.com
Stoneleigh MG Spares Day
This year’s show (again a joint MG/Triumph show) is being held on Sunday 1st March. Details are on the website http://www.mgandtriumphsparesday.co.uk
Once again your editor will be sharing a stall with Brian Rainbow in the usual location in Hall 1, just over the way from Barry Walker’s stand. Brian always carries an amazing selection of spares, particularly those for the MPJG. I look forward to meeting friends, old and new!
“Never throw anything away!”
A seasonal photo (well, it was when I received it!) from Martin Franklin which proves the old MG adage “ Never throw anything away” – even rusty old 4 1/2” x 19’ TC wheels have their uses!
And finally, there are a number of events in 2015 which I have been asked to publicise. As there is insufficient space in this column you will find them on the ‘Bits and Pieces’ page.
JOHN JAMES
DISCLAIMER BY THE EDITOR
Totally T-Type 2 is produced totally on a voluntary basis and is available on the website www.ttypes.org on a totally FREE basis. Its primary purpose is to help T-Type owners through articles of a technical nature and point them in the direction of recommended service and spares suppliers.
Articles are published in good faith but I cannot accept responsibility or legal liability and in respect of contents, liability is expressly disclaimed.
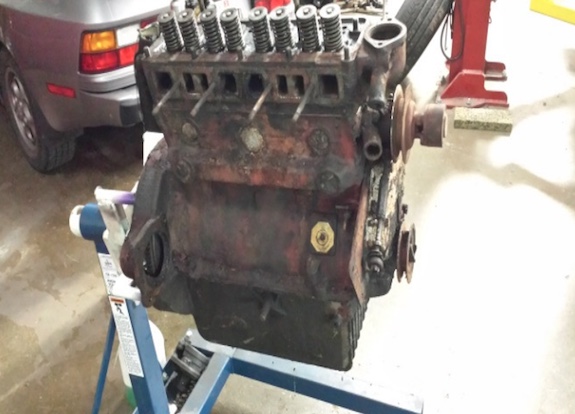
This is a story about the discovery of TC0894 and TC4429, and their subsequent repatriation to England in the mid 90s for future restoration that is now underway.
The account begins with a chance to work in Johannesburg, South Africa in early 1994. I was very aware that classic vehicles found in SA would probably be in very good condition due to the climate, and possibly at an affordable price with around six South African Rand to one English Pound at the time.
The contract I had accepted lasted until late 1995 but it was during the first year there, that I saw an advert in a local Johannesburg newspaper’s motoring advertisement’s column reading something like, ‘MG TC restoration project’. I had always wanted to own a ‘T’ series MG, especially a TC and eagerly rang the number given, to find I was lucky enough to be the first person wishing to view the car.
The viewing entailed a short drive north from Johannesburg to the capital city of Pretoria. On arrival I was shown what was indeed a restoration project!! TC0894 was complete, to a degree. The interior, wiring loom and instruments were all missing. All the wings had been removed, and lay amongst a pile of bits under a small covered area. The XPAG engine was present, and confirmed at a later date by the late Harry Crutchley, to be the matching one for the chassis number. This was fitted with the alloy rocker cover, with hinged Octagonal MG oil filler cap.
All of the steel bodywork was original and in a solid condition as expected, although the ash frame was not in such fine condition, nor properly attached to the chassis in many places. Some small sections of the front wing mounting flanges were corroded but the wings were generally in great shape compared to some I have seen for sale in my numerous, later visits, to shows/autojumbles.
The chassis appeared to be in good condition with only one area of repair required, a crack being present on the lower flange above the front beam axle on both chassis rails.
A set of part finished body timbers also lay within the pile of bits but these had been produced from an African hardwood which is not the best choice for the body frame of a square rigger.
Whilst standing, pondering the possibility and implications of purchasing this rolling basket case project, the seller was keen to explain that the ironwork behind me was also included in the sale. Resting on bricks was the chassis from TC4429 in equally good condition, complete with front and rear axles.
A deal was struck, and pick up date arranged. On the 19th October 1994 a few English work colleagues, my Afrikaans landlord and his brother arrived with his brother’s trailer attached to the rear of his Bakkie (pick up) to collect the MGs. They were duly stored in one of my landlord’s garages until August of 1995 when shipping back to ‘Blighty’ was finally arranged.
19th October, 1994 – collection day in Pretoria
The shipping experience is an amusing little tale.
I live in Worcestershire but have many friends in Essex who had agreed to help me pick up the shipment if it arrived at Tilbury docks in London. So shipping to Tilbury was arranged for the MG, and a vintage motorbike and spares a friend had purchased. However, when we arrived one morning in Johannesburg to pay the shipping agent, we discovered that the container was to be offloaded at Felixstowe!!
The Afrikaans agent did not understand our problem with that, even when we explained the distance between Felixstowe, and our original intended port of Tilbury. Such a distance is nothing to an Afrikaner. They are happy to drive non stop from Johannesburg to Cape Town and back for quick weekend trips, which is the equivalent of us doing something like Lands End to John ‘O Groats, twice!!
The shipping date had been arranged to coincide with my summer trip home, and although the ship was due to call at Tilbury afterwards, I would have already returned to work in Johannesburg by then, so Felixstowe was left as the arrival port.
All the best plans go wrong, and a Dock’s strike at Durban, ensured that I had returned to South Africa before the shipment arrived at Felixstowe!! A final sting was to find, despite assurances from the SA shippers that the cost of UK customs clearance was not included in the price we had paid. Also, the late arrival meant payment for storage costs was incurred, whilst I arranged from distant SA, collection by my friends, who kindly obliged in my absence, and delivered the MG emporium to Worcestershire for me.
On my final return to England it became very apparent that my garage was not particularly adequate, size wise, for the intended restoration. I therefore added some extra space with a rear extension for a small carpentry workshop and brought the front forward, taking the opportunity to incorporate a Steel Beam above new garage doors, to enable easy removal of engine/gearbox.
During most of the past 20 years many other matters have taken priority but I have been
searching for, and finding missing components, at numerous shows/autojumbles. I have also read/purchased almost every book available on the subject of ‘T’ Type restoration.
TC0894, hiding under a dust cover, had therefore been quietly awaiting some ‘TLC’ but a start in late 2008, on what promises to be an interesting rebuild of one of England’s iconic post war sports cars was spurred on by the enthralling presentation given by Mike Sherrell of TCs Forever! fame at the MG Car Club ‘T’ Register ‘Rebuild’ that same year.
This initially entailed a total strip down to the bare chassis in preparation for blasting, repair and repaint. However, prior to dismantling I treated the whole chassis, engine and running gear etc to a brushed on coating of Swarfega cleaning solution followed by blasting with a pressure washer. This is highly recommended as it leaves everything in a reasonably clean state for the strip down.
Stripped down to bare chassis
Technology has moved on since purchasing my two TCs, and I have been able to easily record how every component fits/comes apart with the aid of a digital camera during this initial phase of the restoration. On my PC, I have a photographic reference library, which will be invaluable when reassembly takes place.
The hardest part of this restoration will probably be finding the 3000 hours Mike estimated to complete a first time total rebuild because I also have another very time consuming pursuit; the martial art of Shotokan karate, which has been a very major part of my life for 33 years taking up a large proportion of my spare time. I might be the first person holding a 3rd degree black belt in karate and running a karate club to restore a TC?
The rebuild project is progressing as time permits and the first step after strip down was a trip in 2009 to Yorkshire Chassis (YC) with the chassis strapped to roof bars of my Ford Escort estate.
Ed’s note: (was Yorkshire Chassis, but is now Metalcraft and is based at Idle, Bradford)
The chassis needs to be straight and true for several reasons. Firstly, during the build it is the jig for the body tub build/assembly as there is no hope of getting the body tub etc correct if the chassis is twisted. Secondly, once complete, a good chassis will be key to the car’s correct handling/steering on the road.
Russ Truman at YC tells of many restorers he’s met who skip this vital step and wonder why their cars are so awful to drive once complete, yet they were happy spending thousands of pounds on a beautiful paint job. The old fable of the house built on sand springs to mind here.
Russ checked out the damage to the chassis and declared that he would have to cut off the original dumb irons and fabricate/weld in new pieces incorporating dovetail joints for strength at the junction of old and new.
Bird’s mouth finishers to the chassis boxing, as shown in Sherrell’s TC’s Forever! were also added. This insignificant looking modification is vital, allowing loads in the boxed chassis rails to be transferred to the unboxed rear rails via a gradual change in sectional properties, rather than the abrupt sectional change that previously existed, leading to many early numbered chassis failures in the past.
Further investigation revealed a twisted chassis (not uncommon) that would require a complete derivet of all cross members to enable correct straightening of the side rails as it was beyond the usual method of jacks, chains and blocks etc.
After re-assembly the chassis was to be treated to a blasting followed by etch primer and black paint. I chose black paint for ease of touch up should that ever be required in the future and originality, as powder coating was not around in 1946 at the MG Abingdon works, and those chassis I’ve seen with the latter finish look ‘too good’ in my view.
A few weeks later I returned to find a beautiful black chassis that Russ declared was one of the best he’d seen and as good as the day it left the factory in ‘46. The old and new metal were the 6 same thickness throughout and there was just a hint of pitting in some areas of the old iron work caused by light surface rust, a testament to a life spent under African skies.
TC0894’s chassis after straightening, repair and painting
The chassis of TC4429 hanging from angle
brackets bolted to the garage wall, will probably
receive similar treatment at some suitable stage to
preserve it for another future project?
On arrival home I quickly fabricated a pair of sturdy timber trestles to rest the chassis on. These have subsequently been modified by the addition of retractable caster wheels on both sides so that the chassis can be moved around as and when required to aid restoration access or free up space in the garage.
I completed the bare chassis work by pressure spraying black waxoil into the boxed areas of the chassis rails for future rust protection. Since then I have had the shock absorbers restored by Stevson Motors of Selly Oak, Birmingham. The suspension with new springs at all four corners and front axle are now refitted with poly bushes throughout including the rear spring front eyes courtesy of a kit that Tony Smith produced to cure the tendency for the springs to move when fitted with the original style Silentblocs. The other bushes were sourced from John James (spring shackle pin bushes) and Moss (large lower bushes in rear spring cast shackles).
Ed’s note: the large lower poly bushes are now stocked by me at 4 GBP each.
The late Tony Smith used to sell the kits referred to above. Before he died, Tony sent me a file with his drawings. I’ve included an article in this issue about the rear spring front eye polyurethane bush modification. Back to Steve…
The rear axle bearing journals were worn, as you would expect, and after much searching I finally found Avanti Engineering close by in Tipton, West Midlands who specialise in metal spraying and were able to restore these.
With the axle casing repainted the differential has been rebuilt with new bearings etc along with a new ratio Roger Furneaux Crown Wheel and Pinion to help 0894 in modern day traffic when finally roadworthy and the rear axle plus differential are now assembled to rear springs to complete another stage of the chassis work. This whole rear axle rebuild featured in another of my previous articles ‘The TC Rear Axle’ published in TTT 2 Issue 24.
Rebuilt rear axle with 37:8 (4.625) ratio diff obtained from Roger Furneaux.
Everyone has their own way of carrying out a restoration and I’ll now relate a few bits of modern technology I’ve applied to good effect so far.
Threadlocking
The nuts on most fastened assemblies on the TC and of course many early vehicles, were originally held fast with the use of spring or star washers. This is old engineering technology and both types of retention can easily spoil that lovely restored and painted component on assembly by tearing the paint surface. The use of nyloc nuts with plain washers could overcome this but in my mind such fasteners look incorrect on a 40s car and in some instances on the TC there is only enough thread available for plain nuts to be used on assembly. For my build I’ve therefore chosen to use plain washers and standard plain hex nuts to avoid this damage and the vastly superior method of
retention that liquid threadlock can provide.
As a Design Engineer by profession I have a copy of the Loctite Design Handbook and within this useful tome they clearly describe the benefits of threadlock products:
Firstly, they completely fill the microscopic gaps between the interfacing threads and when cured form a tough solid thermoplastic which has keyed to the fastener’s surface roughness to prevent any movement of the threads.
Secondly, with the whole length of the threaded interface wetted on assembly the cured solid provides a total barrier to moisture ingress, thereby eliminating the age old problem of nuts and bolts seizing together over time with corrosion.
Corrosion Removal
For cleaning up rusted metalwork (i.e. spring hangers and brackets etc) I’ve been using a product called Deox C. This comes as white granules that are mixed with water to produce a non-acidic 20% solution, which is totally clear. You then suspend items in the solution (which works best at around 60°C) and watch the rust fizz off. An old toothbrush is also handy for agitation of the component surface to aid removal by keeping fresh solution in contact with the metal. The solution slowly gets darker until it is exhausted but one 2 litre mix in a suitably sized plastic container can clean many components. For heating I purchased a cheap plastic kettle for £5 (workshop use only) and use this to heat the solution before use and it works a treat. All of the components I’ve cleaned so far only took about 30 minutes to be returned to an as new surface ready for etch primer, primer and top coat. For larger volumes/ containers you can use a fish tank heater or similar. Once exhausted, Deox C can be safely disposed down the drain as it is completely biodegradable.
Using Deox C saves messy sandblasting and the beauty is that being non-acidic it only removes corrosion and not good base material making it very useful for delicate parts such as brake pipe clips etc which on my African TC have all survived the test of time and just need a quick freshen up in the solution before painting or plating.
For the ‘originality police’ notebook, the following points were observed whilst dismantling TC0894, manufactured on 7th June 1946. These appear to be original factory build, although some contradict production data for early TCs found in many books
I’ve read?
Chrome plated items include, Dynamo top mounting bracket and associated bolt, Tappet side cover, Carburettor mounting bolts, Fan blades, Dip Stick, front water outlet from cylinder head, rear plate/cover on cylinder head, Fuel tank straps and, Starter Motor brush cover band. The rear brake drums also show evidence of having been chrome plated at some stage during 0894’s lifetime and, I suspect that this was not factory standard as no evidence can be seen on the front brake drums?
Body colour ~ black Bulkhead colour ~ grey. Engine colour ~ red. Steering column and drop arm ~ light blue. Dashboard – Rexine covered, colour ~ Red. (Sherrel states Rexine replaced wood around TC5113 – TC5742?) Dashboard centre panel colour ~ grey. Interior trim colour ~ Regency red (some remnants survive on the door pillars).
I found no record of the body number during the strip down and according to Sherrell’s excellent reference work TCs Forever!, early TCs never had a body number plate fitted. Sherrell states that the body number was however also stamped onto the LH wooden chassis rail but if it was ever there the ravage of time has erased any such marking.
Time and the restoration have moved on since starting this article and the following paragraphs will bring progress up to September 2014.
Having reunited the completed rear axle with the chassis my attention turned to restoration of the handbrake assembly.
The handbrake lever had excess play on the cross shaft and was in need of a re-chrome. In addition the internal operating shaft and top knob and spring were missing and new replacement parts were obtained from Abingdon Spares in the USA.
To remove the lever the offside handbrake cable operating lever needs to be removed from the cross shaft. To enable removal, two taper pins need to be extracted. This seemingly tricky operation was easily achieved. I put a round steel bar in my vice that had a diameter that allowed it to fit in between the two tails of the pins that protrude into the bore of the cross shaft. Then by sliding the cross shaft over the bar and using the cross shaft as a lever and moving it sideways allowed one taper pin to be pushed out. Having removed one pin the other could be drifted out using a punch inserted through the now vacant opposing hole.
Careful use of a hacksaw and file on the weld between the handbrake cable lever and shaft enabled weld and lever removal.
The collar by the handbrake lever is held in place with a slotted headed grub screw. With the aid of a few heat cycles from a small blowlamp and an old screwdriver ground to precisely fit into the worn / corroded slot of the screw this was carefully extracted and the collar removed allowing the handbrake lever to be finally removed.
The old bush in the lever was badly worn but the mating cross shaft outer diameter was in surprisingly good condition without wear. The two end outer diameters that assemble into the chassis spherical bearing assemblies were also in great condition.
I acquired an ‘Oilite’ bush of correct length and outer diameter for the handbrake lever and had the bush bore machined to give a close fit onto the
cross shaft.
The lever was taken with other parts for rechroming and the result was stunning and totally unrecognisable from the original ‘as found’ state.
Restored handbrake lever and cross shaft.
Prior to fitting the new bush I drilled a hole in the bush wall that would line up with the hollow end of the lever so that lubrication of the ‘Oilite’ bush can be achieved during future maintenance by adding oil from the top of the lever after removing the screw on knob.
Prior to reassembly, the various parts of the assembly were de-rusted (Deox C), repainted with etch primer, primer and black top coat. Some painting had to be left until the offside handbrake cable lever was welded back in place after refitting the two taper pins. The taper pins on my assembly had to be matched to the correct bores to enable correct flush fitment. The grub screw for the collar next to the lever was remanufactured from a suitable BSF bolt cut down and slotted to suit a screwdriver.
I have read articles on this assembly where the author questions the reasoning behind using a fixing screw at this location and not welds as per the handbrake cable levers and the other collar on the opposite side of the handbrake lever?
As a design Engineer by profession I’ll offer my reasoning. The collar secured by the grub screw is threaded along with the mating hole in the cross shaft. On reassembly, the collar can therefore fit onto the shaft in one of two orientations. However and significantly, only one particular orientation of the collar will allow a grub screw to assembly/engage with the thread in the collar and the cross shaft. This means that at Abingdon all those years ago the collar and cross shaft must have been tapped ‘as one’ and probably drilled ‘as one’ on final assembly once correctly positioned, to achieve the required fit of handbrake lever between the two collars, thus making the cross shaft and collar a matched pair. This would have been a preferable and reliable assembly method to achieve correct fits when compared to the alternative of welding both collars.
The chassis spherical bearing assemblies were taken apart and new bearings and rivets obtained from Digby Elliot. The mating outer diameter at each end of the cross shaft was measured and the new bearings were supplied machined to suit, resulting in a very close fit between shaft and bearing. After de-rusting (Deox C) and repainting the bearing assemblies were riveted back together with the aid of a rivet snap, custom made punch and an old Arbor Press I have acquired. The restored handbrake assembly was then bolted back onto the chassis.
When complete I expect my TC will be a vehicle that is only used on a limited mileage basis. Most vehicle mechanical assemblies are designed to move regularly to keep everything in working order and long periods of inactivity can cause deterioration of components. The brake assemblies are one area of a vehicle that can become victims of such inactivity and most notably wheel cylinders and master cylinders due to ingress of water into the brake fluid. With that thought in mind I decided that the purchase and fitment of bronze wheel cylinders and master cylinder was an expense worth bearing for long term reliable function of my TC’s brakes.
The rear brakes were then re-assembled and handbrake cables installed. However, the simple task of refitting handbrake cables was complicated by the new bird’s mouth finishers that had been added to the chassis during its renovation. These needed a little fettling to enable the handbrake cable levers to move through their full angular travel without fouling the chassis. The earlier choice of a painted chassis against powder coating enabled easy restoration of the chassis finish once the fettling was complete.
Having overcome that issue everything was fitted and correctly adjusted.
The brake and clutch levers have been repainted, re-bushed and reamed to suit a new oversized pivot shaft that was manufactured to match the chassis pivot shaft bracket bores that required reaming to remove wear and ovality. Having read the excellent article in TTT2 on this very subject I added drillings and a grease nipple to enable lubrication of the assembly from the outer chassis end of the shaft.
However, unlike the author of the previous article I used black Nylon 66 washers in the assembly in preference to phosphor bronze. My reasoning for this is that the only side loads these washers see are from the two spiral springs that form part of the lever shaft assembly and Nylon 66 is more than adequate for the task.
More significantly, the addition of bronze into the assembly introduces a path for electrolytic corrosion that did not previously exist as the steel shaft, pedals and chassis now have the greater negative potential (-.75V) when compared to the bronze (-.20V) promoting accelerated corrosion of these items which are fully exposed to atmosphere and hence moisture.
The phenomenon of electrolytic corrosion is detailed in another of my previous articles ‘A Negative View’ published in TTT2 Issue 24.
To stop the shaft rotating within the pivot shaft bracket I also used a different method from the previous author’s interference fit.
The diameter of the hole through the chassis is larger than the hole in the pivot shaft bracket. This design feature ensures that on assembly at Abingdon the pivot shaft would never foul the chassis and conveniently allows a small slot to be filed into the bracket at the chassis interface to facilitate fitment of a mating anti-rotation pin in the pivot shaft. By only slotting the bracket no stress raisers are introduced into the chassis (i.e. by a sharp cornered slot). Using a round needle file I made sure the slot in the bracket finished in a rounded end to eliminate sharp corners that could promote cracking.
The anti-rotation pin was fabricated from a broken HSS drill bit.
The pivot shaft has been produced with a larger diameter head at one end to enable fitment of the grease nipple and eliminate one split pin that was a feature of the original design. Adjacent to this larger end diameter a suitable mounting hole was drilled in the pivot shaft ensuring it did not break through into the central grease bore. The anti- rotation pin was assembled into the pivot shaft using Loctite for retention and on final assembly provides a very positive anti-rotation feature.
A modern rubber cover was introduced onto the brake rod connecting brake lever to master cylinder to protect the articulation joint from road dirt and moisture.
This simple modification is detailed in another previous article ‘TC Brake Rod’ published in TTT2 Issue 26.
New cunifer brake pipes have been made and fitted, complete with stainless steel wire coil protective sleeves. The wire protective sleeve was sourced from a company in Redditch, Worcestershire, UK that specialise in manufacture of wire coil. I choose an open wound coil which differs from the original closed coil used by MG but this does facilitate easy flaring of the second end of the brake pipe by allowing the coil to be
compressed and clamped, enabling fitment into the flaring tool. Once the second flare is produced, the clamp is removed, allowing the coil protector to expand/fit between both brake fittings.
The next task on my list is stub axles. I have had the stub axles machined to remove badly worn and cracked axles and have a pair of new axles (sourced via John James) to press in which was the main reason for sourcing and acquiring the old ‘Made in England’ Arbor Press mentioned earlier. The bores produced in the machined stubs have been carefully honed so that the resultant fit between bore and axle will be at the upper end of an H7/s6 interference fit (-.0006 / -.0019in) i.e. maximum -.0019in interference on assembly.
Once that job has been completed the front brakes and steering can be re-assembled after more painting which will hopefully result in a rolling chassis before the close of 2014.
I’ve included a few photographs to accompany this article, which should be the first of many as restoration progresses.
Steve Cameron ~ TC0895
Useful contacts:
Chromium plating ~ Marque Restore ~ 024 7662 2225 Chassis work ~ Metalcraft (ex Yorkshire Chassis) – 01274 612492 Coil Spring Protectors ~ Bywell Springs and Pressings ~ 01527 66551 Handbrake cross shaft spares ~ Digby Elliot ~ ‘Beam Ends’ (by Newton Cross Roads) Whiteparish, SALISBURY SP5 2QL 07836 754034 Metal spraying / machining ~ Avanti Engineering ~ 0121 557 1153 Rust removal ~ Deox C ~ produced by Bilt-Hamber ~ www.bilthamber.com Shock Absorber restoration ~ Stevson Motors ~ 0121 472 1702
Ed’s Note: Also recommended for shock absorber restoration is Raj Patel of Recon and Return. Services include lever arm and link arm re- bushing. Re-bushing is notoriously difficult (actually, well nigh impossible) so why not let an expert do it for you? Raj is at 39a Avenue Road Extension, LEICESTER LE2 3EP. Telephone 0116 244 8103. He usually offers a quick turn around and In the words of one of our subscribers “Raj is a good guy”.
Also, for chromium plating, I’ve had work done by S&T in North Bristol with excellent results. Pricey, but that’s what you have to pay for the best. I’ve just taken some J2 door hinges and a headlight rim there and nearly fainted when they gave me the estimate! www.stchrome.co.uk
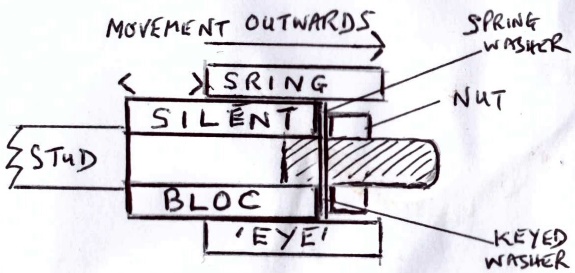
As mentioned by Steve Cameron in his article A Tale of Two TCs in this issue, the front of the rear spring has been known to move sideways with the silentbloc (metallastic) bush fitted. Location relies on the friction between the outer diameter of the bush and the inside diameter of the spring ‘eye’.
The ravages of time may in fact act as a deterrent to this condition due to rust build up! However, it is well worth checking to ensure that the spring eye on each side of the car has not slid along the silentbloc bush.
Derry Dickson (to whom I spoke recently) discovered this during a routine safety check on his TC a number of years ago. On close inspection he noticed that the front ‘eye’ of the N/S rear spring had travelled 3/4″ outwards, leaving the silentboc bush firmly held in place on the stud by the nut and the thick keyed washer. Because this washer is the same diameter as the internal diameter of the spring’s ‘eye’, the spring could slide outwards on the silentbloc bush and over the washer. Examination of the O/S spring showed a compensatory move of the spring towards the N/S.
Here is a sketch to illustrate the problem:
…and here is a photo which shows the standard set up:
Any sideways movement obviously changes the rear axle alignment, which in turn impacts on the steering geometry.
As suggested in TCs Forever! large washers can be placed either side of the silentbloc bush, but according to the late Tony Smith, this is not a true fix, as it will still allow the spring to move 8 mm either way.
However, Derry used this fix (albeit only one large washer was positioned between the keyed washer and the bush) and as far as I know he has not experienced any movement since.
That said, the use of large washers may still not be the answer for TC owners who like to corner enthusiastically and Tony, who was certainly one of these, especially when competing in hill climbs, decided to design a set up using a large polyurethane bush to replace the silentbloc bush.
A photo of the modified set up follows:
The kit comprises of:
2 Polyurethane bushes – 90 Shore ‘A’ hardness
(Here’s one pictured below – the other is in Australia!)
4 large spring eye locating washers – A2 stainless steel 2 large 1⁄2 inch flat washers – A2 stainless steel 2 regular 1⁄2 inch flat washers – A2 stainless steel 2 regular 1⁄2 inch spring washers – BZP 2 full 1⁄2 inch BSF nuts – BZP 1 sachet of installation lubricant An information sheet containing the following:
Fitting instructions
1. Remove the original metallastic bushes from the rear spring front eyes 2. Clean inside of the spring eye and the chassis mounting 3. Press the polyurethane bushes into the spring eyes using a vice and a piece of flat material to avoid damage to the bush. Make sure the bush is central in the ‘eye’, it should protrude slightly each side to provide ‘pinch’ in the final assembly. Tapping with a rubber/hide mallet will help centralise the bush. Do not use the lubricant at this stage. 4. Place one spring eye locating washer on the chassis mounting so that the slightly convex face is facing the bush. 5. Fit the spring/bush assembly to the chassis mounting, this is a tight fit and the lubricant or soapy water and a rubber/hide mallet will help locate the spring/bush against the spring eye retaining washer. 6. Locate the outer spring eye locating washer, convex side to the bush, on the chassis mount. 7. Locate a large 1⁄2 inch flat washer over the threaded portion of the chassis mount and a 1⁄2 inch spring washer. 8. Fit the 1⁄2 inch BSF nut and tighten to 40 ft lbs. It may be necessary to support the outer spring eye locating washer central to the mount as the nut is tightened to ensure correct alignment. 9. Once the car is standing on its tyres again, back off the 1⁄2 inch BSF nut one turn, then re-tighten the nut back to 40 ft lbs. Check all fasteners for security after approximately 100 miles. Originally, the 1⁄2 inch BSF nut was locked using a tab washer or split pin, Examples of both have been seen, but the spring washer described has always proven secure on the cars which were owned by Tony. If you have a TA or TB then you should have checked the rear trunnions or with a TC the rear shackles to make sure they are serviceable. It is no use having a superior front of spring mount with poor rear of spring mount.
• Cost, as a raw material it is about 4 times the price of rubber • Bushes must not come into contact with alcohol-based solvents such as MEK, methanol, or methylated spirit.
Ed’s note:
If there were to be sufficient demand I could probably get some of these kits made up on a non- profit making basis. The expensive item is the polyurethane which comes in 30 cm lengths and has to be machined. Cost of the kits would probably be around 40 GBP.
By the way, if anybody wants to retain the original set up but is short of the thick keyed washers, I had some made a while ago and if I can find them they are yours for a nominal 2 GBP each.
Barb grew up in Lincoln, Nebraska and, when she turned 21 in 1961, struck out for California in her 1960 Pontiac Ventura. She landed a job working for General Dynamics in Pomona, California. In 1963, she sold her Ventura and bought a new Pontiac Tempest convertible. In 1964, despite it being almost brand new, she sold the Tempest and bought a used 1955 MG TF1500 which she had fallen in love with. (English sports cars were very popular at the time).
In the fall of 1965 she decided to return to Lincoln and found a job with Notifier which was a manufacturer of commercial fire alarm systems. She came back to Lincoln driving her MG with her most valued possessions – her sewing machine and her Great Dane.
Herb was just starting his final semester in Electrical Engineering at the University of Nebraska and was working part-time at Notifier as a junior engineer. He had been driving a 1957 Triumph TR3 which he had bought in 1959. In the fall of 1965 he bought a new 1965 Austin Healey 3000 as an early graduation present.
As luck would have it, Barb started in the engineering department where Herb was also working. When Herb first met Barb, he thought she was pretty cute but when he found out she also drove that red MG that had shown up in the parking lot – that sealed the deal – he had to get a date with her to get to know her better.
To make a long story short, they not only started dating, but got married in July of 1966. They honeymooned in the Colorado Rockies in the Austin Healey leaving the MG in Lincoln.
They continued to live in Lincoln using the Healey and MG as daily drivers. In 1969, they decided to sell the Healey and buy a new Oldsmobile Cutlass Supreme while still keeping the MG.
In 1974, they realised that the MG was getting a little long in the tooth to use for a daily driver so they ordered a new Datsun 260Z. Less than a year before that, they had had the MG completely re-upholstered inside and out with the intention of having the engine rebuilt and the car repainted. They were planning on keeping the MG to have fun with so when they took delivery on the 260Z, they used some space in an extra garage her folks had to keep the MG out of the weather – fully intending to drive it now and then. Barb vowed: ”I want to still be driving that car when I am a 74 year old grandma.”
As luck would have it, just prior to taking delivery on the 260Z, they found out Barb was pregnant with their first child. If you have ever seen the MG, you would know that it was not designed to accommodate pregnant women (it barely accommodates normal sized people). The MG remained in the garage.
In that same year, Barb’s parents decided to move to California and Barb and Herb bought their house – an acreage that was just outside of the Lincoln city limits at the time. The MG again remained in the garage.
In 1985, they bought a horse for their oldest daughter who was now 10. Herb built a horse stall and paddock down by the garage where the MG was stored. The MG was pushed farther into the garage to make room for hay and feed storage. After the horses were gone and their two daughters had grown and left home, the MG languished in the garage almost forgotten. For several years thereafter, Herb would promise Barb that for her birthday, or perhaps as a Christmas present he would work on the MG and get it running again. Never happened – the MG still remained in the garage.
The garage, where the MG was being stored, began to show its age – the foundation walls were starting to bow in severely and threatened to collapse (probably the only thing holding it up was all the crap packed inside). The decision was made to clean out the garage and get a quote on getting it repaired rather than tearing it down. This would make better use of the garage and give them a good place to keep the MG after it was restored (Barb had just turned 74 in June and was a grandma twice over – her vow was in jeopardy).
Herb searched the Internet for somebody local that was capable of restoring old vehicles. He came upon Gary Otto’s Otto Performance website and was impressed with what he saw and read. He contacted Gary and, yes, he would be interested in taking the MG restoration on as a project. On July 2, 2014 (one day before Barb and Herb’s 48th wedding anniversary), Gary and his son Shelby, who works for Gary, came to pick up the MG. It had to be winched out of the garage and onto the trailer because one of the rear wheels was frozen. As it came out into the light of day for the first time in forty years, Shelby kept saying “This car is so cool! This is going to be so much fun to work on!” It is mid-November now and the garage has a new foundation and is waiting for a break in the weather to get some cement work done, a retaining wall built and a new garage door installed. The MG is distributed around Gary’s shop and his brother Todd’s paint and body shop. The frame has been sand blasted and painted, the body parts have been stripped for repair and painting, and a ton of parts have been ordered from Moss motors. The rebuilding process is about to begin.
Barb’s vow: “I want to still be driving that car when I am a 74 year old grandma” is about to come true.
Ed’s Note: Herb and Barb Griess kindly sent me this article from Lincoln, Nebraska via Barrie Jones, MGCC T Register Technical Specialist for the TD and TF models. The TF1500 is TF6596, one of the first hundred 1500s. I’ve promised Herb and Barb that TF6596 can have pride of place on the front cover when it has been completed… and now to another TF, but on this side of the ‘pond’!
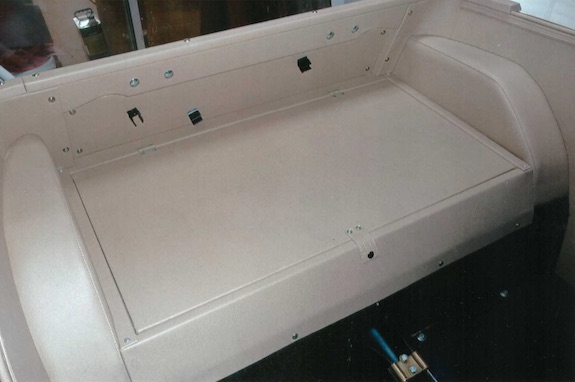
Chris Postle over in East Anglia has been ‘beavering away’ on TF2680 for the past few years. The ‘pic’ above shows it arriving in 2004. The next few ‘pics’ show the standard of restoration that Chris has achieved so far. He is hoping that the car will be completed later this year.
And now, one of the interior behind the seats:
And a couple of the refurbished steering wheel…
Chris told me that his steering wheel was refurbished by Paul Banham 01843 844962 of www.steeringwheelrestoration.com
I contacted Paul and asked him to let me have some further information about the service he offers and he responded with the following:
At Steering Wheel Restoration we not only specialise in repairing steering wheels for a multitude of different vehicles, cars, trucks, buses, tractors, planes, boats from the turn of the previous century to date. We also mould and reproduce exact replicas of original unavailable steering wheels. We work with wood, celluloid, bakelite, steel and aluminium. Our aim is to repair or reproduce your steering wheel in a way that is fitting for the age of the vehicle and your requirements.
We particularly specialise in wheels from the 1910s onwards when most steering wheels were covered in celluloid over steel or aluminium frames. Many of the wheels produced during this time were made by Bluemels for which we have moulds and jigs to reproduce the detail of the original celluloid coverings. Later period steering wheels were made of Bakelite. We can finish the steering wheels in black, colours marbled, clear or even recover in leather.
With regards to MG steering wheels, we have moulds dating from approximately 1930 onwards, as well as later moulds for MG TC, TD, TF, MGA and MGB. With some of the earlier manufactured wheels we can offer brand new replacements rather than repairing the original. MG TD and TF wheels were often finished in a marbled effect and we can replicate this. The MG TC is a particularly weak steering wheel and if necessary we can replace the whole rim, retaining all the original detail. We have also been surprised to see MGB wheels coming into to be restored with the spokes parting company from the inner rim; we re-weld these and can recast a new rim. With MGC wheels we also cover them in leather. We also offer an exchange service on the MG TD & TF steering wheel although restoration normally only takes one week on the majority of these wheels.
Two more photos follow, one of which highlights the loose spokes which these wheels were often manufactured with, leading to the cracking at the intersection of the spoke to the rim. Some steering wheels have been found to have not been welded at all!

TD owner, Laurent Castel from the South of France has been researching the Patent numbers shown on the Patent number plate on his car. Here’s what he has found…
“The shiny patent plate of my TD shows mysterious numbers. We all guess that those numbers refer to some smart processes that make our cars so pleasant.
A few internet queries can provide answers to these mysterious numbers.
One can browse www.directorypatent.com to read the complete specification of the patents including original drawings.
As a cultural interest, this article presents a brief synopsis of these patents. I’m not a legal expert so my reading only focuses on technical aspects.
There are 12 patent references and one registered design on my 53 TD plate. How different is yours? What about other Ts?
Only one (532566) couldn’t be documented from my internet efforts, for unknown reason. The registered design is only available at British National Archive according to their website.
Too far from my home!
N° 495125 Date : November 8, 1938 Authors : Reginald William Ryder The patent describes a staggered pattern of the cooling tubes of the radiator. The tube section is oval and each tube row is somehow overlaying the neighbouring ones.
Furthermore, the horizontal cooling plates that maintain the tubes have bumps between the tube holes. Morris claims that this improves the cooling feature for low speed air flow and even for oblique air flows. The bumps slightly deviate the air flows and probably increase the cooling feature of the plate. All cooling radiators today include louvres on the plates between tube holes for this reason.
However, I doubt of this improvement for oblique air flows!
What is actually oblique air flows in our cars? Cornering or very low speed with lateral strong winds? Anyway, these conditions never last more than a few seconds. Too short for overheating the entire engine.
The text states that the author is aware of a similar US patent dated 1934. The US patent claims a special arrangement of the radiator elements to cope with the whistling effect of radiators at high speed. Therefore, the goal of this similar process is different.
Staggered pattern and oval section tubing is still in use today. My radiator was not original so I have no clue if this patent was implemented in TDs.
N° 437562 Date : October 31, 1935 Authors : George Alfred Priestley What a surprise to discover that the sliding mechanism for adjusting seat position in modern cars still relies on this Morris 70 year old patent! The patent is partly implemented in TDs. Sliding devices are directly from the patent but locking mechanism and seat removal are different.
N° 527468 Date : October 9, 1940 Authors : Alexander Arnold Issigonis
Rubber pad for suspension springs.
The invention claims a better spread of the thrust on the suspension arms. Obviously, there is no rubber pad on either side of the suspension spring of my TD.
N° 502031 Date : March 9, 1939 Authors : Alexander Arnold Issigonis This patent is not a user improvement. It is just an industrial simplification. The purpose is to facilitate the manufacturing of the independent front wheel mounting. Only one steel part with two perpendicular holes for the king pin and the steering lever. It’s interesting how Morris was concerned about factory problems, but these would affect manufacturing times and eventually final production costs.
It seems that cost is today’s main concern and, sadly, sometimes the only one for any industry but, back in the 30s, the performances and the quality were probably the leading aspect for any conception.
This invention is still implemented in TDs.
N° 502029 and 502030 Date : March 9, 1939 Authors : Alexander Arnold Issigonis Here is described the threaded swivels in the front wheel steering design. N°502030 patent also claims to be only a manufacturing improvement. Axial bearings or thrust bearings are no longer necessary. A good article in TTT N° 40 explains, from Issigonis notes, that this gives a lighter steering than conventional non ball bearings and that lubrication is more effective and more protected.
N°502029 describes a solution for applying the preceding one but in the case of the steering axis of the hub shall lie in the same plan that the upper and lower pivotal axes of the suspension arms. Although 502030 is implemented in TDs, 502029 is not.
N° 502028 Date : March 9, 1939 Authors : Hubert Noel Charles The patent describes a combined suspension system for front wheels with laminated springs and a sort of half anti-roll bar. This enables the use of relatively soft springs and even minimises the steering interference when brakes are applied. When braking, the sagging effect of the spring is counteracted by the upper rod which is then compressed. Furthermore, it is also mentioned that linking nearside and offside previous systems acts as an anti-roll bar.
N° 511064 Date : August 14, 1939 Authors : William Robert Boyle Chain tensioner: damping function and/or tensioning.
One means of linking the camshaft and the crankshaft of engines is to use a chain; but the chain wears and needs a chain tensioner. The invention is an automatic chain tensioner.
The invention relies on the hydraulic power which is available in engines based on the pressurized lubrication circuit. This is really a good idea since the oil circuit is running very close to the chain for camshaft or crankshaft bearings. The invention also describes an additional spring inside the piston for static pressure. A combination of a piston special design and the spring action can act as a tensioner and a damper.
This invention is implemented in the XPAG engine of our TDs.
N° : 539083 Date : August 27, 1941 Authors : Alexander Arnold Issigonis This invention allows the oil and air to flow from one end to the other in a rack and panel steering mechanism. The cross section of the moving rack must be different from the housing where it is sliding in. Morris describes an example in which the housing cross section is round and the sliding rack cross section is square shaped. The angles of this square shape are rounded to fit the inner section of the housing. Therefore there are 4 passages for air and oil from one end to the other. This patent is implemented in TD steering mechanism.
All these patents are pre-war. This is strange that 12 years after, no additional patent is displayed on the plate. Did Morris declare some more and did not change the plate? Alternatively, we could realize by this lack of patent how the T series needed a global renewal. However, as an obsolete car, compared to popular French cars in 1953, the TD was still advanced technology (rack and pinion, twin leading shoe front brakes, 12 V battery, spring front shock absorber, adjustable steering wheel?). Obsolete in 53, still a pleasure today!”
Ed’s note: Laurent asked me to check his (very good) English. I have made one or two alterations and in doing so I hope that I have not spoilt the text.
The following has been received from Declan Burns:
“The idea is a “Keep your pedal box clean kit”.
This is a gaiter with a mount which fits my uprated clutch rods and also the standard TD/TF clutch linkage. The mount has a lip which centres on the hole in the pedal box. It comes with an NBR rubber seal and is screwed with two self-tapping screws to the front of the pedal box. I could also provide the seal (in emergency cases – even the cover) for the side of the pedal box in rubber or cork and, of course, the rubber bung to cover the bottom hole. The photo shows this as fitted to my TD 21284.”
Email: declan ‘underscore’ burns ‘at’ web ‘dot’ de.
declan_burns(at)web.de {substitute @ for (at)}
Above: Mount. Below: Gaiter and mount.
Above: Gaiter and mount fitted to Declan’s TD. Below: Seal and cover.
New corrector gearbox
Another item from Declan:
“Here’s a photo of the nearly finished prototype of my latest corrector gearbox. It is designed specifically around the Ford Type 9 five speed gearbox which we all know is becoming increasingly popular and not just for our beloved MG T models.
The idea was to make it modular so it consists of four stages as I have indicated on the photo. It attaches to the Sierra gearbox using the standard Ford circlip and comes out at 110°. This reduces the bending radius of the cable as the speedo cable then runs almost parallel to the chassis. I can also adapt the angle at which the corrector stage sits.
The output matches the cable supplied with the Sierra gearbox conversion kits. The corrector stage can be adapted (with limitations) to suit the individual needs.”
Photo of Declan’s nearly finished prototype of his latest corrector gearbox.
TF Clock
TTT 2 Issue 27 listed three possible causes as to why a TF owner’s clock runs for a short while and then stops. These were given by Barrie Jones, MGCC T Register Technical Specialist for the TD and TF models to the owner. Barrie’s diagnosis, (wear in the bearings and dirt clogging the mechanism) given the information that re- orienteering the clock ‘helped’ the clock to function again for a while, proved ‘spot on’ as the owner took the clock in for repair and the jewel was replaced. It has been working fine ever since.
The following is a useful bit of advice to the owner from Barrie:
“Whenever you take your TF off the road for an extended period, it is a good idea to disconnect the battery, otherwise the clock will keep going, your lovely new bearing will start to wear and the tiny electrical contact will erode some more.”
Reproduction Vehicle Excise Tax Discs
Following the mention of this item in the previous issue two further suppliers (both of whom are considerably less expensive than Earlswood) were notified to the Editor as follows:
Roger Cork mentioned Creative Tax Discs (Mr Bill Blackmore, 74 Barnsley Road, Wombwell, BARNSLEY, South Yorkshire, S73 8DJ. Tel: 01226 495230 or 07800 965338) www.creativetaxdiscs.co.uk
Jerry Birkbeck mentioned Greg Powell, 24 Elgar Avenue, Hampton Park, HEREFORD HR1 1TY www.poplargreg.com Tel: 01432 353963 or 07710 26733.
MURPHY’S LAW
Many of you will be aware of ‘Murphy’s Law’, or ‘Sod’s Law’ as it is known to some. A recent article in the Gardner Engine Forum magazine (sent to the TTT 2 editor by TF owner Stuart Barnes – thank you Stuart!) highlighted its origin in the aircraft industry and came up with the following statements which apply equally well to T Types!
If anything can go wrong, it will.
It is impossible to make anything foolproof because fools are so ingenious.
Specified environmental conditions will always be exceeded.
Interchangeable parts won’t.
Any wire or tube cut to length will be too short.
Identical units tested under identical conditions will not be identical in the field.
Availability of a part is inversely proportional to the need for that part.
After an instrument has been fully assembled, extra components will be found on the bench.
A dropped tool will land where it can do the most damage or cannot be found.
(Also known as the law of selective gravitation)
Components that must not and cannot be assembled improperly will be.
The most logical way to assemble components will be the wrong way.
With thanks to the Engine Forum
(Some) After-Market TABC Master Cylinder Pushrods
If you go to Doug Pelton’s end of year Newsletter
you’ll see a “Product Alert” from Doug that some replacement TABC master cylinder pushrods (not the ones he supplies) are known not to have sufficient angular displacement which may result in a side load and binding of the brake pedal as opposed to a straight longitudinal thrust of the master cylinder piston.
New XPAG Crankshafts from Steve Baker
Steve Baker is offering steel billet crankshafts in EN40B and will have one for inspection on the Octagon Car Club stand at Stoneleigh on 1st March. The prices in his advert include VAT. We hope to do a feature on some of the products sold by Steve in the next issue of TTT 2.
Events in 2015
I have been notified of the following events:
3-Night Trip to Crepon, Normandy 22-25 April
Instead of the annual trip to Bollezeele, this year it is hoped to organise a 3 night trip to Crepon in Normandy. The hotel will be La Ferme de Ranconniere, www.ranconniere.fr which was used by the T Register several years ago. The hotel can take a booking arriving on 22 April and departing on 25 April. They have offered a bed, breakfast and evening meal package ranging from 125€ per night for single occupancy to 190€ per night for a double room. If you are interested please contact Gillian Smith at [email protected] or on 07800 950333 or 01252 336271 and say which room type you would require.
3rd Dolomites MG Event – 01-07 June
Christian Bianco extends an invitation to join him and friends from Europe for this event which is based in a small village near Bolzano – The South Tyrol. It is a tour around the Lakes and Mountains and hopefully including Stelvio and the Cortina area. This will be all based in a village surrounded by orchard and vineyards – one hotel is a small castle! From here MG’rs could extend their trip down to Florence or across to Pisa or return via Innsbruck or Bavaria. Entries due by 9th March.
Visit mg-dolomites.info for more details.
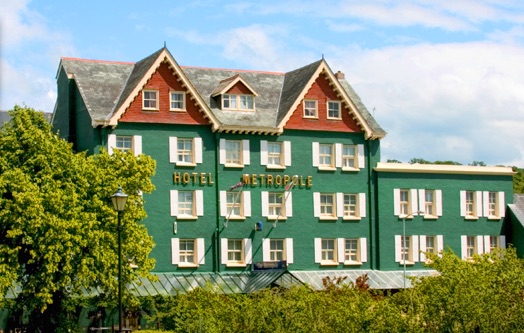
MG OCTAGON CAR CLUB – FOUNDER’S WEEKEND 08-11 MAY 2015
Based in Llandrindod Wells at the Metropole 4- star, family–owned hotel. The format will be a road run on Saturday, and on Sunday morning a visit to Abbey-cwm-Hir Hall, followed by buffet lunch, then another short road run. Details from Brian Rainbow brian(at)brianjrainbow.free-online.co.uk
‘LOST AND FOUND’
A couple for this issue as follows:
Barry Woolford is keen to trace the TC which was his honeymoon car in 1968. It is TC10238, registration mark EDP 721.
Barry completely rebuilt the car doing the woodwork, engine, electrics and spraying himself.
The car went across ‘the pond’ to the USA.
Barry’s contact e-mail contact address is b.woolford(at)btinternet.com {Please substitute @ for (at)}
TC6533 (CTK 759)
As can be seen from the ‘before and after’ photos, Peter Seymour brought this car back to life during 1998/1999. The car was since owned by Stanley Hughes, but he died in 2005. The car was sold in 2006 and is known to exist.
Peter would very much like to trace the current owner. peter.seymour(at)btinternet.com {Please substitute @ for (at)}
Two nice T-Types owned by Marcello Spina in Italy. TD16017 was exported new to Florida and sadly, nothing is known of its history. TA1131 came to Italy in 1968 and was originally a Lancashire Police car with registration mark BTF 77 (black with blue upholstery).
This website uses cookies to improve your experience. We'll assume you're ok with this, but you can opt-out if you wish. Cookie settingsACCEPT
Privacy & Cookies Policy
Privacy Overview
This website uses cookies to improve your experience while you navigate through the website. Out of these cookies, the cookies that are categorized as necessary are stored on your browser as they are essential for the working of basic functionalities of the website. We also use third-party cookies that help us analyze and understand how you use this website. These cookies will be stored in your browser only with your consent. You also have the option to opt-out of these cookies. But opting out of some of these cookies may have an effect on your browsing experience.
Necessary cookies are absolutely essential for the website to function properly. This category only includes cookies that ensures basic functionalities and security features of the website. These cookies do not store any personal information.
Any cookies that may not be particularly necessary for the website to function and is used specifically to collect user personal data via analytics, ads, other embedded contents are termed as non-necessary cookies. It is mandatory to procure user consent prior to running these cookies on your website.