
The following has been received from Paul Busby with apologies to Paul for the delay in publishing. Following on from this is a brief article on the rope seal from Eric Worpe, with similar apologies to Eric.
The rear oil seal article in issue 62 has prompted myself to write a few words on the front oil seal particularly having seen the lip seal being offered as a replacement of the graphited rope original i.e. a plain nitrile rubber lip seal held with mastic in the original housing. This may work in some cases and may for a short term be an improvement on the rope seal but I doubt its suitability as a long- term solution.
Firstly, it must be noted there is a whole science behind the design of lip type oil seals to be fit for purpose. You only have to refer to the manufacturers’ tech data catalogue. It must be remembered that the original rope seal split housing was not machined using the crankshaft as a pilot for the outer diameter of the seal, hence there is potential for eccentricity to exist here (coaxiality/run-out the correct term). The tolerance in housing diameter and oil seal o.d. is very low as is the verticality to maintain the knife edge sealing parameters.
The pulley shaft surface itself needs to meet parameters in order for the seal to perform properly. It is already a secondary fit on the crankshaft itself, leading to potential out of roundness (circularity) max tolerance in the order of 4 microns. The surface of the pulley shaft (the counterface) itself needs to meet hardness and finish requirements. The original pulleys after tens of thousands of miles are probably worn and ribbed from ingress of dirt and debris flying off the fan belt alone. Surface finish should be in the range of Ra 0.2 to 0.8, Rz 1 to 4, Rmax 6.3 and a hardness of 55 HRC or 600 HV for a comparison get hold of a ‘Speedysleeve’ repair kit to give you a flavour of the surface required. A rough surface will destroy your new seal in seconds and particularly if not lubricated on assembly. Make sure the lead edge of your pulley is nicely chamfered or rounded off.
Owners wishing to fit a modern lip type rotational shaft seal should select one that has been designed for use as a crankshaft seal in a petrol engine. Such seals will be most likely made of silicone rubber ‘MVQ’ usually an orange colour and have a ‘wave’ seal not a knife edge seal. This looks like a swirl moulded in like a reverse scroll. (please see close up photo). This produces a hydrodynamic aid to produce sinusoidal edge presented to the shaft and dramatically improves the sealing effect. Silicone rubber permits rotational surface speeds of up to 2 M/sec. An XPAG 36mm dia shaft runs at nominally 9.4 M/sec at 5000 rpm. Some seals also come with the benefit of an additional dust lip to protect against ingress of dirt and debris around the crankshaft seal i.e. fan belt granules.

To properly fit a modern crankshaft seal the first move is to ensure the housing is fully concentric with the shaft. As the seals I use are 12mm wide the front flange needs to be cut off which is a bonus as it allows the seal to be fitted/replaced if required without removing the sump and timing cover.
To ensure axial alignment I have for my own engines made up a special cutting tool that pilots off the end on the crankshaft. With sump and timing cover all bolted up with relevant gaskets to ensure ‘pinch’ retention fit of the seal. The new seal housing is simply cut into the sump and timing cover (See photographs of process and finished article).

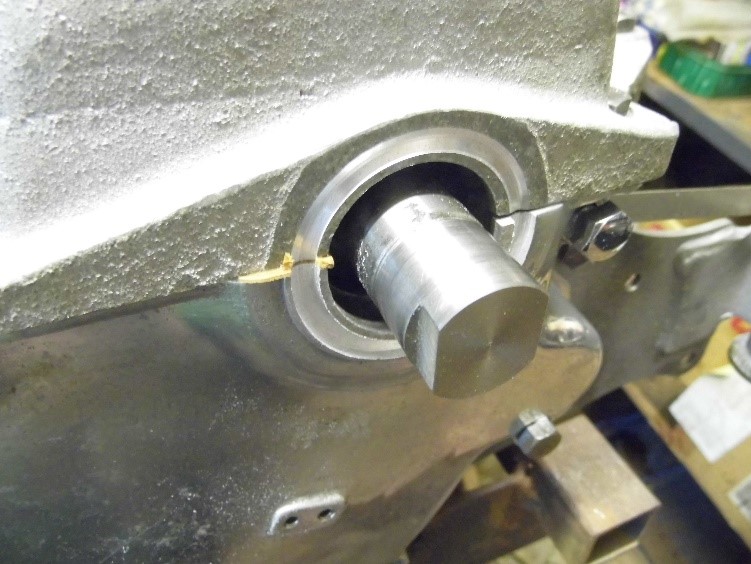

Note: ‘Speedi sleeves’ are available for 36mm dia shafts. In selecting seals be sure O.D is not too large, else you may break through the rear oil thrower on the timing cover; however, this can be welded up before you start.
Paul Busby
…….and here’s the contribution from Eric Worpe…
Graphited rope seal.
It’s a little embarrassing that some components such as thermostats for our XPAG engines are to be found in the tractor section of old spare parts catalogues. Another such component is the graphited rope oil seal, an item whose roots can be found in steam engines going back to the Industrial Revolution.
This unsophisticated piece of old rope may have unwittingly contributed to the survival of so many T-Types due to the fine spray of oil leaking from the front of the engine and distributing itself over the chassis. Our debt of gratitude is somewhat diminished by replacing it with a modern oil seal, the justification for which has occasionally been due to the incorrect size of rope seal included in some “bottom end” gasket sets.
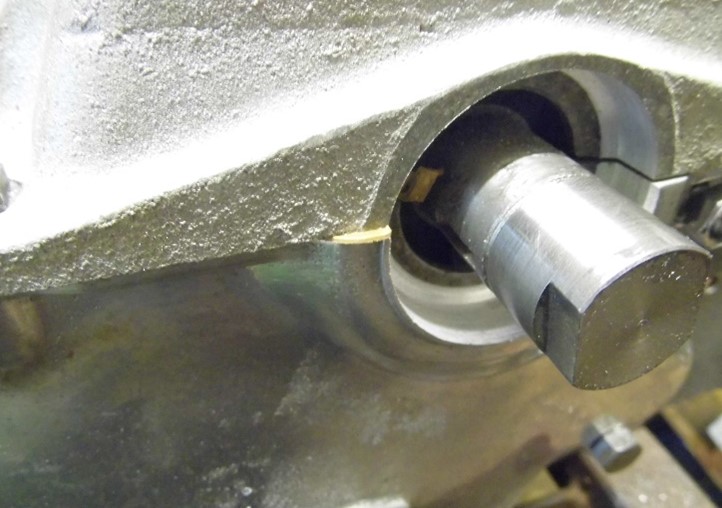
The original rope seal measured some 9.5 X 7mm, giving a cross sectional area of around 66mm squared. Some of the replacement rope seals measure 10 X 10mm, resulting in a cross- sectional area so large that even if one were able to fit them in to the grooves machined in the sump and timing chest cover, they would “lock up” the crankshaft when the fasteners were tightened.
However, other engines still use such graphited rope oil seals and 1 meter long lengths are available either from vintage tractor spare suppliers or even e-Bay. The nearest size suitable would be the 8 X 8mm Graphited Gland Packing Rope Seal, which gives a similar cross-sectional area to the original rope seal. The rope seal can be cut with a very sharp knife to leave a very slight protrusion either end of its housing groove.
The development of rope seals has not been static and some versions exist made from graphite impregnated woven PTFE; these are not easy to locate and may only be available in long lengths. It could be argued that rope seals are more tolerant of scored running surfaces, so they could still hold their own against modern lip seals.
Eric Worpe
I struggled for many years trying to properly fit a replacement front seal. I will not bore you with my agony. Rather, I will reveal my stupidity.
I suspect that my front rope seal never leaked. Yes, I had a persistent drip from the area of the seal. It turned out, however, that it did not come from the seal. It came from a ruined gasket between the block and the Front Bearer Plate!
Interesting article, although the 4 micron tolerance is rather small in my opinion, around 1.6 tenths of a thou in “proper” units. My understanding is that lip seals can tolerate non-concentricity of several thou’s, depending on seal diameter.
I fitted a lip seal to the front of the crank, mounting it in an ally ring to maintain concentricity, sealing it in with some sealer. Many owners have used a seal mounted only by silicone sealer, usually with good success. As you say, your solution gives the ability to replace a failed seal in situ, saving an enormous amount of work. Did you make the special cutter yourself?
Oops, I read you did make the cutter, you must have advanced machining facilities, how did you do this.
Would a simpler cutter, maybe a single point one do the job, a bit like a piloted boring head.
Thanks Mike for this very helpful article. I plan on doing my TC front seal in the manner you do it. I have ordered a 47 mm annular cutter to do the housing. I will make up a suitable mandrel to allow the cutter to be centred on the crankshaft. Could you please advise the part number of the seal you use. The seal needs to be 35×47 as the pulley is 35mm. it seems to me that it would be better to go for a wider seal than the readily available 7mm wide seals. You said you use a 12mm seal which don’t seem to be readily available here in Australia.