Well, it’s been a bit of a roller-coaster! The reception for the new website and new magazine has surpassed my wildest dreams. Within three weeks of starting up we reached a milestone of 500 “subscribers” and now, at the time of writing, we are on 711. I confidently predict that we will soon reach 750.
I would like to thank visitors to the website for their ‘welcome’ comments and would also like to encourage readers to continue to comment on the website versions of the articles – whether it is to compliment the author, to ask for clarification on a point, or to start a discussion.
First out of the traps is some news on MG Spares Day at Stoneleigh. The 2011 date is Sunday 20th February. The lady who has run the event for the past 4 years, Lyn Bateman of Vintage & Classic Events, has sold the business to ‘Live Promotions Events Ltd’; this company runs Race Retro plus other Classic events. As usual, I shall be sharing a stand with Brian Rainbow and we will be at our usual pitch opposite Barry Walker’s stand in Hall 1. It will be good to catch up with many of you, particularly as I didn’t attend Silverstone in June.
I was saddened to learn of the passing of Bill Wallis, President of the MG Car Club. Bill was an exceptionally kind man and that is how I shall remember him. When he heard that I had not renewed my MGCC membership he wrote to me and asked me if there was anything he could do. He used to write regularly when I was TTT editor and thank me for his complimentary copy and say how much he enjoyed it.
The cover photo for this issue is of Malcolm and Linda Sayers’ TD. When you read of the trips and mileage they have covered in the car over the last 13 years you won’t fail to be impressed, both at their stamina and by the reliability of the TD. True to form, they are out and about as I pen this editorial. They left home on 28th August for an event in Corsica (a mere hop, skip and a jump for these seasoned travellers!) and they are calling in at Angouleme on the way back.
My good friend in Argentina, Marco di Paolo has just e-mailed to tell me about a new TC ‘find’ in Argentina. It is TC0324, which still has its original engine (XPAG 1019). An extract from his e-mail reads as follows: “From the land of Fangio, Balcarce, Province of Buenos Aires (450 km far from the capital) a TC was discover!!!!! It is in a very, very bad condition, but is alive!!!!” TC0324 was completed by the Factory on 11th December, 1945 and was one of a number of very early TCs which were imported into Argentina by the agents, Agar Cross. I’ve asked Marco to send a photo if he can get hold of one.
As we continue to develop the website we now have a Parts for Sale section. If you want to sell any surplus MG T-Type parts, or if you are looking for a particular part, you can place a free For Sale or Wanted advert in the knowledge that you are reaching a worldwide audience and one that is growing in numbers.
It is said that the only certainties in life are death and taxes. I can add one more certainty, which is that downloads of TTT 2 will always be totally free of charge. Having given this pledge, I am aware that some Internet subscribers have said that they would like to make a small donation. I am happy to accept donations on the grounds that I have arranged a small print run for each edition of TTT 2. I have done so to satisfy the needs of those who do not have Internet access and probably never will, as the cyber age has passed them by.
The problem with small print runs is that they are hideously expensive and I cannot charge ‘hard’ copy subscribers the going rate. I also plan to send contributors a complimentary copy so the net result is that I am currently out of pocket. Whilst this is not of major concern to me it would be nice to be able to afford some jam on my bread and butter (only joking!); so, if you are so inclined, a section has been added to the website, listing the ways in which you can help the cause, including making a donation. You can view these at ttypes.org/help
At the time of writing, I still have some printed copies of the August issue so if anybody would like to sign up as a ‘hard’ copy subscriber the cost is £15 for the August, October and December 2010 issues. You can pay via PayPal by sending the payment to jj(at)octagon.fsbusiness.co.uk (substitute @ for at).
This month’s issue contains the following articles:
● Front cover story –TD11153 ● Fitting an alternator to the TC/TD ● Buying a T-Type – Caveat Emptor! ● A luggage rack offer for your TA/B/C ● Performance issues with modern fuel ● Simplifying the task of draining and re-filling the brake system on the TD/TF ● Mounting the front springs on the TC chassis ● The Lech Zakrzewski Oil Filter Converter for an MG TA.
Finally, I’m pleased to be able to let you know that Jonathan Goddard’s new book on the TD should be available sometime in week commencing 4th October. Ordering details are on page 13. We have brought forward a new regalia section on the website especially for this. It is at the following address: https://ttypes.org/tshop Further regalia items will be added in due course.
Well, that’s about it for now – hope you enjoy Issue 2 of Totally T-Type 2!
Malcolm Sayers must surely be in the top ten of owners who use their car – read on…
I was reading a classic car magazine one day towards the end of 1997 when from the pages something jumped out at me; a 1951 MG TD was for sale at a garage in a village near High Wycombe. So I went to have a look at it. The car was in need of some very serious restoration but it looked all there. So after some haggling over the next week on the telephone I became the proud new owner of my very first M.G. and I brought it home on a trailer just after Christmas 1997.
I had owned and restored 3 other vehicles before buying the TD so I knew what to expect, and I really looked forward to the task ahead.
The car was exported by the Factory to Trinidad so it was a right hand drive, The previous owner was sent from the U.K. to Trinidad with his work and purchased the car there in 1970; when he retired in 1984 he brought the car back to the U.K.
The restoration took me 6 months from start to finish doing nothing else but the MG, (I could put all this time in because I had just retired).
I have made many changes to the car since the restoration. I chose to make the car as adaptable as I could, because doing long distance touring was going to be my main object. However the modifications have always been carried out so they can be put back to standard again if a future owner so desires.
I remember doing the first test run after finishing the restoration and being utterly disappointed with the low gearing of the car. So it was back in the garage with the car to carry out the first major modification.
By the summer of 1998 we were taking part in MG runs in the UK to get used to the car. The spring of 1999 saw us out and about doing lots of day runs; the Kimber Run, Daffodil Run, Octagon Wings Run, to name but a few.
We were trying to build our confidence up as well as our confidence in the car. The TD was now starting to feel right so we thought how nice it would be to take the car on the Continent.
In 1999 I was reading through the Safety Fast magazine and saw an advert for The Prix Des Alpes rally, which sounded very interesting. This particular year it started in Annecy and finished in St Morritz. After a lot of discussion and nervous trepidation we decided to give it a go. We did the rally and thoroughly enjoyed it. This particular rally took us up and over The Gavia and Stelvio passes with many hairpin bends and steep climbs. At that time I was running a 3.9 diff but the TD got over them with no problems. At this time the engine was bored to 1350 with a crane fast road cam fitted. We participated in this particular rally many times since then until its demise, enjoying going over some of the very best routes in the Alpes. That was the start of our exploration of Europe in the TD.
The rest of 1999 was spent doing various day rallies/ road runs organized by the MG clubs in the U.K. Whilst we enjoy these very much we had been ‘bitten by the bug’ for the continental rallies and have visited many places in Western Europe, meeting many people and making lots of friends. We have found that the MG people are a “friendly bunch” always willing to help you or knowing someone who can help in your moment of need.
During the year 2000 we did the usual MG rallies in the UK plus the Prix Des Alpes rally, which started in Chantilly near Paris and ended in Aix Les Bains – again we had another fabulous time. Then after the rally, we visited our daughter, who was in her 3rd year at university and working for Daimler Chrysler in Friedrichshafen on Lake Constance for 9 months. So we toured around the Bodensee for about 10 days with our daughter sat crossways in the back of the TD. It is a very nice area of Southern Germany.
In 2001 the European Event of the Year was in Gabbice Mare on the Italian Adriatic. It was a long way from England and we wondered if the TD was up to the task, but over the years we had gained confidence in the car. I remember that the Mont Blanc tunnel was still closed after the horrific fire, and we went into Italy through the Frejus tunnel. Then on to Gabbice Mare where we found a wonderful friendly organised rally. This was our first encounter with the renowned Italian hospitality. After the rally Linda and I took the TD to Venice for another week. We booked a week in a Eurocamp tent near to Venice so we could park the TD near our tent for security. It was only a 30 minute walk to the ferry from the camp site which took us over to Venice. We returned back to the UK via Lake Como and the Gotthard tunnel and the Bugatti museum in Mulhouse.
Later in that year we also did The Prix Des Alpes rally which started in Besancon and finishing in Monte Carlo, taking in a lot of the high cols. After the rally we spent another week in the Ardeche near Vallon-Pont-d’Arc. We then returned to the UK via Calais.
In 2002 we applied and were accepted for a rally in Sicily, organised by a member of the MG Car Club in Italy. We drove to Genoa on the Italian Mediterranean to catch the ferry to Palermo. I remembered that the Mont Blanc Tunnel was now open so that made the drive down to Genoa a lot easier, but finding the ferry terminal in Genoa was a complete nightmare, you could see it, but you just couldn’t get to it. The ferry had engine problems which meant that we arrived in Palermo at about midnight. We thought it would be quiet at that time of the night but oh no! The place was buzzing with people and cars, copious amounts of horn blowing as we all tried to follow my leader out of Palermo to our hotel, where Linda and I had actually spent a holiday 30 years before.
The rally again was very well organized and the people very friendly. Naturally, the weather was excellent for a circular tour of the Island, visiting a lot of the hilltop towns and sites of historic interest. We returned back to the UK via the Aosta valley which is a really beautiful valley; then, through the Mont Blanc Tunnel overnight, stopping at Chamonix and Chaumont before catching the ferry from Calais.
Later that year we attended the European event in Belgium and we stayed on for a few days after with a group of T-Types from the UK visiting Ghent and Brugge. There was no Prix Des Alpes for us this year because it clashed with our daughter’s graduation from university, so we spent the rest of the summer in the UK doing the MG runs.
It was about this time, the end of 2002, that the TD gearbox was starting to get very noisy again (I had rebuilt it in 1997), so I decided to fit a Hi-gear 5 speed conversion, and change the rear axle ratio to 4.5-1 which was carried out in the winter of 02/03. What a difference this mod makes, it totally transforms the car!
2003 saw us back in Gabbice Mare in May for another excellent rally. The Prix Des Alpes rally this year started in Reims and finished in Aix en Provence, then after the rally we drove up through Germany to attend the European Event of the Year in Viborg, Denmark. Stopping off at Belsen, the infamous concentration camp on the way. We then drove back around to Calais for the boat after the event.
August saw us in Zug Switzerland for another excellent rally; it was extremely hot I remember. The car has only let me down once terminally in all that time. (I say “me” because I was with a group of friends going to Angouleme for a ‘boys’ weekend to the Circuit des Remparts racing.) The crank broke about 30 miles from Angouleme, so we were towed into Angouleme by a B GT on a length of rope.
To this day, Linda is adamant that the crank would not have broken if she was there! So she has always accompanied me since then to Angouleme.
In 2004 The Prix des Alpes started in Beaune and finished in Annecy. We also went to the Isle of Man with a group of T-Types and afterwards took in trip to Ireland, covering both North and South. There was also a very enjoyable trip to Sardinia where the weather was hot. The crystal blue waters off the Island of Maddalena are still deep in my memory, and also Piero, the rally organiser, placing giant bottles of white wine in the sea to try and keep them cool for our BBQ.
2005 we went to the Peloponnese in Greece (see photo below) visiting the Corinth canal, Athens, Olympia and the Southern Cape of Europe, catching the ferry from Ancona to Patra.
2006 This is the summer we never seemed to be in the UK. In May we went to the MG event in Gabbice Mare, then back to the UK. At the end of June we attended the European event in Clermont France and on to Umbria in Italy (pic below) for another event via the Millau Bridge, returning to the UK mid July. The middle of August saw us departing the UK for Berlin for another MG event and driving down to Colditz to look over the castle, before returning to France to take part in the Prix des Alpes rally starting in Beaune and finishing in Monaco. Then driving to Angouleme for the Circuit des Remparts racing weekend before returning to the UK at the end of September via Calais.
I can remember this is the summer when the TD never missed a beat and it was being driven quite hard most of the time and covering a lot of miles. It seemed every time we returned to the UK I had to give the car an oil change. The engine by this time had done a good mileage and I felt it was time to get another engine ready to put in over the winter, so I set about getting another engine prepared. I started to ask questions to various people whether it was possible to bore an XPAG/XPAW to make it 1466cc.The general opinion was that if you are lucky you might get a XPAW block to bore out to 1466cc, but it’s more than likely to break through the cylinder wall.
So I decided to go and get the XPAW block bored right out and then fit liners, but then the problem is you loose the rigidity in the block. So what I did then was to use a block filler in the base of the block around the liners. Since 2007 I have used the car with the 1466cc engine without problems. I have done a good 35,000 miles now. It does seem a lot of work for the extra cc, but the extra torque of the engine is noticeable.
2007 We went to Speyer in Germany for the European event in May, where I remember I had to fit a water pump on our arrival. After the event we returned to the UK. Early July we were on the boat again heading for Salzburg to start another rally which was going to take us to Budapest and around Lake Balaton and back into Austria. This was another excellent trip.
2008 In May we did two rallies in Ireland one in the South and one in the North – always good fun! The North was around the Glens of Antrim and the South was around Dublin. Afterwards we stayed on and did our own tour.
In August we were in Zug Switzerland for another rally. We took a birthday cake that Linda had cooked in the shape of a rocker cover for a friend who was 70.
In September we attended a rally in Umbria Italy and returned via Angouleme for the racing.
In 2009 In May we returned to Sicily sailing from Civitavecchia to Palermo which was a longer drive down through Italy but it gave us the opportunity to visit Pisa on the way. This time we visited the North East area of the island, including a visit by boat to the island of Stromboli to watch the volcano do its bit after dark. The only problem was that the wind blew up and the ride back to port, which was about 3 hours, was very bumpy indeed and a lot of people were looking and feeling the worse for wear.
In June we went to Norway for the European event. We caught a freight boat from Immingham to Brevik it took 32 hours and there were only 8 passengers on board. After the event we stayed on for another week touring around. Norway is a nice place with scenery similar to the South Island of New Zealand. We happened to talk to an English ‘white van man’ who had just been fined the equivalent of £600 for speeding, he was not best pleased!
In September we visited the Dolomites, with a Swiss group. Each day the owner of the hotel that we stayed at would lead us on his motor bike around various places of interest, stopping for lunch and coffee en route.
This year has been a quiet year for our MG travels because we were expecting our first grandchild, and Linda did not want to travel too far around its birth date, which was mid July. In May we were in Scotland for the Caledonian 3 day rally. Then to Gabicce Mare at the end of May for the European event.
Gabbice Mare in 2006
I can now report that we have had our first grandson born on July 17th – a healthy chap called “Arthur” – I am trying to get him interested in MGs but his feet won’t reach the pedals yet.
Over the years my memory has faded a little, perhaps a lot, to the places and exact dates where we have visited, but I can say in this time we have always found the MG fraternity kind and helpful.
I now have a TC which is helping the TD with the mileage we cover each year.
Over the last 10 years we have covered between 10-12000 miles per year, with 15000 miles the record for any one year.
Malcolm Sayers
Editor’s Note: Malcolm mentioned his TC (pictured above). The car was finished in mid January 2009, and he left for a holiday in New Zealand. While Malcolm was away his son arranged for the car to be MoT tested and on his return at the end of March he drove it locally to put about 3,000 miles on the clock to make sure it was OK. Then in early May he and Linda set off to Sicily for a rally with Piero Fusaroli from the MG Car Club of Italy. The car drove perfectly with no problems covering at least another 3,000 miles.
The alternator is from a Ford Transit – the type with the brake servo pump attachment on the rear. I got my recon units off eBay for about £45 each.
First of all the car must be changed to negative earth. This is not a major problem but if you have an original clock in your rev counter I am not sure if this will change to negative earth, without doing it damage.
1. I used the standard TD pulley without the cooling fan ring. I have not tried the TC pulley with the integral fan ring, so I do not know if the shaft on the Alternator is long enough.
It is necessary to make the hole in the pulley larger to become a nice snug fit over the shaft.
2. It is necessary to remove the 3 long bolts which hold the alternator together and twist the front plate of the alternator to get the adjusting bracket hole in the correct position.
(it must be in the same position as the dynamo you take off)
3. Next, depending on which type of alternator you have, you must make sure that the wiring connections are on the rear face of the alternator. It is sometimes necessary to remove the plastic connection block and modify the connections/insulator. This is to give you enough clearance between the engine and alternator and allow you to use the standard fan belt.
4. The shaft that protrudes out from the rear of the alternator needs to be shortened by about 20mm. I cut mine off with an angle grinder because the shaft is hardened.
5. You need a 50mm long distance piece with an 8mm hole in the centre to make a spacer for the rear mounting point of the alternator.
The next item you must modify is the rev counter gearbox.
1. You need to remove the 2 screws (or sometimes they are rivets which need to be drilled out), to separate the casing where the gears are. Then fit a spacer over the screws inside the gearbox. This is because when you make and fit the bracket to the gearbox you can tighten the screws; then it does not squash the casing on to the gears and seize the gears.
I removed the knurled nut which tightened the gearbox to the dynamo and made a coupling from steel bar, but I think it would be possible to use a piece of rubber or plastic hose. That way it would be easier to make, and it would also allow a little flex if the gearbox was not aligned correctly.
2. Fit the bracket to the gearbox using just 1 of the screws. I made the bracket from a piece of 15mm wide by 3mm flat bar.
3. On the rear of the alternator there are 3 threaded 6mm holes which were the mounting positions for the pump on the Transit. I used the top outer hole to screw in a piece of 6mm threaded rod and the other end of the threaded rod goes through the bracket you have made and fixed to the gearbox.
4. Push one end of your coupling over the alternator and the other end over the rev counter gearbox. My coupling is about 30mm long you then adjust the gearbox until it is running true in the centre of the alternator.
5. I carried out the simple wiring change by visiting the MGA guru web site, where there is a very good explanation on how to convert the wiring. www.mgaguru.com/mgtech/electric
Moss part number for the TD pulley 433660 Ford alternator part no 5030668 or Lucas exchange part no. LRA 780.
The usual disclaimer applies that I accept no responsibility for anything whatsoever, and that anyone considering or intending to carry out this modification should be confident in their own minds that they are able.
I have carried out this mod on both my TC and TD and it has been very successful. It is a joy to drive with halogen headlights on, wipers going and the heater on if necessary, without having to keep looking at the amp meter worrying if the electric is going to dry up and vanish.
I ignored the advice and bought a T–Type. I bought TC7045 in 1990 in a wonderfully reassuring cloud of nostalgia, inexperience and enthusiasm from a dealer. No names, no pack drill – it was, after all, a 42 year old car even then and I was advised to go for the (considerably more expensive) restored car which was also available.
Lesson number one – research your car’s type and specifications before hunting for your purchase. In researching its history, a previous owner sent me photos – what I had not realised was that at some point it had been stripped of a number of original parts which would prove expensive to replace if I was going to be a stickler for originality.
Lesson number two (following on) – do not underestimate the cost of replacement of parts which are much sought after, now that originality is so important. Foglamp, Horn, Steering Wheel, Headlamps and a host of other parts, even for modern reproductions, have price tags which can make your eyes water. The reasons are simple – Supply and Demand. Because of the age of our cars, their parts now have to be either re-manufactured in small batches on special order or (increasingly rarely) found through diligent search of forgotten store shelves or dismantling of other cars and restoration. None of it comes cheap and each person involved has to make a mark-up. Get a Moss catalogue and read the prices.
Lesson number three – don’t go alone. You will persuade yourself to ignore many drawbacks because the cars are so inexplicably desirable that you will not be able to resist. Take someone with you who knows the model and already has one and been through all of the disasters which we all know too well – and preferably carry with them a bucket of cold water!
Lesson number four – Unless you really, really, …REALLY like working on old cars and have adequate practical skills, don’t buy a basket case and fondly think that a few weekends spent tinkering will put it straight. On the surface my car looked pretty good but the years had taken their toll in a myriad little (and big) ways under the surface, of which more anon. Remember, these essentially pre-war design cars were mostly driven hard by enthusiasts and went through a phase of being an old banger before being a classic.
All good stuff but of course I did not follow this advice myself.
I had wanted one since I was a child, when a neighbour owned one – it had an MoT, it ran well and I was utterly besotted, so I bought it.
Back to the marriage analogy – she has driven me to distraction, caused me no little heartache and cost me a fortune but boy have we had some good times. I still love her and we’ll be together for life.
For the setbacks on the way however…..that’s for another time!
Chris Oswald
Editor’s Note: Chris offers sound advice; the number of instances that have been relayed to me of people getting ‘caught’ beggars belief. There is one particularly bad example where a car was sold with a downright dangerous steering set-up and this could well be the subject of a future article.
Chris has offered to write a regular series of articles about the rebuild of his TC and I have gratefully accepted. You will find lots of photos at: http://www.flickr.com/photos/mgtcdismantle2006/
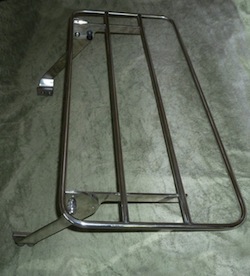
The original style luggage rack that sits above the spare wheel / petrol tank has a number of disadvantages. When loaded, it completely obscures any view to the rear, placing a heavy load high above the roll centre and makes the car less stable, it makes it virtually impossible to fill the fuel tank when loaded and finally, it is difficult to fit, damaging the tank straps.
Unable to find a suitable alternative, I have resorted to designing a luggage rack that addresses these problems. It consists of two arms fitted to the existing “spare” holes in the rear of the chassis (TA, TB and TC, they will need to be drilled for the earlier MMM cars) supporting a flat rack positioned behind the spare wheel. Not only is this very easy to fit, it folds up when not in use. On my recent trip to the Le Mans Classic, mine proved very effective, carrying not only my luggage but all the camping paraphernalia.
In response to the positive comments from people when they saw my prototype, I have arranged to have a small number of racks manufactured (shown in the pictures – the last pic shows the ‘standard’ arrangement on David Moir’s TC). They are made from highly polished stainless steel and cost £235.00 (plus P&P) including all fittings.
I still have a couple left so if you are interested, please could you email your details to octagon ‘at’ ireland-family dot org or ring me on (+44) 1206 298736.
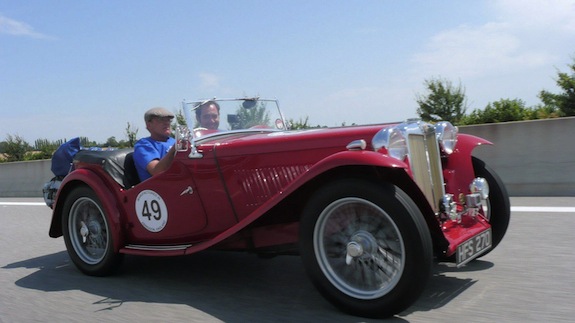
The author of this article, Paul Ireland at speed (about 70 mph) in his TC with his son as passenger. They were returning from the Le Mans Classic trip.
Over the past three years I have written articles on the problems I have experienced using modern unleaded fuel in my TC. Talking to other classic car owners it appears as though these problems are widespread and not always attributed to fuel. Last year I shared the results of my rolling road tests with the Federation of British Historic Vehicle Clubs (FBHVC) and another MG car club, suggesting they were sufficiently conclusive to warrant independent, scientific tests; only to be told by the car club that it was unable to help and by the FBHVC Fuel Expert “there are no problems running classic cars on modern fuel”. To put it bluntly, my request was ignored.
Fortunately, club members have shown a great deal of interest and I would especially like to thank David Heath, John James, Chris Morgans, Colin Whitmore, BP Australia Fuel Research and Dr Robert Woolley from the Engineering Department of the University of Sheffield, amongst many, for their advice and help that ultimately led to the tests described below. Despite the difficulties of making scientifically justifiable measurements while bumping along busy, public roads in a classic MG, both David Heath and I have managed to gather what I believe to be definitive evidence. I leave it to you, the reader, to judge who is correct. I present the case:
Classic cars v/s Modern Fuel.
Charge:
The charge against modern fuel is that it burns more slowly in classic car engines than the fuels these engines were originally designed to use. As a result, an engine set at standard tune operates less efficiently, possibly with still burning gasses leaving the cylinder. This causes elevated exhaust gas and cylinder head temperatures, which, in turn, lead to higher under-bonnet temperatures, overheating and fuel vaporisation problems. In some engines, these elevated temperatures, appear to cause damage to the cylinder head and valves.
Witnesses for the Prosecution:
I would like to call on the evidence gathered by:
1. (TA) David Heath’s TA, with a standard MPJG engine, a compression ratio of 6.5 to 1 using richer AV carburettor needles.
2. (TC1) My TC, with a standard XPAG engine, a compression ratio of 7.5 to 1, resulting from the head being skimmed, with standard carburettor needles.
3. (TC2) Mr A’s TC, whose XPAG engine has been bored out to 1350cc with a cleaned up head, a compression ratio 8 to 1 and a higher ratio back axle.
4. Colin Whitmore’s 3992cc Armstrong Siddeley Star Sapphire, having a compression ratio of 7.5 to 1, probably higher due to the head being skimmed twice.
The evidence:
The tests David and I performed are easily repeated and may be used by anybody to validate these findings or indeed to tune their own car; however, heed the warning at the end of this article before you do.
All you need is a stop watch, a digital multi-meter with a temperature measurement facility (e.g. 600.038 Digital Multimeter – cost about £10 – search for the code on the Internet), an insulating pad (e.g. asbestos) and a straight, level, quiet, de-restricted stretch of road about 1 -2 miles long. A timing light with the means for measuring engine advance (e.g. Gunson Supastrobe) is useful if you want to compare your results with ours, but not necessary.
Fasten the thermocouple onto the rear of exhaust pipe as close to the manifold as possible using circlips and insulated from the air stream using the insulating pad (see photo below), install a passenger with a notepad and the stopwatch and you are ready to go.
The results, presented as evidence, are from a set of runs measuring exhaust temperature and timing full throttle acceleration. The first run was performed using the manufacturer recommended ignition advance setting and advanced each by around 3 – 4 degrees using the vernier on the distributor for each subsequent run. This gave acceleration time and temperature measurements for a range of different ignition advance settings.
After advancing the engine, the tick-over advance was measured using the timing light. Every attempt was made to ensure the data was as accurate as possible by starting the run at the same place on the road, taking the average of more than one reading or by using two stop watches to time the acceleration and repeating the each run, in opposite directions.
Exhibit A: The full throttle top gear acceleration time from 2000rpm to 3000 / 3500 rpm (approximately 30 to 50 mph). (Note: On the TA, a wooden block was fitted underneath the accelerator to reduce engine load and possible damage). I fitted a modern digital rev counter to my TC (TC1) for these measurements. In the other cars, the original rev counters were used.
Exhibit B: Exhaust temperature. (see opposite column) After a constant speed run of around ¾ mile on a flat section of road, the temperature reading taken once it had stabilised towards the end of the run.
Witness 4: In tuning his Armstrong, Colin has found he needed to advance it around 2 degrees above the recommended setting. “If I didn’t advance the ignition, the car would overheat” he said, “I use 97 octane fuels to stop it pinking”.
Summing up: When an engine is running at its optimal efficiency it is delivering the maximum power from the inducted fuel load. Using a consistent throttle setting for the acceleration tests ensured the inducted fuel was the same for each run; hence the acceleration time is a direct measure of the power generated by the engine over the rev range (Exhibit A). I direct, you the jury, to consider that the fastest acceleration time is achieved when the engine has delivered its maximum power. You will note the differences between the worst and best cases are around 1.5 seconds, much larger than any measurement errors.
Cruising at a fixed speed on a flat road ensured the volume of inducted fuel was constant, therefore any variations in exhaust temperature are only due to differences in the way the engine is burning the fuel. The jury should consider the thermocouple is on the outside of the exhaust pipe and does not provide an accurate measurement of exhaust gas temperature, however, as it is insulated the temperature reading will be a good approximation of the exhaust pipe temperature. This in turn will reflect the exhaust gas temperature. When an engine is running less efficiently, less of the heat energy from the fuel is being converted into motive power and the additional unused heat will raise the temperature of the exhaust gasses. The temperature of the exhaust gives a good estimate of how efficiently the engine is running. I direct the jury to consider that lower exhaust gas temperatures are an indication that the engine is running more efficiently.
An engine runs at optimal efficiency when the maximum cylinder pressure on the “bang” stroke occurs 15 degrees after Top Dead Centre (TDC). Those who have read my “Suck, Squeeze, Bang, Blow” article (published in the April 2010 Octagon Magazine) will know the ignition is fired in advance of TDC to provide sufficient time for the fuel to burn. The jury should be aware that a slow burning fuel will require a higher advanced ignition setting to allow it to run at optimal efficiency. Additionally they should consider, when the ignition is retarded, there may be insufficient time for all the fuel to fully burn before the exhaust valve opens. In this case still burning fuel will leave the engine, further raising exhaust gas temperature.
Mr Whitmore’s evidence was arrived at independently from the research of Dr Ireland and Mr Heath. Initially he did not consider the need to advance his ignition timing to be related to fuel issues and once stated “I do not have problems with modern fuel”. While Mr Whitmore has not presented any data to justify his findings and his figure of 2 degrees advance is “from memory”, the jury should be aware this statement is from an independent source and relates to a more modern (1960s) vehicle.
I ask the jury to note the correlation between exhibits A and B. As the ignition was advanced both the acceleration times improved and exhaust temperature fell. These are independent measurements of engine efficiency and the fact that they agree adds significant credence to the presented evidence.
I now ask the jury to retire and consider its decision. Should you find modern fuel guilty as charged, please contact the Secretary of the FBHVC (Tel: 01865 400845 E-mail: [email protected] ) stating you believe there are problems running classic cars on modern fuel which should be investigated. If you find the defendant not guilty, I suggest you skip the warning below and read the other, more interesting articles in the magazine.
Conclusion and Warning:
Originally, I assumed the XPAG’s lower compression ratio was the reason modern fuel burned slowly. For all the three cars tested, the optimal ignition advance occurs at a similar degree of advance even though they have significantly different compression ratios. As there is very little difference, other than compression ratio, between the XPAG and the engines in “modern” classics, it is probable that the heat related problems seen in these later cars is also related to the burn rate of modern fuel.
These results are frightening. You can see from Exhibit B, running your engine with the standard ignition advance gives an exhaust temperature of 390˚C which decreases to 325˚C as the ignition is advanced, i.e. it is running 20% hotter. If this increase is reflected in the exhaust gas temperature, the 1200˚C gasses leaving the cylinder are probably nearer to 1440˚C. It is difficult to imagine how such a large temperature increase is only due to the decreased engine efficiency, adding further weight to the suggestion that fuel is still burning when the exhaust valve opens. It is no wonder some cars suffer from exhaust valves disintegrating and dropping into the cylinders. I am sure you can imagine the damage this causes.
Advancing your ignition timing gives modern fuel more time to burn, increasing engine power and reducing running temperatures. For the cars David and I tested, the ideal is 15 degrees advanced at tick-over. For my TC this is 13 degrees advanced static on an engine where the static advance should be set to 0 degrees. This may not sound a great deal until you look at the advance curve (Exhibit C) and realise 13 degrees static corresponds to 38 degrees at 4000 rpm. A standard TA would be 6 deg at tick-over with a maximum of 38 deg at 3000. Tell anybody who knows about engines what advance you are using and they will say “what!!” and when you repeat the figure suck air between their teeth, shake their heads and say “you know, that is very high”.
Modern cars run at as little as 5 degrees advance. People who have read the Suck, Squeeze, Bang, Blow article will be aware of some of the problems running such high levels of advance can cause.
Classic car owners are between the devil and the deep blue sea. They have a choice, destroy your engine through heat damage to the head and valves by running at standard advance or run it at a large advance and risk a hole in your piston or damage to the bearings through pinking. Remember the overheating and petrol vaporisation problems we all have seen are just symptoms of the slow burning properties of modern petrol. Don’t think your car is immune. Unfortunately, there is no compromise. Exhibit D shows the exhaust temperature for my TC across the rev range running at 7 and 15 degrees tick-over advance. As you can see it is still running significantly hotter with only 7 degrees advance.
Given this choice what option have David and I adopted? We are both running our engines with an advance of 15 degrees at tick-over and in my case using 97 octane fuels to offset the effects of kerosene lowering the octane rating. On my drive to Le Mans 2010 Classic, TC showed no signs of heat related problems despite the very hot weather and 35C ambient temperatures. On the downside, it does not run as smoothly on some brands of fuel.
A strong warning for anybody else thinking about following this example. Running your engine so far advanced can be dangerous. Certainly you should ensure the advance springs in your distributor are not tired otherwise the advance curve will be too steep (Exhibit C that shows the differences in my advance curve between new and old springs). David has fitted new TC springs in his distributor so his TA advance curve will be the same as a TC’s. Also be aware that it is very difficult to detect pinking in low compression engines; you should heed Chris Morgan’s warning. While running with high levels of advance mitigates the overheating problems, it carries with it its own risks.
I recommend you take the time to measure your advance curve. This is very simple using the Gunson timing light and a volunteer to hold the engine at a fixed number of revs. You set the dial on the timing light to align the mark on the front pulley with the TDC marker and read off the advance. I usually take measurements every 500rpm (e.g. 1000, 1500, etc.). This should give a curve something like Exhibit C.
What I personally find appalling is that in 1989, more than 20 years ago, Chris Morgans published an article in the Octagon Bulletin describing the running problems he was experiencing which could be directly attributed to the slow burn rate of unleaded fuel. He also described the serious engine damage these problems can cause. Why has this warning been ignored for so long? And why have both the car club, mentioned above, and the FHBVC chosen to ignore the problem? My impression was that both these bodies were created to help classic car owners so why are they not taking this problem more seriously?
Heat related problems affect a large number of classic cars to a greater or lesser extent. If you have read this section and you have found Modern fuel guilty as charged, I urge you to write to the secretary of FHBVC (E-mail: [email protected] ) asking they take this matter seriously. If sufficient people contact them, we may be able to elicit some action. My hope is that through an understanding of what causes modern fuel to burn slowly, it may be possible to find acceptable solutions for the benefit all classic car owners.
This article and associated graphs are the copyright of Paul Ireland and may not be reproduced without his explicit permission.
So over to the jury: what are your thoughts on Paul’s case? Add your comments below!
As mentioned in the editorial, this new book by Jonathan Goddard, which is currently being printed, should become available in week commencing 4th October. The price of the book is £6.99 plus postage of £0.81 UK, £2.25 EU, £3.75 Rest of World.
A new regalia section on the website has been specially brought forward to facilitate sales of the book.
If you order through https://ttypes.org/tshop the book will be sent promptly once available and on receipt of payment, which may be settled via credit card/PayPal, or additionally by a cheque made out in Sterling drawn on a UK bank.
Please make cheques payable to Stephen James and send them to the following address:
The T-Shop, 85 Bath Road, Keynsham, BRISTOL BS31 1SR, UK.
I use DOT 4 in my TF and in order to avoid corrosion due to water ingress, I purge and re-fill the system with new fluid each spring.
To simplify the task I’ve designed and made a kit that takes a lot of hassle out of the job and eliminates the risk of spilling brake fluid (which doubles as an excellent paint stripper) onto the chassis.
The pictures and drawing show what the kit looks like and how it’s made.
The procedure is as follows:
Having exposed the master through the floor board, remove the filler plug and attach the reservoir. Now fill the reservoir with clean brake fluid.
Follow Brian’s guide to bleeding the brakes and top up the reservoir as and when necessary. This is easily done because the mouth of the reservoir is wide, it is well clear of the floor board and the fluid level can be seen without the need for a double jointed neck.
Completely purge each slave cylinder – this is still a two-man job.
I find that even after only 12 months the old fluid is cloudy, suggesting the presence of small amounts of water.
Finally to the clever bit:
Insert the length of brake pipe through the reservoir and into the master cylinder – suck out the excess fluid with the aid of a small bore flexible tube and plastic bottle – mine is an old hand cream container.
The length of the brake pipe (see drawing) is measured to leave the brake fluid level in the master cylinder ½” below the neck, as per the Workshop Manual for TD/TF.
Keith Douglas
Editor’s commentary: The photo immediately below shows the early stage of the manufacture of the kit. A brass disc has been silver soldered to the bottom of the length of copper tube to form the base. Under the base is a short length of hexagon bar and the dummy filler cap.
In the August issue of TTT 2 we looked at modifying aftermarket front springs, including the desirability of bushing them at the front ‘eye’ and rounding off and chamfering the edges. This article looks at mounting the springs to the chassis and suggests a material specification for the shackle pins as well as giving dimensions of the pins and the bushes.
Quoting from the Instruction Manual, “The front ends of the springs are attached to the front end of the chassis by hardened steel suspension pins, which run directly in the spring eyes, being lubricated through grease gun nipples fitted in the outer ends”
At this point the reader may find it useful to look at a couple of photos to illustrate the text.
Photo 1: Chassis stamping for TC0750
The above photo serves two purposes. If you enlarge it you will be able to see that whoever was stamping the chassis numbers at Abingdon in May, 1946 must have had a momentary lack of concentration having not realised that he had already stamped all of the 0740s. The ‘4’ is just about visible “behind” the ‘5’, if you see what I mean.
However, the main point of the photo is to show the front mounting point for the spring. The hardened steel pin goes through the hole in the chassis dumb iron (or knuckle), through the spring ‘eye’ and screws into the threaded portion of the front chassis cross tube. The following photo (photo 2) shows the pin which has been passed through the spring eye. Note the tab washer which locates between the ‘nibs’ on the chassis front knuckle (see photo 1) with the other tab being bent over the ‘nut end’ of the pin.
Photo 2: Hardened steel pin and spring eye
A spare pin and tab washer (but not the grease nipple!) can be seen in the second photo; the pins I have are made from EN351 steel, case hardened and ground, the tab washers I keep have been laser cut and cost £0.70 each, compared with £3.60 each charged by MOSS Europe.
The diameter of the pin is ½” and the overall length is 3.569 inches. The pin should not be over tightened as it acts as a pivot for the spring.
Photo 3: Front spring rear shackle plates and shackle pin assembly
Photo 4: Tube in chassis that holds the top shackle pin along with its two bushes
The drawing of the rear shackle assembly above has been scanned from the TC Instruction Manual.
The suspension arrangement for the rear of the front spring is a little more involved, albeit, quite straightforward. If you refer to photo 3, the top shackle pin (shown without its bushes) is inserted (with its two bushes) through the tube in the chassis shown in photo 4. The bottom shackle pin is inserted (with its two bushes) through the ‘eye’ of the rear spring. The top and bottom shackle pins are then joined by shackle plates – one on the outside (as you look at the car) and one on the inside.
With the help of the photos above we can now put the jigsaw puzzle together. The front ‘eye’ of the spring is offered up to the space between the two sides of one of the chassis dumb irons, the tab washer is held in place with one of its tabs located between the ‘nibs’ at the side of the dumb iron and the pin is pushed (normally with a twisting action) through the hole in the tab washer, through the first side of the dumb iron, through the spring ‘eye’ and through the second side of the dumb iron until it locates the threaded insert of the front chassis cross tube from when it can be screwed in and tightened.
Photo 5: shackle pin and bushes inserted in the rear ‘eye’ of the front leaf spring – a spare shackle pin and 2 bushes also shown
Photo 6: The shackle plates
DIMENSIONS FOR FRONT SHACKLE PINS AND SUGGESTED MATERIAL SPECIFICATION
The overall length of the front shackle pins is 3.33 inches. The critical length is the measurement between the shoulders, which should be 1.75 inches. This leaves 1.58 inches for the threads on both sides of the pin, so 0.79 inches each side. Of the 0.79 inches, 0.615 is threaded (7/16 BSF) and 0.175 is left unthreaded (these latter two measurements are the best I could get and may be slightly different). The diameter of the pin between the shoulders is 0.5 inches and 0.434 inches at the unthreaded portion.
The pins I keep are made from EN19T. Originally they were lightly plated but mine aren’t – the manufacturer recommends a liberal application of grease or copper-slip before assembly.
KEEPING THE SHACKLE PINS PARALLEL
The tube in the chassis which takes the top shackle pin measures 1.5 inches across (and is 0.875 inches in diameter), however the rear ‘eye’ of the leaf spring which carries the bottom shackle pin is only 1.25 inches across. To keep the shackle plates parallel a 0.125 inch ‘washer’ is brazed to one end of the shackle pin (see photo 6). It would have been helpful when taking photo 6 to have placed the shackle pins the other way around so that the thicker ends were at the bottom (as they are when fitted to the car). Sorry about this!
THE SHACKLE PIN BUSHES
The original bushes were made by Harris Flex and were patented. A couple of these original bushes, which were removed from TC0750 are shown in the photo below.
There are two different part numbers for these rubber bushes:
ACA 5242 (a BMC part number, I believe) is the bush (one of a pair) which goes through the tube in the chassis (see photo 4). The Harris Flex part number is CW8505. Part number 99557 is the bush (one of a pair) which goes through the rear ‘eye’ of the leaf spring and is used for the rear ‘eye’ of both front and rear leaf springs. The Harris Flex part number is CW719.
The chassis tube bushes should measure 0.75 inches in length from inside the flange – the thickness of the flange should measure 0.125 inches. The spring ‘eye’ bushes should measure 0.625 inches in length from inside the flange – the flange (thickness) should measure 0.125 inches.
Bushes are available commercially both in rubber (the original spec for these bushes) and in polyurethane. Polyurethane is the way to go, since I am told that the rubber bushes “do not last five minutes”. As long as I can get a favourable price, I am going to have moulds made for these bushes and also for the large bush on the lower shackle pin at the rear. An added bonus is that ACA 5242 fits the rear ‘eye’ on the rear TD/TF leaf spring.
In 2001 Lech Zakrzewski published a drawing of an oil filter converter for an MPJG engine which has a Tecalemit bracket between the block and the filter housing.
Much has been written about oil filter converters using custom made parts and parts from much later engines. The advantage of Lech’s conversion is that no extra pipe work or additional metalwork is necessary. I decided to make this from aluminium as a bar of suitable diameter was available. This needed a threaded steel sleeve for the screw-on filter for wear reasons. The complete original working drawing is shown opposite.
The oil flow for the original felt type filter was from the centre of the filter to its outside. This converter causes the oil to flow from the outside of the filter to its centre as is usual for modern filters.
There are two types of oil filter bracket for the MPJG engine. For early blocks the bracket is mounted below the oil gallery and two oil pipes are used, one from the oil pump to the bracket and one from the bracket to the block oil gallery. This bracket was changed for later blocks to the type which is bolted to the block at the oil gallery.
The later bracket has a bypass valve which should be blocked similarly to that shown. In the photographs, both sides of the converter are shown with the later Tecalemit filter to block bracket. This type of bracket is used on MPJG Engine no.1025 which came with my TA no.0844. As it was in very good condition this converter was ideal.
The upper photo of the two above shows the top of the converter and the Tecalemit bracket as fitted to the block. The lower photo shows the filter screw on the side of the converter and the bracket by-pass hole filled with a grub screw. There should be an annealed copper washer under the screw which holds the converter to the bracket. A suitable washer is a top bearing washer from an SU ‘H’ type carburettor, part number AUC 2122. This will need a slight increase in its internal diameter.
At the final assembly (photo, right) the converter is positioned between the oil pump and the breather pipe with the thread on the converter fixing screw secured with Locktite 243 Threadlock. Between the converter and the Tecalemit bracket I used a flat rubber ring, this was from my spares box, its origin is unknown. Its dimensions are 50mm inside diameter 59mm outside and about 1.5mm thick. As an alternative I think that a thick paper gasket and suitable gasket cement can be used.
Suitable filters are: Fram PH966, Unipart GFE 443, Champion C 103, Motoquip VFL 101, Crossland CRO 642, Cooper Z25, Wix WL7098, Hof 203, Delphi FX0004.
Many thanks to Lech Zakrzewski for the drawing (above) and details.
This website uses cookies to improve your experience. We'll assume you're ok with this, but you can opt-out if you wish. Cookie settingsACCEPT
Privacy & Cookies Policy
Privacy Overview
This website uses cookies to improve your experience while you navigate through the website. Out of these cookies, the cookies that are categorized as necessary are stored on your browser as they are essential for the working of basic functionalities of the website. We also use third-party cookies that help us analyze and understand how you use this website. These cookies will be stored in your browser only with your consent. You also have the option to opt-out of these cookies. But opting out of some of these cookies may have an effect on your browsing experience.
Necessary cookies are absolutely essential for the website to function properly. This category only includes cookies that ensures basic functionalities and security features of the website. These cookies do not store any personal information.
Any cookies that may not be particularly necessary for the website to function and is used specifically to collect user personal data via analytics, ads, other embedded contents are termed as non-necessary cookies. It is mandatory to procure user consent prior to running these cookies on your website.