Category Archives: Issue 13 (August 2012)

The Editor

Welcome to Issue 13, August 2012. The number thirteen is unlucky for those of a superstitious nature – I don’t consciously worry about this but sub-consciously I must as I always take extra care when crossing the road on Friday the thirteenth!

I’m not sure if “unlucky” is the right word but I have in fact struggled with this issue of TTT 2. I can’t put my finger on it, but for some reason it hasn’t ‘flowed’. Maybe I’ve been spending too much time on the J2, which hopefully should be on its wheels very soon.

A lousy summer here in the UK doesn’t do much to lift one’s spirits – the weather has been appalling with hardly one consecutive dry day for months. It’s been the same in Sweden according to my friend Gabriel Öhman but he did brighten my day recently when he sent me this reminder of summertime.

Over the last couple of months there have been two opportunities to meet MG friends from Australia and the USA. In early June we met up with Doug and Julie McWilliam from New South Wales. Doug had ordered some polyurethane bushes from me but said he would collect them in person as he was taking a canal boat holiday not far from where I live. We had arranged to meet up in a Bristol hotel but I did a bit of detective work and found out when and where Doug was handing the boat back. Armed with this information we organised a welcoming party of five MGs. Doug wasn’t expecting this and was quite overcome! The photo shows the editor and Doug inspecting a TD. My thanks to those who turned out in their T- Types on the day, there are more photos later in this issue and the caption records the names of those who were present.

In late June we met up with Tom Wilson from Indianapolis. Tom has been over here on a couple of previous occasions and is a regular visitor to the British Motor Industry Heritage Trust (BMIHT) archive at Gaydon, where he spends hours researching MG T-Series history. We met up with him at the BMIHT and drove to a pub in Gaydon village where we enjoyed a drink and a meal. The photo shows from left to right John James (Editor), Tom Wilson, Graham Walker, Brian Rainbow. That’s Graham’s TC in the foreground and you can just see part of the windscreen and steering wheel of Brian Rainbow’s TA.

I was hoping to be able to give you a half year report on the finances but this will have to wait until the next issue as I have not had time to ‘get my ducks in a row’. Suffice to say that the finances have been transformed this year due to donations received over and above the cost price of spares charged, notably the polyurethane bushes. A small increase in the number of ‘hard’ copy subscribers has also helped with the unit cost of the magazine. However, the swingeing increases in postage, particularly the overseas mailing costs have been extremely unwelcome.

Just enough space left to tell you about a Tour I am organising in September, 2013. It is the TTT 2 Tour of Rutland and takes place on Saturday 7th September and Sunday 8th September. Rutland is England’s smallest county but there is plenty to see and do. All XPAGs and XPEGs are welcome, and indeed any other engines! If you are a reader, but don’t own a T-Type (or Y-Type) but are looking for one, it might be an ideal opportunity to come along and see the cars at first hand. Full details of the Tour and how to book are given in this issue.

JOHN JAMES


DISCLAIMER BY THE EDITOR

Totally T-Type 2 is produced totally on a voluntary basis and is available on the website www.ttypes.org on a totally FREE basis. Its primary purpose is to help T-Type owners through articles of a technical nature and point them in the direction of recommended service and spares suppliers.

Articles are published in good faith but I cannot accept responsibility or legal liability and in respect of contents, liability is expressly disclaimed.

Front Cover – TA0355

MG TA Airline Coupe
TA Airline Coupe – photo taken by Wolfgang Fischer with his vintage Leica camera when the car was in his ownership in Switzerland

History – Special bodied cars

Right from the vintage era, special bodies were available on MGs. As early as 1927 the Company was selling chassis to specialist coachbuilders. Some 18/80 models were built by the Factory to special order, taking account of the buyer’s wishes as to how s/he wanted the car to be different, some were bodied by coachbuilders e.g. Carlton.

The Jarvis bodied M-type was available for the princely sum of £255, quite an increase on the £185 price tag of the standard model. The J2 was not to be found with a special body in any great numbers (one might argue that the archetypal sports car should not be re-bodied!) whilst the F- type, particularly the F1 (4-seater) was altogether more in demand from the specialist coachbuilders; a few D-types also.

By the time the P-type was introduced a special bodied option known as the Airline was available. The Airline Coupe body was designed by Henry Allingham in 1934 to embody the design concept of “Art Deco” at its peak. The Airline was available on both the P-type and N-type chassis and though relatively expensive, it sold in reasonable numbers.

I checked out the Airline statistics with Lew Palmer, Registrar of the North American Triple-M Register {NAMMMR} (Lew’s car is pictured below) and he came up with the following:

MG PB Airline Coupe
PB Airline (PB0560) owned by Lew Palmer
MG PA Airline
PA Airline PA1811 owned by Lou Louchios
MG Airline Coupe Statistics

Note: Only survivors which retain their Airline Coupe body are listed. A number survive, but only exist in another form, usually a 2-seater. One of these (NA0540) was a 2-seater special race car for the last 60 years but is currently being returned to Airline Coupe configuration.

The MG TA Airline

In his excellent book Original MG T Series, Anders Ditlev Clausager lists two TA Airline examples as having been built, both in 1936. However, only one of these (TA0355) is a known survivor with continuous history; the account of the provenance of this car forms the basis of this article.

Quite recently, a photograph which appears to confirm the existence of a second TA Airline has appeared in the May, 2012 issue of Enjoying MG, the monthly magazine of the MG Owners’ Club:

MG TA Airline AMO 825
Another TA Airline? AMO 825 (thought to be built on the chassis of TA2210)

The photograph was sent to the magazine by Sherryl Healey, who was enquiring as to the current whereabouts of the car on behalf of a friend.

AMO 825 is stated to have belonged to Mr. J Witney of Wallington, Croydon in 1936/37 and then to his son in 1951/52. According to Mr. Witney’s daughter (on whose behalf Sherryl Healey is seeking information about the car) the TA was bought by Mr Witney senior from Donald Healey, who had stayed with the family during the First World War. The car has happy memories for Mr Witney’s daughter as she was allowed to borrow it for her touring honeymoon.

The above information came to the attention of Roy Miller, the Historian of the ‘T’ Register of the MG Car Club who wrote to the Editor of Enjoying MG. An extract of Roy’s letter follows:

There have been various reports of the second TA Airline coupe but far less is known of that car. It appears that AMO 825 was built in March 1938 using the chassis of TA2210 and registered in Berkshire. Little had been heard of this car until the late 1970s when it was reported that the derelict remains were sadly broken by a well known trader, now deceased, who sold on the chassis only. The chassis of TA2210 was sold again in August 1996 to another T Series enthusiast who built it into a road-going open, two seat special bodied car in the style of a Q Type Midget developed by Abingdon in the mid 1930s for competition. This much modified TA was registered as MG 4463 and used by the builder until his death after which it is understood to have been sold at auction to a Swiss buyer.

The attentive reader will have noted that TA2210 was built by the Factory in 1938 (actual date of production was 14th March, 1938) whereas the date of 1936/37 is mentioned as being in Mr Witney’s ownership and Donald Healey is said to have owned it prior to Mr Witney senior. This needs to be checked out. It is always possible that the car originally left the Factory as a ‘standard’ TA and an Airline body was retro fitted.

The History of TA0355

TA0355 was built by Abingdon on 27th July, 1936 and was fitted with engine number MPJG 622. The Factory Build Book (which is the only surviving record of T-Type production details) does not state if the car was produced just in chassis form.

MG TA0355 Bill of Sale
The original bill of sale for TA0355

The first document which exists on the car is the original bill of sale (right) dated 1st December, 1936 for the sum of £298-14-9 raised by Wheatley & Knight of Cole Green, Hertford. It is not clear why there was such a long interval between production at the Factory and sale. The fitment of an Airline body was supposed to take four weeks. We know this to be the case because it is stated in a letter dated 16th July, 1938. The letter from Henry W. Allingham (Motor Vehicle Consultant, Body Design and Construction) of 10 Stratford Place, LONDON W1 to a Mr. Steek of Stratton-on-the Fosse, Somerset reads as follows:

In reply to your letter of the 15th instant, I have pleasure in sending you herewith a leaflet describing M.G. Series T. M.G. Airline Coupe, which I trust reaches you in good order.

These bodies are in stock ready for mounting on the Model T. chassis, and delivery takes about 4 weeks from receipt of chassis.

MG 4952
Two views of TA0355 after its repaint

By the time Henry Allingham wrote to Mr. Steek, it seems likely that the majority of Airline bodies (made by Carbodies of Coventry) would have been used up on the overhead camshaft cars (the P/N models) and by 1936 they had ceased production. Therefore, when the TA came along, it would have been something of a bonus to be able to make use of any surplus. However, the time for delivery quoted by Henry Allingham may have been on the optimistic side as it would have been a case of employing the art of the coachbuilder to find a solution to the ‘one size fits all’ Airline body as had been done to accommodate the differences in the P-type and N-type chassis. The TA chassis would have presented a new challenge being more akin to the P-type chassis but with the wider track of the N-type.

The invoice of nearly £299 was a hefty premium on the £222 price tag of the standard TA (although knowing what we now know it would have been well worth it!). The Airline was a gift to Jean Maitland from her father and the invoice was made out to her. The colour was duo tone green and carried the registration mark MG 4952. The previous but two TA chassis (TA0352) was registered as MG 4950.

MG 4952 remained in the same ownership for twenty five years until it was purchased in 1961 by Peter Lines of Salcombe, Devon. Peter was a 17 year old enthusiast and the car was registered in the name of Edward Lines, his father. The Airline was completely renovated over the next two years, including an engine rebuild and a repaint in red. By 1963 it was back on the road and was in daily use until it was sold to the Bone brothers (MG second hand dealers) on 8th October, 1971.

MG TA0355
TA0355 in the Bones’ yard in 1971/72

The Bones sold the car to Martin Shantz, a movie producer, living in Pennsylvania, USA on 27th February, 1972. The sale price was $3,400, which included shipping. The Airline underwent another colour change during the brief period of Martin’s ownership and was now silver over black.

In only a matter of months TA0355 changed hands again. Reputedly, to help finance a new film, the car was sold at auction in April, 1972 and was bought by Mark Gibbons of Cambridge, Mass, for the reserve price of $4,600.

Apparently, Mark did not get off to the best of starts with the Airline and he arrived home in Cambridge (some 350 miles from the auction venue) with two flat tyres and with oil in the radiator. Undeterred, he brought the car back to her former glory with a complete restoration, including a change of colour to ‘black over gold’ (its present colour scheme).

The Airline won its class in the New England MG T Register’s ‘Gathering of the Faithful’ event in 1975, having just had its restoration completed. In 1986 Mark sold the Airline to Kurt Baer and Wolfgang Fischer in Switzerland for $65,000. Having previously crossed the Atlantic by sea, she crossed by air (KLM Airfreight) this time. However, on arrival in Switzerland, Kurt found the car too small and sold his share to Wolfgang shortly afterwards.

After another twenty seven years the Airline, affectionately known as “Grace”, was offered for sale and acquired by Colin Schiller and Tony Slattery of Queensland in early 2012. The much travelled “Grace” went to start a new life in Australia via the Mediterranean Sea and the Indian Ocean.

So, quite a story for a car that has experienced life in three continents and has well documented continuous history. Now resident in Australia, she joins another Airline Coupe (PA0286), the very first Airline to be built and living in Western Australia. Although it is a long way from South East Queensland to Western Australia it is hoped that the cars will meet one day.

Tony Slattery’s wife, Debbie giving an interview for television at the 2012 NatMeet in Tasmania

Four more ‘shots’ of “Grace” – the second photo shows the long bonnet particularly well.

Joint owners Tony Slattery and Col Schiller with ‘Grace’ at the Victorian MG Club Concours 29/4/2012

Whilst in the course of preparation of this article, Terry Andrews told me about one example of a TD Airline Coupe which exists in the USA. The car does not carry an original Airline body, but was specially fabricated. Some photos, kindly sent by Terry follow:

MG TD Airline Coupe
MG TD Airline Coupe
MG TD Airline Coupe

Article complied by John James with grateful assistance of Tony Slattery (joint owner of TA0355), Terry Andrews (for information on fitment of body to chassis and TD photos), Lew Palmer (for production and survivor statistics), Roy Miller (for TA2210 history details), Richard Ladds for permission to reproduce photo of AMO 825 from Enjoying MG and to Dave Lawley, Editor of The Sacred Octagon.

Postscript

When I first contemplated preparing an article on TA0355 the existence of the photograph of AMO 825 was not known about. There is now an opportunity to fully research the history of this car and I am aware that further photos are available.

One particular mystery is that Clausager records two TA Airlines as being built in 1936 but AMO 825 (Chassis TA2210) was built on 14th March, 1938.

Help at hand for Incontinence

XPAG Oil Leak Tray
Help at hand for Incontinence: a discreet offering from David Pelham

The XPAG engine is well known for its oil leaks and in particular, the one from the rear crankshaft seal. My cars have regularly dripped oil from the bottom of the bell housing on to my drive so I thought that it was time to fit an ‘Oil Catchment Tray’ so that oil escaping from the bell housing could be caught into a container, rather than being liberally dispersed on my drive and anywhere else that I parked. However, when I enquired about finding a suitable product on the market I was astounded to find nothing suitable. There were two companies supplying, what appeared to be an identical product, which consisted of a small container, similar to a square ‘Baked Bean’ tin affixed by a single bolt in the centre of the bell housing, but this appeared to be somewhat basic although costly (in excess of £62 plus P&P). I therefore decided to commission my own.

Fortunately, I had a spare XPAG bell housing so getting an exact profile, using the bottom three bolts of the bell housing, was relatively easy. However, I hadn’t envisaged quite so many problems with the prototype before production could finally commence. In order to maximise the oil catchment I wanted the tray to be as wide as possible. Additionally, as there was an obvious ‘niche’ in the market for the product, I decided that whatever I ended up with should fit all XPAG cars e.g. TB/C/D/F, Y saloons and Y Tourers.

The two main problems in the ‘one size fits all’ approach were coping with the exhaust pipe routing differences and the ‘finned’ sump on late TDs and YBs. The exhaust system on a TC and TD is fixed to the offside of the car (RHD), whereas the exhaust pipe on a Y, both Saloon and Tourer, is fixed to the nearside of the car. The location and size of the various exhausts determined the shape of the final product, as sufficient space had to be left to accommodate the various positions of the exhausts.

It is vital when fitting an oil catchment tray that the split pin hole drain in the bell housing operates freely and therefore this was also a major consideration. The split pin hole on ‘finned’ sumps, fitted to later TDs has minimal space between the side of the sump and edge of the catchment tray. The third prototype was made 67mm in width, the maximum achievable to facilitate the finned sump.

The two prototype catchment trays were successfully tested on a TD and my own YA/YT and I ordered a pre-production run of fifteen for further tests before ‘I pressed the button!”

Once I had a ‘successful’ report of a fitting to a ‘Finned’ sump TD I contacted an owner, who had seen a prototype at the MG Spares Day at Stoneleigh and expressed an interest. I sent one off to him, full of confidence that all would be well. What I did not realise was that he had a ‘Hi Gear’ five speed conversion on his TD – another variant that I had not catered for! He kindly took the trouble to explain that as the ‘Hi Gear’ bell housing is thicker than the MG one, the front of the drip tray does not go far enough forward to be under the “drip hole”. He went on to say that in order to rectify this he had cured it by bending the front face of the drip tray about 1/8th inch forward and with some other minor fettling the problem was solved!

XPAG Oil Leak Tray fitted to MG TD with 5-speed gearbox conversion
Tray fitted to a TD with 5-speed conversion

These Oil Drip Trays have now been fitted to a number of cars and orders have been received and fulfilled not only in the UK but also in Continental Europe, Australia and the USA. Response has been highly favourable. The oil drip tray is made from aluminium, weighs approximately 230 grams and has a 3/8 inch BSP drain with a 5/8 inch Hexagonal Sump plug. (Earlier drip trays had an Allen Key Sump plug).

The latest Drip Trays are first ‘Laser Cut’ to ensure accuracy before welding. They have a capacity of 250ml, which means that even with the ‘leakiest’ XPAG the drip tray should not require draining too often. They can be painted to match the sump and really do not look out of place; it could almost be an original fitting. The cost is £40 plus postage and packing and can be obtained from me at dapelham ‘at’ btinternet.com Whilst an XPAG engine is renowned for leaking, this enhancement not only reduces the amount of oil on my drive but avoids embarrassment when I park on somebody else’s!

XPAG Oil Drip Tray - Bottom

HUM 7 (TB0440)

The following has been received from Mike Sherrell:

“Read with interest about HUM 7 (cover of TTT 2 issue 11). Thought you might like to know a bit more about its stay in Western Australia. I went to the Fremantle docks with John Hunting on the day he picked up the TB Tickford, (TB 0440), as I was very interested in these rare MGs at the time.

TB0440
TB 0440 at Fremantle docks 1978/79?

The car was bought sight unseen from a Harry J Sibberly in the UK. John recalls it “didn’t look too bad in a nice dark blue paint job, until we got it home. Tugging at the bottom corner of the near side door, it began to peel away in a nice sheet of newly painted aluminium foil. Underneath and to our horror it began to reveal a pastiche of chook wire, concrete and newspaper. In fact, the entire car hardly existed at all, up to the door handles. Concrete running boards were a feature”. A lesser man would have been reduced to tears. As it was, it set J.H. on the road to many breathtaking Pre-War MG restorations.

John restored the car up to primer stage, but before it could be completed it was sold to Harry Pyle who did some more work on it before selling it to a buyer in the USA.”

Mike Sherrell

Ed’s Note: This photo shows the magnitude of the task faced by John Hunting.

MG TB Inner Guard
Photo 1 – Inner guard – how rusty is rusty?

This photo shows the new rear section of the body taking shape.

MG TB Body
Photo 2 – new rear body

According to John Hunting, the original colour of HUM 7 was red, including visible parts of the chassis.

MG TB Tickford Interior
Photo 3 – Interior of HUM 7 as she is now

NEW MG TC LIGHTING – See and… Be Seen!

MG TC Lighting
Top row: original bulbs. Bottom row: modern bulbs. Application for bulb group left to right: Headlamp, side lamp, D-lamp, panel light, fog lamp.

Recent technologies have improved the lighting on modern vehicles. This leaves the original MG TC lighting somewhat in the dark. What can be done to improve the TC lighting? Tungsten, Halogen, LED? Let’s “see” what is available today.

The following technologies are the choices we have for TC lighting:

Tungsten: The TC was born with Tungsten lighting. Same technology as the house light bulb.

Halogen: The halogen bulb has about the same power draw as a tungsten bulb but provides 30-40% more light. It is much brighter.

LED (light-emitting diode): This is a solid-state technology that is very efficient. LED has about 1/10th of the power draw compared to tungsten and is bright. Polarity (+/-) sensitive.

Depending on the application, the best suited technology may be different. Below is a summary of items (and item #’s) that are the recommended replacements for each stated application. As an aggregate, this set would provide an “optimum” and complete update to the TC lighting.

Headlamp: EL602 – Halogen double filament 35W/35W bulb. Same bulb base as original, simply remove old bulb and replace with the new bulb (R&R).

Sidelamp (single filament): EL610 – LED Positive Ground (+). To install: R&R.

Sidelamp (double filament): EL612 Halogen double filament 35/5W. To install: R&R.

Dash, Map/30 light (single filament): EL610 – LED Positive Ground (+). To install: R&R.

Dash, Instrument Lighting: EL622 – LED Positive Ground (+), There are 6 screw-in bulbs on backside of dash. (2 Speedo, 2 Tach, 1 Oil, 1 Amp). To install: R&R.

Foglamp, FT27: EL625 – Halogen single filament 50W bulb. To install: R&R.

Foglamp, SFT27: EL627 – Halogen single filament 55W bulb. To install: R&R.

For the D-Lamp, you have some additional choices depending on the type and condition of your existing lamp.

If you have an original split lens D-lamp with good internal adapters:

Tail Lamp: (Stop light bulb) – EL613 Halogen single filament 35W bulb. To install: R&R.

Tail Lamp: (License bulb) – EL610 – LED Positive Ground (+). To install: R&R.

If you have a single lens D-lamp with a good internal adapter:

Tail Lamp: (Stop/tail light bulb) – EL615 – Halogen double filament 35W bulb. To install: R&R.

If you have an original split lens D lamp with poor internal adapters or you want to convert to internals to a complete new LED panel:

Tail Lamp: (Stop/tail light) – EL618 (+) or EL619 (-) LED replacement panel. Installation required. Remove old internals and replace with solid state LED dual panel.

For further information on how best to improve your MG TC lighting please contact me directly.

Doug Pelton
[email protected]

The Resurrection of TA0844 (Part 6)

In this article I have illustrated the rest of the extras for TA0844. I hope to cover the lighting arrangements in a later article I have been asked where I had purchased the BX44 fan belt. This and many bearings came from Bearing Boys Tel: 01233 822150.

A speedometer cable square drive to Yeager Tube

I had a new speedometer cable with a square drive at the instrument end which is for a later T- Type. A converter from square drive to Yeager tube would eliminate the need to purchase another cable. This is illustrated in the drawing and photo. I used some thin wall brass tube of 5mm OD having an inside diameter such that it could be tapped square around the square cable inner and then soldered into a hole in the Yeager tube drive inner part. The protruding brass was turned to finish the end. The outer part was threaded to accept the cable outer cap. The inner part is a sliding fit in the outer. Both parts were made from stainless steel. The brass tube can be found at most model components suppliers.

Cable End Converter Drawing
Drawing 1 – cable end converter drawing
Cable End Converter Photo
Photo 1 – Cable End Converter

Modified petrol change-over tap

The petrol feed change-over tap is a potential source for a fuel leak because of its cork seal. In an article in the MGOCC Bulletin for December 2011, J.E.Harris illustrates in detail how to modify this tap to incorporate a PTFE seal. The external appearance of the tap is unchanged. A short piece of PTFE rod is not easy to obtain but I was successful on eBay.

An alternative to this arrangement has been suggested by Keith Gordon in a letter to the MGOCC Bulletin, February 2012.

The oil pressure switch

I purchased an oil pressure switch from GL autos: E-mail glautos ‘at’ hotmail.com (Item No.140740000053). It operates at 17.4 to 23.2 psi and switches to earth for ‘on’. An operating pressure of about 50 psi may have been more desirable but one could not be found at a reasonable cost.

I made an adaptor from 5/8inch square brass bar to fit the oil gauge exit on the engine block (1/8 BSP). The switch is screwed into the top (M10x1) and the oil gauge feed screws on the end (1/8 BSP) The switch was supplied with a sealing washer. The washer for the adapter to block was selected for thickness for the adapter to arrive in an appropriate position for the switch connection.

The switch is open circuit for no oil pressure and short circuit when the pressure is above the operating point. The open circuit state is converted to 12v to drive a warning light and the same buzzer as is used for the indicators.

MG TA Oil Pressure Switch
Photo 2 – oil pressure switch and adapter (see photo 4 to view the switch in position)

Brake lamps switch

The idea for this came from an article in the MGOCC Bulletin by Ernie Preston.

The brake lamp switch is fitted to a banjo bolt on the back of the master cylinder. The original banjo bolt is not big enough to accommodate the thread for the switch so I used a banjo adapter bolt from a TD no. 27H167, which is also the Moss number. I used a hydraulic switch Lucas 34765 as used for the TD which I obtained at autojumble. There is a later switch with a similar shape but with push on connectors which is probably more easily found.

The Lucas switch has a 1/8 NPT thread. I did not have this size of tap so I turned down the thread and rethreaded it M8x1. I drilled out the thread from the new banjo bolt and silver soldered in a steel plug. I drilled this and tapped M8x1 to fit the switch. The original bolt has two exit holes but the TD bolt only has one, therefore drilling is necessary.

Also required are three copper washers. The banjo washers are Moss No. 324-908 (unfortunately only sold by Moss as a car set of twelve), and one for the switch. I used one from my spares bin.

MG TA Brake Switch
Photo 3 – from left to right, the original banjo bolt, the TD banjo bolt, the modified union, the modified switch (see photo 5 to view it in position)

Indicators

As stated in my last article I have converted to negative earth to enable the installation of LED lighting, except for the indicators. Having decided to use LEDs for all lighting (except the headlights) I have now replaced the indicators relay for conventional bulbs with an electronic indicators relay. The relay was supplied by Vehicle Wiring Products. It was a three pin relay no. LED02 rated at 10watts. As it is silent in operation an audible warning is desirable. I used the circuit shown to isolate the 12 v from the indicators relay to drive the buzzer. A feed from this circuit connects to the green 30mph led warning lamp.

The buzzer used was a very cheap one from the Maplin Electronics range which will have to be changed if not loud enough. All other components came from my spares bin but can be obtained from any electronic components supplier. I soldered the circuit components to a section of Vero board and remodelled the indicators switches mounting bracket, which was described in the June issue, to include side lugs and to accept the circuit board. Its connector will plug into the six-way connector on the dashboard.

Bob Butson

Ed’s Note: One more diagram and five photos follow:

MG TA Indicators Circuit Diagram
Diagram 2 – oil pressure and indicators circuit
Oil Pressure Switch
Photo 4 – oil pressure switch in position
Brake
Photo 5 – brake light switch in position
Buzzer Circuit Board
Photo 6 – buzzer circuit board, indicators switches
Connectors and Indicators Panel
Photo 7 – connectors and indicators panel
Driver's View
Photo 8 – driver’s view

Ed’s Note: Bob mentioned the BX44 fan belt which he purchased from Bearing Boys. This has reminded me that Brian Rainbow has recently done some research on prices of regular service items for the TA model and the fruits of his labours are as follows:

Part DescriptionBest Price (£)Supplier
Contact breaker points 4004157.00JB Vintage Spares
Condenser 4003086.97Octagon Car Club
Distributor cap 40013519.50JB Vintage Spares
Rotor arm 400051 4054682.50London Classics
Top hose14.00JB Vintage Spares
Bottom hose set12.00MOSS
Core plug 39mm0.60Octagon Car Club
Fan belt 44 inch5.35Bearing Boys
Oil filter (felt)13.50Grove Classic Motorcycles
Thermostat (bellows type)55.00Barrie Bishop Scunthorpe
Ignition coil (screw type)12.50JB Vintage Spares
Front hub inner bearing 62053.47Bearing Boys
Front hub outer bearing 63044.00Bearing Boys
Rear hub bearing 62088.02Bearing Boys
Front hub oil seal 48 x 62 x 83.89Bearing Boys
Rear hub oil seal 1 1⁄2 x 2 1⁄4 x 0.33.61Bearing Boys
Brake linings and rivets – axle set35.90NTG
Brake shoe set (no exchange)75.00MG Centre Wrexham

Notes:

For the purpose of price comparisons, the advertised prices of four main suppliers were recorded. The four suppliers were: MOSS Europe, NTG, Brown & Gammons, Octagon Car Club.

The contact details for those suppliers who offered one or more of the best prices are as follows:

JB Vintage Spares – www.jbvintagespares.co.uk
Octagon CC – www.mgcars.org.uk/octclub
London Classics – stores.ebay.co.uk/London-Classics
Bearing Boys – www.bearingboys.co.uk
MOSS Europe – www.moss-europe.co.uk
Barrie Bishop Scunthorpe – www.ebay.com
NTG – www.mgbits.com
MG Centre Wrexham – www.welshmg.co.uk
Grove Classic Motorcycles – www.groveclassicmotorcycles.co.uk

All the prices included VAT, and were like for like. They were obtained via online searches a few weeks ago. For a number of the suppliers, such as JB Vintage Spares, London Classics, Barry Bishop, MG Centre Wrexham, the prices quoted were taken from e-Bay searches, not their websites. Quite a few suppliers sell on e-Bay and sell the same parts a lot cheaper than on their website. You can of course use MG AuctionWatch (the website which lists and categorises by model, all MG parts on eBay). Use the T-Types ‘All Parts’ search facility. The above prices may no longer be applicable, but give an indication of who was the cheapest supplier at a given point in time. The motto is ‘check before you buy’!

Trial by Trunnion (Part 2)

Dick Knudson described how he and his son Erik fitted replacement rear trunnion repair tubes to Erik’s TA in the April issue of TTT 2. Not an easy job, especially if you haven’t tackled it before.

The rear trunnion housing can be found to be badly worn on some cars and is worth checking, since the consequences of the main leaf of the rear spring parting company with a worn housing are not pleasant.

The cause of wear is lack of lubrication and this is generally brought about by the use of grease in the grouped nipple lubrication system, which can dry out and effectively block the thin bore of the brass lubrication pipe, which is designed for oil, not grease. It doesn’t help that the rear trunnion lubrication points are the farthest away from the oiling nipples which are situated towards the front of the car.

The TA and TB share the front and rear trunnion suspension arrangement with the Triple-M cars and some of the part numbers are the same as demonstrated below:

Part DescriptionMMM #TA/B #
Trunnion roller819MG681/125
Washer for ditto820MG681/126
  MG681/127
Distance piece 873873
Cap for x-tube872872
Greaser/set screw874874

So far as I can tell, the parts are identical even though the part numbers are different in some cases. The exception is the washer (820 for MMM) – MMM cars have only the one, but the TA/B has two MG681/126 (outer washer) and MG681/127 (inner washer).

A drawing for the MMM arrangement follows and after that is a photograph of the MMM components.

MMM Trunnion
MG MMM Rear Trunnion Components
Photo 1 – Rear trunnion components MMM (TA/TB are identical apart from the washer)

If you are wondering about the trunnion housing in the photo, it is not a repair tube but a sawn off length from an old cross tube. I had a complete cross tube made some years ago and I kept the old pieces (never throw anything away!).

Trunnions
Photo 2 – showing trunnions located in the housing

When fitting trunnions make sure that the slots are a good sliding fit on the main leaf and that the trunnions themselves are a good fit in the housing (tube). When the cap is tightened (remember that it is a left hand thread on both sides) there should be no detectable lateral movement.

Before fitting the leaf spring I get an old length of spring and after tightening everything up I make sure that the trunnion rollers are rotating OK. Having checked this I then dismantle and fit the spring.

I have had a small batch of phosphor bronze trunnions made with a 1⁄4” slot (OK for rear spring and for front if you have replacement springs on the front). The price is £6.50 per trunnion, which is cost price but I would appreciate a donation of £1.00 per trunnion for my TTT 2 fund – they are still keenly priced compared with those elsewhere.

MG Insurance Quotes

As I own two Triple-M cars in addition to TC0750 I occasionally read the Triple-M Bulletin when I remember to download it from the Triple-M website. One comment which I took careful note of was the following from the April, 2011 editorial of the then Editor, Phil Bayne-Powell:

In the current climate of escalating insurance premiums it is even more important to shop around. Footman James had the audacity to try and charge me 50% more, when I advised them that I wanted to reduce the number of cars insured from four to two – i.e. a 50% reduction in car numbers. I shopped around and got a quote at 43% less from Hagerty (0844 8241134), who seem to be run by classic car enthusiasts.

When I received my insurance renewal from Footman James (FJ) for the PB this year I noted that it had increased from £181.10 to £216.08, an increase of just over 19%. Recalling Phil’s comments in his editorial, I decided to shop around. Peter Best Insurance (PBIS) quoted £226.62 – the quote being based on me stating that the car is above average condition and being a member of the Octagon Car Club. When I asked if the quote would be lower if I joined the MGCC I was told that it would make no difference as the rate quoted was the rate for members of car clubs.

I then tried RH Classic Car Insurance (01277 206911) who quoted me £169.50. As the quotes were getting better I tried Hagerty (01327 810600) and Heritage (0845 330 0660). Hagerty quoted £136.48 and Heritage £132.90.

I decided to go with Hagerty because I like their set up and I valued their customer interface. Having said this, Oliver Saunt, who dealt with my quotation from Heritage was very good.

When I received my renewal from FJ it was based on my valuation of £18,500. This was what I paid for the car 13 years ago so I decided to go back and ask for agreed valuation of £30,000. They came back with a revised premium of £288.16.

As with all insurance quotations it is important to read the small print. All the quotations from the companies mentioned above were on the basis of an agreed valuation of £30,000, only me driving and being a member of the Octagon Car Club. The only exception to this was that I have always kept my 33 year old son on the policy with Footman James and the FJ quote was on this basis. However, he does not feel comfortable driving the car so there is no point in including him in the policy. I doubt if removing him from the policy would have significantly lowered FJ’s quote.

On the basis of my experience this time around, I doubt if I will seek quotes from FJ and PBIS again.


The TTT2 Tour of Rutland

Bits and Pieces

Lots more room for this item this month!

The Highs and Lows of Sourcing Parts

I’ll start with a ‘High’ but it then goes rapidly downhill!

I have been really pleased with the success of the polyurethane bushes for the TC and TD/TF. It’s good to receive feedback, favourable or otherwise and I have had plenty of the former. A recent satisfied customer e-mailed me as follows:

The poly bushes you supplied for the TC front springs have been very successful. They are the exact size, easy to fit and are an instant improvement to the car’s steering. Gone is the vicious oversteer when cornering hard and then hitting a pothole. Straight line steering is much improved and now it is nearly possible to drive in a straight line! We took the car to Castle Combe to a track test day and proved the benefits again.

Just a reminder, the 3⁄4” bushes (Part number 0074) fit the rear shackle pins on the TD/TF and YA/YB/YT) – eight (8) required per car. They also fit the front chassis tube on the TC – four (4) required per car. The 5/8” bushes (Part number 073) fit the rear ‘eyes’ of the front and rear leaf springs on the TC. Eight (8) of these are required for the TC.

The bush sets are supplied with sachets of special assembly lubricant and come well packed in a little box. As the bushes are light, postal charges are fairly moderate with typical costs being £2.30 (UK) £3.00 (EU) and £4.00 elsewhere.

As I own the moulds for these bushes and order in bulk, I get a substantial discount, which I pass on to TTT 2 readers. The cost per bush is £2.35 (which is exactly what they cost me, having amortised the cost of the two moulds over 600 bushes). In addition I ask for a contribution to TTT 2 funds of 50p per bush, which makes the effective asking price £2.85 per bush. Putting this price into context, the cost per bush from a major supplier is £8.35 and what is on offer is a “uni-fit” bush with the bushes for the front and rear leaf springs on the TC having to be trimmed to fit.

To order, please send an e-mail to John James at jj ‘at’ octagon.fsbusiness.co.uk (substitute @ for ‘at’) and I will send you a PayPal invoice. Alternatively, UK orders can be paid for by cheque and sent to 85, Bath Road, Keynsham, BRISTOL BS31 1SR.

Large Rear Shackle Bushes for the TC

Here’s the start of the downhill bit! No sooner had I read the e-mail from the satisfied customer quoted above when I opened the boxes of the large rear shackle bushes which I had collected a few days earlier. I was on the point of starting to send out the orders on hand when I thought “better make sure they are to specification first”. To my shock and horror they were not, being almost 1/8” short in the length. How this error could have occurred I know not, but I now have 100 scrap bushes.

By the time you read this I will have contacted the supplier and asked him to put matters right.

Rear Springs for the TC

On 22nd May I ordered eight (8) pairs of TC rear springs with a requested delivery date of the end of June. Towards the middle of June I received a phone call from the supplier saying that he was closing for two weeks’ annual holiday on 22nd June and whilst he had made all the main leafs, he was waiting for more steel to be delivered to finish the order. The indicative delivery date (the springs will be sent direct from the supplier’s premises) is now end of July.

Since I placed the order for the eight (8) pairs I have now received a request for three (3) more pairs and so as not to give the supplier any excuse for further delay with the initial order I have not ordered these yet but will do so when I know that the first batch has been made. Therefore a second batch is unlikely to be ready much before end of August/September.

Front Springs for the TC

I have had a request for six (6) pairs of TC front springs which I have not yet passed on to the supplier. These will be made with a 5/8” front ‘eye’ to enable a 1/16” bronze bush to be pressed in. The bronze bushes (SAE 660) are being made separately and I still have to resolve the issue of whether the spring supplier will fit the bushes or whether the bushes are sent out independently of the springs for them to be fitted locally. A delivery date of end of August/September is being aimed for.

Phosphor Bronze Trunnions for TA/TB

As mentioned earlier, I have organised a small batch of trunnions for the rear springs on the TA/TB (and for front if you have replacement springs with a 1⁄4” main leaf on the front). The price is £6.50 per trunnion, which is cost price but I would appreciate a donation of £1.00 per trunnion for the TTT 2 fund. They are still keenly priced compared with those elsewhere – one supplier is charging nearly £30 for a pair.

MG Trunnions

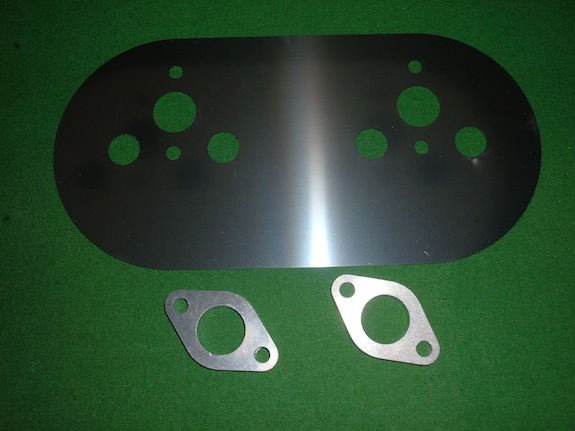
Heat Shields for TB/TC/TD and TF

MG Heat Shield

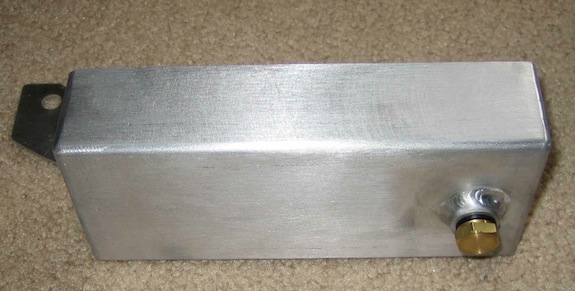
It doesn’t seem entirely appropriate to be talking about heat shields, given the British summer we’ve had (or not had) so far, but I have a few in stock which have been supplied to me by Barrie Jones, Technical Specialist for the ‘T’ Register of the MG Car Club. They are made from stainless steel and are priced at £15, plus postage. The TF heat shield has larger holes for the H4 carburetters and must be fitted along with the original TF spacers. The TB/TC/TD version has smaller holes for the H2 carburetters. To fit this shield to the TB/TC/TD you will also need the aluminium spacers shown in the photo (at £5 per spacer). This in turn will require longer exhaust manifold studs (not supplied), ideally 60mm long, with 20 mm of thread at each end. The threads should be 10×1.5 modern metric.

Some questions have been asked about the use of aluminium for the spacers. Here is Barrie’s explanation of the theory behind his design:

“The main problem with modern fuel seems to be the Ethanol content. This apparently slows down the burn so that the partially-burnt fuel continues to burn after it has been ejected from the engine. This raises the temperature of the exhaust manifold, and the radiated heat could boil the fuel in the float chambers.

The TC/TD float chambers are very close to the exhaust manifold, so:

1) The polished stainless steel reflects the heat away from the float chambers.

2) The spacers move the float chambers further away from the exhaust manifold, reducing the effects of radiation even more.

There is a secondary problem. When Ethanol vapourizes as it exits the jets of the SU carbs, this has a refrigerant effect. On a cold, damp morning it could cause any water vapour in the air to freeze, blocking the jets with ice. This happens in aircraft. Pilots are taught that icing-up of a carburetter can happen with air temperatures as high as 20°C (68°F).

So, by making the spacers from alloy I am trying to get MORE heat to the carb body whilst I am trying to get LESS heat to the carb float chambers”.

Did Jimmy Cox Work on your TC?

Jimmy Cox started work at Abingdon on 15th October, 1945. The Factory had just resumed car production after the end of the war, but the model which was being produced, the TC, (the post-war successor to the tragically short lived pre-war TB) was not being completed in any great numbers, nor were there finished examples on a daily basis. Much of this was down to material shortages in the immediate post-war period.

The day after Jimmy started in the Factory, eight TCs (chassis numbers TC0273 to TC0280) were built. The previous batch was completed on 28th September and it was not until 30th October that a further batch rolled off the production line.

Jim started out in life as a Messenger (he was hoping for an apprenticeship, but his father was told that no apprentices were being taken on). The young lad was itching to get a job on the production line and after a few months he progressed to ‘Tea Boy’ and standing in (for any absent colleague) on the line. Here the story ends, but it will be told in far greater detail one day.

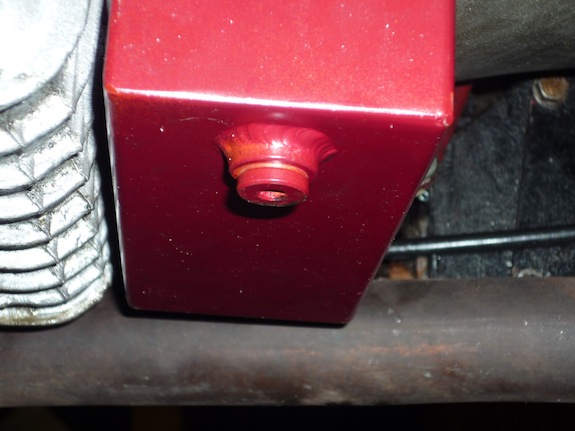
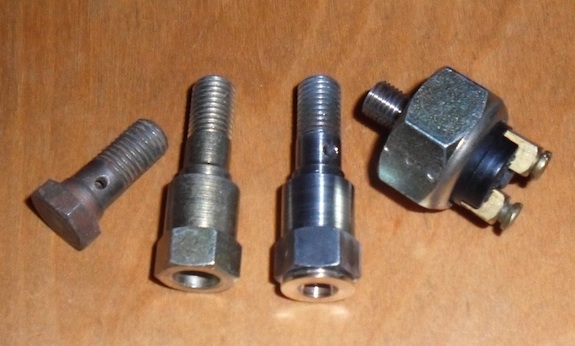
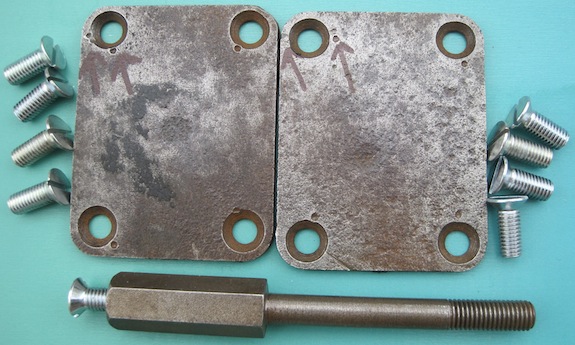
However, the purpose of this brief introduction is to advise those of you who have relatively early TCs (probably those manufactured in 1946) that you can tell if Jimmy helped to assemble your car by looking at the buffer pad which is located above each front spring and examining the punch marks at each corner. The 1⁄2” by 5/8” countersunk machine screws which attach the buffer pad to the buffer bolts (a buffer bolt and the screws are shown in the photo) were tightened and secured by peening the plate to stop the screw from turning. You can tell if Jimmy assembled this part of your car because he would put two punch marks on one corner of the pad on the advice of his dad, who told him that it would identify his work. The arrows in the picture show Jim’s handy work – the punch marks are clearer in the pad on the left hand side of the photograph.

Jimmy Cox MG TC

The pads are from my car (TC0750) and Jim, who is still around, has seen the photo, albeit a different one taken by Tom Wilson.

So the next time you have your front end apart, take a look to see if Jimmy Cox worked on your car!

TC braking

When TC0750 was on the road I always found the braking to be adequate. Recently, I took careful note of a posting on the tabc Bulletin Board by Carl Fritz of Gainesville, Florida. I think this is an excellent summary and is well worth repeating here for those who have not seen it:

I would contend that the real limiting factors on TC braking power are the following:

1) The size of the tire-to-road contact patches (Small, compared to more modern cars) 2) The tire compounds and tread designs available in tires of 4.50 x19 size, compared with more modern tires 3) The poorer friction characteristics of steel drum, compared with cast iron drums 4) The elasticity of steel drums, again as compared with cast iron drums 5) Linings used 6) Accuracy of the fitting of linings to drums

The TC’s standard brakes, IF properly set up, are perfectly capable of locking up all four wheels at almost any speed. Some “improvements” will reduce the amount of force the driver must exert, but will not change the ultimate retardation. Alfins will improve the efficiency of braking because items 3,4, & 5 above come into play, and will also delay the development of brake fade from repeated heavy braking.

NO MATTER HOW GOOD THE OTHER ITEMS MAY GET, ITEMS 1 and 2 WILL ALWAYS BE THE FINAL LIMITING FACTORS in determining how fast you can go slower.

An Honourable Trader

The following was received from Mike James:

Last year, at the Silverstone Classic I bought a number of books – from various stands. One of them, a copy of the Original MGT Series The Restorers Guide was marked as ‘limited edition’ on the inside front cover, with a pencilled price on the first page. The problem was that, only when I was actually reading it one winter’s evening did I discover that there had been a problem with the compilation. Apart from repeating everything about the Tickford and omitting the juicy bits on the TC, the repeated text was in French.

As I’d bought books from different stands I wasn’t altogether certain from which vendor I’d actually bought this one, so I e-mailed a couple of likely ‘suspects.’ Both responded and I was able to ascertain during a telephone conversation that it was in all probability purchased from JOHNS CARBOOKS. John Parsons told me that he operated from the Tonbridge area and that the pencilled mark inside sounded like his so he would collect and exchange the book the following weekend.

True to his word, he arrived at my home, examined the faulty book and exchanged it there and then.

Apparently this sort of thing is rare – but it happens and although this ‘limited edition’ is probably a collector’s item, the one I now have is far more useful so I was confidently able to spend loads more cash at the MG show in Stoneleigh, buying all the bits I didn’t realise I needed for my TC until I saw them.

So, if anyone is interested, I’d have no hesitation in recommending John Parsons of JOHNS CARBOOKS as an honourable trader.

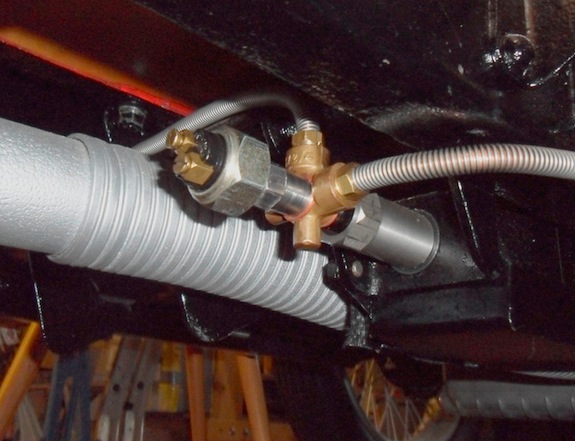
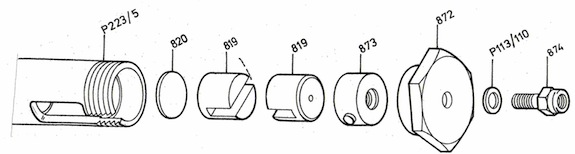
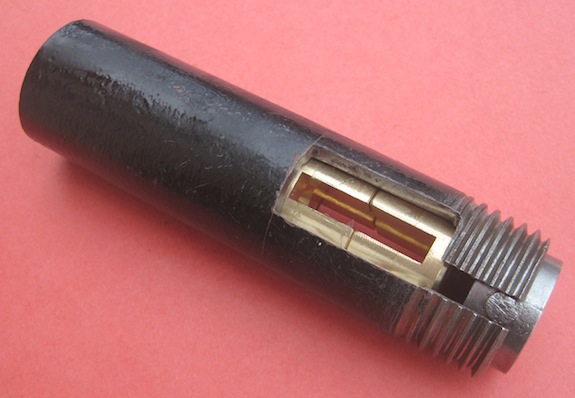
Priming the XPAG Oil Pump

Following some correspondence with Mike James on this subject I asked Barrie Jones for some advice. He provided the following useful summary of changes to the XPAG oil pump:

There were several changes to the XPAG oil pump.

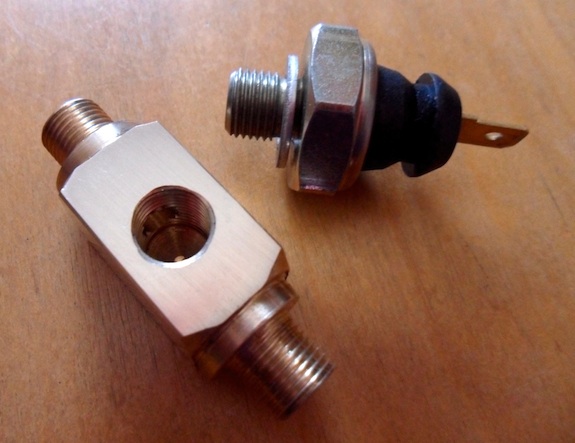
The TD2 engine (with 8” clutch) was introduced at XPAG/TD2/9408, the pump with the horizontal filter was introduced at XPAG/TD2/14224, and a priming plug was introduced at XPAG/TD2/20972.

In December 1953, during the production of the TF, the body of the pump at long last received an internal drilling at XPAG/TF/31263 rendering the pump self-priming. This modification could be made to earlier (horizontal filter) pumps by a competent engineer.

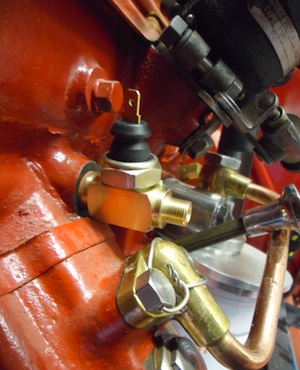
Note that the TB, TC and early TD pumps did not even have a priming plug. The only reliable way I know to prime them is by filling the oil gallery of the engine with oil through one of the external holes AND packing the gears with Vaseline petroleum jelly.

By the way, the Rover V8 engine has the same problem, and the V8 workshop manual recommends packing the pump with Vaseline.

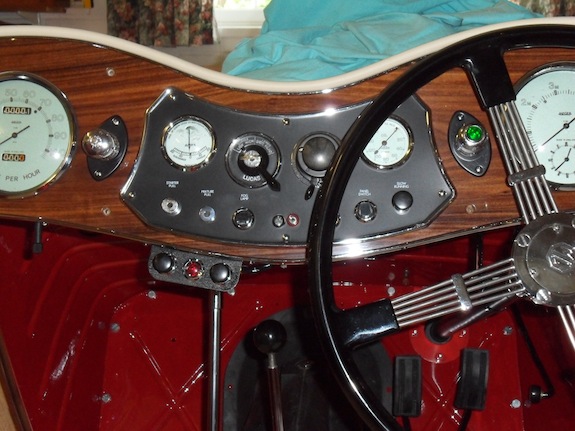
Mike was having problems with lack of oil pressure on his rebuilt XPAG when he recalled to memory something he had read in TTT 2 about MG building cars without self-priming oil pumps. This put him on the right track and he eventually had success as follows:

Having ‘primed’ the oil pump on my rebuilt, early engine by removing the oil delivery pipe, putting a funnel full of oil into the hole and rotating it in top gear whilst pushing the car backwards (as the pump hadn’t been coated with Vaseline), when I eventually started it up it the gauge immediately showed 70+ pounds per square inch of pressure.

On its first run this weekend – to the MOT station, it continued to show between 50 – 70 lb’s – so thanks again for the timely article on how to avoid blowing a rebuilt XPAG engine.

That’s all for now folks – more in the October issue due out around about 15th September. The Editor


Back Cover Photos

Photos from the TC Owners Club 50 Year Celebration Rally held at Collie, Western Australia in October, 2011. Above pic shows all TCs; below shows all MGs and participants.

Click photos to view bigger versions.

The surprise welcoming party at Hilperton Marina, Wilshire for Doug McWilliam from New South Wales in early June, 2012. Top photo L to R: Dave White (TC), Chris and Dawn Rainey (TD MK II), Mike and Jane Lee (TD), John James (PB), Timon Iles (TC). Bottom photo: Same people except that Doug McWilliam is in this one (waving) and Dave White is in the background (partially ‘hidden’ by Doug).