It’s hard to imagine that this is the ninth anniversary of ‘Totally T-Type 2’. I continue to enjoy producing the magazine, but it gets harder as copy dries up and I have to ‘keep the show on the road’.
We live in a world which seems to be frequented by fraudsters. I suppose they have always been around, but modern methods of communication have undoubtedly made life easier for them and thus they multiply and increasingly prey on the unsuspecting.
I’m aware that at least three of our private advertisers have been duped by these scumbags and I end up feeling uneasy because fellow owners have lost money through placing an advertisement on my website.
I keep a sharp lookout for these ‘scammers’ and I warn ‘Wanted’ advertisers when I am aware that a particular ‘scammer’ is replying to adverts. We also post the following caveat emptor on the appropriate advertisements’ page:
“When you receive a response to a Wanted advert on ttypes.org, apply common sense. Does the person sound like a T-Typer? Ask for photos of all of the parts, including close-ups on serial numbers or other distinguishing features. If the person refuses or makes excuses, do not continue with the deal. Likewise, if you are selling parts, then be absolutely sure that any payment has cleared completely before shipping anything. Where possible, deal locally, face-to-face, or failing that, use PayPal, which affords you a level of buyer protection.”
Despite the foregoing, a ‘Wanted’ advertiser still occasionally gets ‘caught out’. If in the slightest doubt I’m always happy to be contacted for an opinion. jj(at)ttypes.org
A recent scammer, who has replied to several adverts is one Paul Haggis. Whilst his amateurish attempts to deceive are pathetic, I have nevertheless alerted several advertisers to his existence.
As I pen this editorial on 10th July, I am slightly missing my beloved PB. It was sold via Steve Baker at the end of June and is now in the hands of its new owner. Had I kept it for another two months, I would have owned it for 21 years; but one must not look back!
The blow is somewhat cushioned by the fact that I still have my J2, which is coming up to 54 years of ownership and now has its rebuilt engine and its gearbox installed. It just needs to be rewired and I have a friend lined up to help with this job.
My J2 was purchased in 1965 for 35 GBP and has not turned a wheel under its own power since 1966. It might even be on the road one day – mustn’t rush these jobs!
I’ve just had a visit from David Taylor from Sydney ‘down under’. David had ordered some books and a head gasket set and as he was due to visit an old friend in north Bristol, it was convenient to travel from Chichester on the south coast, via south east Bristol where I live.
Next week I have John and Robin Libbert visiting from Ohio. I have occasionally corresponded with John, so it will be good to meet him and his wife.
The ‘Totally T-Type 2 Tour of mid- Wales’ is now a little over seven weeks’ away. The routes have been checked and the Roadbook has been sent for printing. All down to the help of Brian Rainbow – I don’t know what I’d do without him!
We can still take a couple more entries. Just to recap, the dates are 23/24/25 August 2019 with an optional stay on the 26th. The booking reference is ‘Octagon Car Club’ and a £20 non-refundable deposit per person is payable on booking (Telephone number 01597 823700). The rate for guests staying for 3 nights is £80 per person per night with a 50% reduction for those staying the extra night. There is no single room supplement – up to a minimum of 6 available.
Entry fee is £45 with a reduction of £10 if there is no passenger. Entry forms can be obtained from the editor at the jj@ttypes address given previously.
Finally, is this what happens when old car guys get sent to a nursing home (picture, right)?
My thanks to Jerry Felper in the US for forwarding this on to me. I’ve slightly ‘doctored’ it – please excuse the pun.
This
year’s ‘Founders Weekend’ took on a special significance as it
was a celebration of the 50th
Anniversary of the founding of the Club by the legendary Harry
Crutchley.
Running
in parallel with the ‘Founders Weekend’ was TB80, co-organised by
Mike Inglehearn and Jeff Townsend to celebrate the 80th
Anniversary of the TB. The TB enjoyed a brief production span in
1939, until it was cut short by the outbreak of the Second World War.
The
TB participants were ‘billeted’ at a country inn just outside of
Witney, this being necessary because it was not possible to
accommodate everybody in the private dining room of the Oxford Spires
Hotel.
Brian
and Rosey Rainbow presented us with some interesting routes for the
two days of touring. The Saturday run took us to the south and west
of Oxford in the area known as the ‘Vale of the White Horse’ and
covered some 90 miles. The Sunday run, at around 85 miles, took in
the Chiltern Hills area to the south and east of Oxford.
Setting out on the Saturday run, we made a point of stopping off at The Boundary House, now a pub, but formerly Kimber’s home from 1933 until 1938. As can be seen, the plaque on the wall was installed there, courtesy of the New England “T” Register back in 1990 when the Register came over from the US for their Circuit of Britain tour. My main reason for stopping was to check that the weeds in the border area below the plaque had been kept down and I was able to report back to Mike Leckstein that everything was ‘ship-shape and Bristol fashion’; meaning, in good order.
We
then followed the post-war to late 1940s Factory test route and
called in at The Black Horse, situated quite early on the route, for
a cup of coffee. It did not seem 14 years ago since I last stopped
there when I organised a run to mark 60 years since the start of TC
production on 17th
September 1945.
This Greene King brewery (Old Speckled Hen) public house is one of the venues used by the Abingdon Works Centre of the MG Car Club.
Having
completed the test route we went ‘off-piste’ (we often do!)
because the call of the massive Garden Centre at Millets Farm Centre
in nearby Frilford was just too much for Sue to ignore. Octagon
readers of this magazine (there are plenty of them) might recall that
‘Millets’ was a favourite venue for the ‘Wings Runs’ back in
the 90s, when it used to attract over forty cars.
Having studied the roadbook, Sue was keen to visit ‘The Living Rainforest’ at Hampstead Norreys, situated at the southern-most area of the route. It was well worth going there to see lizards, beautiful butterflies and birds, Goeldi monkeys, Harry the Armadilly (six-banded armadillo), Cinnamon the two-toed sloth and many species of plants and trees.
We
made our way back to the hotel and arrived early enough to enjoy a
walk along the river Thames towpath to Oxford city centre.
For
the Sunday run we had arranged to meet Mike and Angela Inglehearn at
Wheatley windmill. The history of the windmill is sketchy, but it is
thought to date from the 18th
century.
With
the coming of the nineteenth century and the certainty of title
deeds, we know that mill was bought by George Cripps in 1857 and it
has been in the hands of the Cripps family ever since, except that we
learnt on our visit that it is currently in the process of being
sold.
The
picture shows the mill, which has an octagonal plan which narrows to
form the circular rotating top.
We were fortunate to visit the mill on one of its rare open days (only 6 open days a year) and we enjoyed the hospitality of the locals with very nice home-made cake.
Our other stop on the Sunday run was at Pendon museum. We had heard excellent reports of Pendon and we certainly weren’t disappointed. The inspiration for and founder of Pendon was Roye England, who was born in Perth, Western Australia in 1906. He came to England in 1925, staying in the Vale of White Horse. It was here that he saw the dramatic changes that were taking place in rural England and resolved to preserve in model form the English countryside as it was in the 1920s and1930s. The realisation of this vision became his life’s work.
The Vale Scene is a massive landscape based on the Vale of White Horse and the modelling is absolutely stunning right down to the vegetables growing in the kitchen gardens of the cottages! The Railway Scenes are no less impressive – we were so glad we went.
We thoroughly enjoyed the camaraderie of the Founders Weekend, as did the TB80 participants. In fact, they enjoyed it so much that they are talking in terms of having another reunion, but not waiting for TB85 or TB90 holding one instead in two or three years at the same venue.
The Friday evening / Saturday morning TB80 line-up – photos by kind permission of Mike Inglehearn
Steve Priston now has twin leading shoe front brakes on his TC using a Morris Marina backplate as a template to alter his TC backplates ….. and just a few other mods!
Over
to Steve……
“I
have recently fitted the twin leading shoe front brake upgrade
onto my TC and I must say I feel that it was well worth all
of the work involved, I can’t make claims about it being worth the
expense because it wasn’t at all expensive, just time consuming, as
well as requiring the services of a good welder, one of whom I am
lucky enough to have as a very good friend.
My
trade is as a mechanical fitter, currently working shifts over
weekends and nights, so during quiet times it has been almost
therapeutic, having a project like this one.
I
first needed to find the most modern vehicles that I could, employing
a nine-inch front drum brake, this turned out to be the Girling
set-up, as used on a Triumph Toledo, Vauxhall Victor &
Morris Marina 10CWT van or pick-up.
Source
of supply was of course eBay, where a set of NOS (new old stock)
wheel cylinders are to be had for as little as £20, shoes at £10,
return springs £6.75, along with 22.5mm long shoe springs,
cupped Girling type washers, 42mm hold down pins and Ford Fiesta
spring clips; the adjusters are replicas made for a Willys Jeep at
£12 a set. It even turned out that I could use the
original TC hoses.
What
made the job less daunting, was the purchase of a set of TC back
plates and most importantly, the luck of finding a NOS offside brake
plate, for a Marina van, at a hefty £28!
Above: The lucky find of a NOS offside backplate, stamping number 64276625, from a Marina van. Below: an alloy alignment dolly was made to centralise it with the TC plates, it being turned around, to give the opposite side/hand.
The
Marina brake plate was my template/drilling jig, to ensure correct
position of each of the critical components, with all of the
positions being transposed onto my back plates, simply reversing the
plate to give the opposite hand.
All of the holes were filled that were no longer required and a very important modification had to be made to the lower part of the back plates, to enable the lower shoes to fit. The Marina backplate is quite an intricate piece of press work for 10-gauge steel, so care needed to be taken in altering the plate without losing rigidity. This was done by only removing the minimum where needed and replacing what was removed with a very closely fitted piece of folded metal; this avoided any distortion issues on welding, unlike another article I have seen, where this was not done, causing problems.
The important modification referred to in the text.
Unlike
a conversion using TD/TF parts, that has previously been featured, I
did it the way it was fitted to the intended vehicles, but having
been trained in bench fitting at 16 years old, with a few years’
experience since, knew the importance of accuracy, when it came to
making the various blanking pieces fit, with minimal clearances
so as to avoid distortion during the welding process.
Thanks to the skill of my TIG man, I had no distortion to deal with and very little cleaning up to do.
This
picture shows the modified TC back plates, prior to blasting &
painting, having had all of the redundant holes filled, wheel
cylinder spacer plates attached, the brake spring anchor plates along
with the re-positioned brake shoe guides, it also shows the holes for
the Jeep adjusters, along with the holes for the shoe hold down pins.
The
wheel cylinders needed to be spaced off of the back plate with 5mm
packing, the small plates next to them are the spring
anchor points, the triangular shoe guides were carefully removed,
being re-attached in new positions.
The
shoes required quite a bit of alteration, firstly being too wide,
requiring one eighth of an inch taken off each side, after the
original linings were carefully removed & responsibly disposed
of.
The
shoes already have short slots for the hold down pins but these
needed extending towards the underside of the linings, by about the
same length again, another job was to attach a pair of one sixteenth
of an inch-thick spacer plates to the trailing end of the shoes,
for a better fit in their tracks.
The
shoes were relined using a modern woven, brass wire reinforced
material, which I know works well on vintage motorcycles with steel
brake drums, which turned out to be the single greatest expense, at
£50.
The
adjusters needed a bit of head scratching because a flat area is
required around them on the back plates so new bespoke 8mm pins were
made & fitted to the shoes for them to act against, simply using
modified bolts, with two nuts.
The
Willy’s Jeep adjusters give a movement equivalent to the lining
thickness and I chose not to use spring washers, with the plain
nuts as supplied but used dowty washers, with stainless nylock nuts,
in an effort to prevent seizure through corrosion, by sealing
the area of thread within the nuts, having of course copper
slipped them on assembly.
One
of the wheel cylinders from each side (Girling 64678875/6 or
64676115/6)
required the three eighths UNF tapping on its inner port,
increasing to seven sixteenths, enabling the TC hoses to fit. If
using NOS cylinders they may be a bit grubby outside but the length
of time spent on the shelf will require them to be stripped and
cleaned as a matter of course.
What I have now is a floating, twin leading shoe assembly, which gives very good feel, being nicely progressive and powerful, rather than feeling like a piece of wood is being pushed against the inside of the drum, it is also lacking the unsightly/costly plumbing as used on the TD/TF, being pretty easy to bleed, with very accessible adjusters.
The
following has been adapted from a little booklet entitled Our
“Old Number One”, The First TB, TB0251
produced by Mike Inglehearn for the participants of TB80 (the TB 80th
Anniversary weekend held in May 2019).
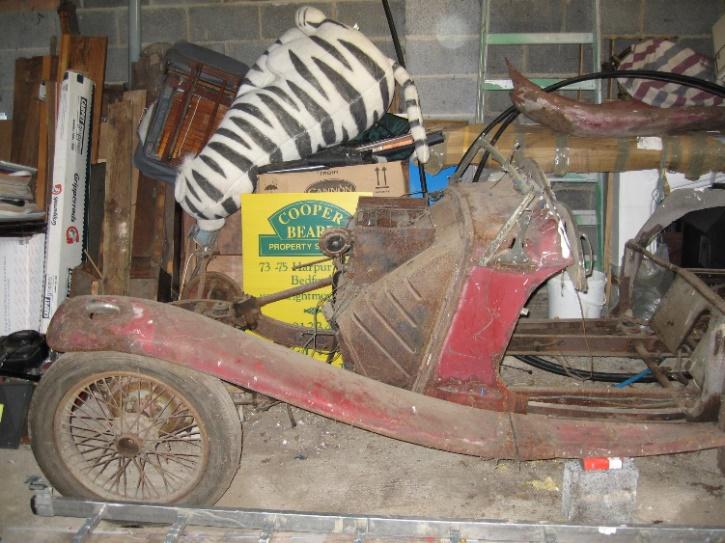
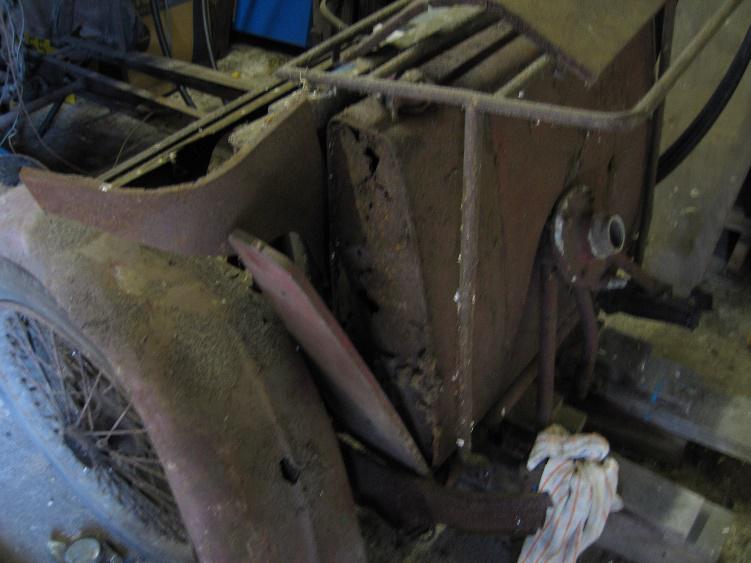
“TB0251
was one of two prototypes built in April 1939 along with TB0252.
Whatever reason, it was not however registered until 4th
July 1939 with the registration number BRX 805. Nothing is currently
known of it from then until the 1960s when a log book shows it
changed hands in 1961, 63, 65, twice in 66, and again in 67, with
owners in London and elsewhere in the south of England.
An MoT, (probably its last) expired in 1968; a photograph (see below) dated May 1968 shows it in front of a greenhouse, which is likely the one in which it was about to be placed, where it rotted away for the next few decades.
After
emerging again as a “barn find” it was dismantled at some point
and bought by Geoff Radford, who renovated and replaced many of the
parts, including having a new body made, but sourcing original wings,
bonnet etc. to make it a viable restoration project. It was then
sold’”
Ed’s
note: I
contacted Geoff Radford, who told me that
“I
stripped down what was there to bare chassis, checked for trueness,
shot blasted it and all the associated brackets etc. then painted it
all.
The
engine was a Morris XPJM, I sourced an original TB engine!!
The
ID plate is with the car, thank goodness as are original axles,
gearbox, diff, original radiator shell, but core etc was missing,
lost years ago when sent for repair!! The body work was totally
beyond all help and repair, unbelievably so.
I
sourced original front and rear wings as well as a TB bonnet and
original front apron.
The
firewall was shot too, I sourced a good TA one.
I
also found a perfect correct original petrol tank as well.
I
had a new body made.
I
saved and restored the original screen, hood frame, side screen
frames, hand brake assembly, sourced correct TB headlights (with the
inverted rims). I found an original, new rear number plate, single
eared and a new original Lucas Pork pie lamp.
Also,
an original FT 27 fog light.”
A
week or two after contacting Geoff, a chance conversation with Keith
Herkes on another matter and me mentioning that I was working on an
article on TB0251, resulted in Keith telling me that Geoff had
originally seen the car advertised and had asked Keith to go along
and see it. Recognising its historical significance, he immediately
alerted Geoff, who had no hesitation in purchasing it.
Keith has sent me lots of pictures taken of the car at the time of purchase and I have reproduced some of them to give an indication of the state that it was in. These, follow:
As
mentioned previously, having done a tremendous amount of work on the
car, Geoff Radford sold it as a restoration project. Quentin Miller,
the new owner has had
both the engine and gearbox rebuilt and obtained new differential
parts from Roger Furneaux.
Here are a couple of pictures to show progress:
TB0252
TB0252
is in Sweden with Hans Larsson. The picture was taken in early June
by photographer, Per Svensson. Per also took a selection of photos
for the front cover. The location is St. Anna archipelago, east coast
of Sweden.
The
Production Records show both TB0251 and TB0252 as built in April
1939. However, TB0252 was registered as BRX 265 on 3rd
May 1939, whilst TB0251 wasn’t registered until 4th
July 1939 (as BRX 805).
TB0252
was the Factory exhibition car, which still retains its metallic grey
coachwork and dark green interior. Its original engine XPAG 506
(TB0251 had XPAG 501) was changed in 1955 by University Motors to
replacement engine number XPAG B83435.
The
first log book (Hans has this, together with two further continuation
books) records TB0252 as being registered in the name of The M.G. Car
Company with registration mark BRX 265 on 3rd
May 1939. It changed hands on 1st
December 1939 to a gentleman with a Surrey address. This chap moved
house twice within the county of Surrey before moving again to Kent
(the log book is stamped Kent County Council, 7th
February 1946).
The
next owner is recorded as living in Greenwich, but he or she probably
didn’t keep the car very long because there was a change of owner
with a Paignton (Devon) address in July 1948. This person kept the
car until July 1964 when it changed hands again, but stayed in Devon
at a Crapstone address in West Devon.
The
next owner, and the last before Ben Hyams of Octagon Sports Cars (but
see the next paragraph) bought the car, had a BFPO Ships address with
two further change of address notifications to Gosport, Hampshire.
The second continuation log book shows Octagon Sports Cars (then of London E17) acquiring the car in November 1977. Our Royal Navy Officer had sold the car to them on moving to Australia and Hans purchased it from Octagon Sports Cars (who by now had moved to Chart Sutton, Kent) in December 1977.
The
original log book for TB0252 in the name of The M.G. Car Company
Limited.
Hans drove ‘Lady Grey’ from Chart Sutton (Maidstone) via London to Cambridge, on to Felixstowe and then a ferry back to Gothenburg. In Hans’ words “A very cold trip in minus degrees and snow., but at the age of 27 and a warm enthusiastic heart there was no problem!”
A
young and enthusiastic Hans Larsson arriving back in Sweden in
December 1977.
Originally
published in the Alvis Car Club of Victoria, Australia Newsletter, to
whom I am happy to give accreditation.
INTRODUCTION
This
discussion is focused on engines of the type likely to be found in
vintage and pre-war Alvis with compression ratios in the range of 5:1
to 6.5:1. Please note, some of the parameters quoted do not apply to
modern engines with electronically controlled engine management
systems.
Whilst
most owners of vintage and pre-war Alvis cars are quite knowledgeable
about the various heat range values available in spark plugs, not all
are aware how this impacts the ignition and combustion process. This,
compounded by the fact that spark plug types specified when these
cars were new, are not likely to be available nowadays, makes them
rather a fit and forget component, and when running issues develop,
as long as spark plugs appear serviceable, they are dismissed as not
being contributory to the problem, which is not always the case as we
shall see.
Before
examining spark plugs in detail however, it may be helpful to have a
very brief look at the ignition and combustion process, before
examining why the correct choice of plug is so vitally important.
NORMAL
COMBUSTION
In
a petrol powered internal combustion engine, as the piston approaches
the end of the compression stroke, the pressure of the air-fuel
mixture in the combustion chamber will have risen to about 80 to 120
psi, and the temperature, as a result of compression, will have risen
to around 400°C, according to compression ratio and degree of
throttle opening. After the occurrence of the spark, there is an
ignitiondelay
period before
the flame front progresses steadily outwards from the point of
ignition, with the pressure in the combustion chamber rising to
between 500 and 1000 psi, accompanied by peak temperatures in the
region of 2000° – 2500°C. It must be stressed this combustion
process is not instantaneous but is a steady spread of the flame
front, causing a progressive increase of pressure and temperature
ahead of it.
IGNITION
TIMING
The
indicator diagram, Figure 1, shows the delay that occurs after
ignition is initiated before any rise in pressure due to combustion
occurs. It is because of this delay that timing of the ignition must
be advanced to occur before the piston reaches top dead centre. Most
engines are designed so that the ignition timing results
in
peak pressure occurring between 10° and 20° crank angle after top
dead centre. This is purely a mechanical consideration so that the
geometric angle which the connecting rod makes with the crank is the
most favourable at the time there is the greatest pressure exerted on
the piston.
It can also be seen from the diagram that excessive ignition advance is undesirable as it will cause unduly high pressures to be exerted on the piston while it is still rising on the compression stroke.
As
a number of factors influence the rate of combustion, it is necessary
to be able to vary the degree of ignition advance so that peak
pressure always occurs at the optimum time. These factors include
(amongst others) engine speed, compression ratio, cylinder pressure
and mixture strength. An increase in any of these will result in
faster burning.
It
can be seen that when starting, because of the very low engine speed
it is essential that the timing is retarded as far as possible to
prevent the rise of pressure forcing the piston back down before it
has reached the top of its stroke, causing possible damage to the
starter Bendix (or your wrist if you are hand starting).
It is
also necessary to retard the ignition under high load conditions for
example when climbing hills with the engine running slowly at
wide-open throttle, as high cylinder pressure and resulting faster
combustion will cause peak pressure to occur too early in the cycle,
resulting
in rough running, a reduction of torque and possibly leading to the
onset of detonation.
DETONATION
Detonation,
or ‘knocking’ is uncontrolled combustion and occurs when the
temperature and pressure in the combustion chamber rise to a level
where the steady, progressive combustion process no longer continues,
and the whole of the remaining unburned mixture (the so called
‘end-gas’) ignites spontaneously. The resulting high-pressure
wave hitting the cylinder walls and piston crown can produce a
metallic knocking sound (the absence of audible knocking does not
mean detonation is not taking place however).
Detonation
causes loss of power, local overheating, and mechanical shock
loading, and sustained detonation will inevitably result in serious
engine damage.
The
incidence of detonation depends on:
Operating
conditions such as mixture strength, ignition timing and cylinder
head temperature.
Characteristics
of the fuel being used.
Engine
design factors including compression ratio and combustion chamber
shape, although these are outside the control of the operator.
It is
totally erroneous to assume that detonation cannot occur in low
compression engines using modern high-octane fuels. If the ignition
timing is too advanced then the pressure and temperature rise caused
by compression added to the pressure and temperature rise caused by
combustion can cause spontaneous combustion of the end gas.
Detonation
can lead to pre-ignition because of overheated surfaces in the
combustion chamber.
PRE-IGNITION
Pre-ignition
is an entirely different phenomenon and should not be confused with
detonation. Pre-ignition
is an uncontrolled ignition process where the air/fuel mixture is
ignited at any time prior to the spark occurring. Ignition in this
instance is initiated by localised hot spots in the combustion
chamber where the temperature has risen to over 850°C.
These hot spots can occur at
spark plug electrodes, exhaust valves, overhanging gaskets or ash and
carbon deposits. Pre-ignition can occur at any time in the inlet
cycle and if it occurs while the inlet valve is still open then back
firing through the carburettor will result.
The
danger with pre-ignition lies not with the destructive high-pressure
shock waves that occur in the case of detonation, but rather the
intense heat build-up that results. In nine cases out of ten,
pre-ignition is initiated by overheated spark plug electrodes. Every
10° of ignition advance will raise spark plug firing end temperature
by 70°C to 100°C.This
situation is dangerous and can cause serious damage to the engine,
especially when it occurs in only one cylinder, when the effects may
not readily be noticed.
In
the normal combustion process, the piston crown and combustion
chamber surfaces are protected from very high temperatures by a thin
boundary layer of relatively stagnant air-fuel mixture. However, if
detonation or pre-ignition occur, the extremely rapid combustion
removes this boundary layer exposing the surfaces to the full heat of
combustion. This almost always manifests itself in softening and
consequent pitting of piston crown.
THE
SPARK PLUG
Although
the spark plug appears to be a fairly simple component, the
conditions under which it has to function are very exacting. It has
to withstand pressures up to 1000psi and temperatures reaching
2500°C. At moderate
engine speeds it has to carry a 5 – 10 000-volt spark 25 times every
second. In these conditions, the plug insulator and electrodes must
remain within an optimum temperature range of between 450° – 850°C,
known as the ‘self-cleaning temperature’. This is hot enough to
burn off any combustion deposits that might form, but not so hot as
to initiate pre-ignition.
HEAT
DISSIPATION
To satisfy this requirement it is necessary for the spark plug to pass to the engine cooling system just enough heat to stay within this temperature range. As engines vary enormously it is obviously necessary to have different spark plugs with varying heat dissipation characteristics to suit different engines. The rate at which a spark plug dissipates heat is known as its ‘heat-range’. Spark plugs capable of passing a large amount of heat to the cooling system are known as ‘cold’ (or ‘hard’) plugs, generally used in higher performance engines which generate more heat per cycle.
Conversely,
spark plugs which retain large amounts of heat are known as ‘hot’
(or ‘soft’) plugs and find use in cool running engines operating
at low speed such as industrial or tractor engines.
The
design of the spark plug determines the rate at which it passes heat
to the cooling system. The primary method used to do this is by
altering the length of the insulator core nose as shown in Figure 2.
A cold plug with low insulator seat will conduct more heat to the
cooling system and will remain cooler. Conversely a hot plug with
high insulator seat will retain heat from the combustion chamber so
the firing end will stay much hotter.
In
addition, the gas volume of the plug, which is the area between the
insulator nose and the shell, can be varied – a greater gas volume
exposes the insulator to more of the combustion flame and as a result
it stays hotter. Further, the alloy composition of the electrodes can
be formulated to conduct heat faster. This means it is not possible
to visually determine the heat range of a particular spark plug.
HEAT
RANGE
The
method of classifying spark plugs is by using a numbered scale. This
was initially based upon the time in seconds it took for a plug to
heat from cold to auto-ignition temperature in a test engine.
Unfortunately, nowadays there is no universal numbering standard and
every spark plug manufacturer uses their own system.
To
make things even more confusing some manufacturers, for example Bosch
and Champion, use low numbers to indicate a cold plug with the higher
the number the hotter the plug, while others, such as NGK, do the
opposite, the higher the number the colder the plug.
The
Champion range goes from 1 (cold) to 23 (hot) but then there are
additional ranges for industrial and racing applications.
Furthermore, Champion heat ranges have undergone a number of changes,
so it is not a straightforward process to find a current equivalent
for a pre-war heat range.
The
Bosch range is possibly simpler, ranging from 13 (hottest) to 2
(cold) but then continuing from 09 to 06 for very cold racing plugs.
The
NGK general application range is similar to the Bosch range, but
reversed, ranging from 2 (hot) to 10 (cold) and then extending to 12
for racing applications.
The
KLG range (though KLG plugs are no longer available) equates very
closely with the NGK range, one simply has to delete the final zero
from the KLG number. This is useful as KLG plugs were often specified
in Alvis cars. For example, a KLG TMB50
(mid
heat range plug specified for the Alvis 12/50) has a direct
equivalent in the NGK A5, or better still the NGK AB5, essentially
the same plug but with a reduced 13/16” hex, allowing a standard
plug spanner to be used, which is a better fit in the plug recesses
of the 12/50 cylinder head.
READING
SPARK PLUGS
The
best way to tell whether a spark plug is of the correct heat range
for a particular application is by ‘reading’ the spark plug
firing end as shown in Figure 3. It is essential to do this after a
period of normal driving as prolonged idling or slow speed running
will give false indications on an otherwise correct plug.
A
useful fact to remember is that on the NGK range, a change of one
heat range number will result in a change in the firing end
temperature of a plug by 70° to 100°C. This means if a plug is
operating just inside the overheating range, a reduction of at least
two heat range numbers will be required to bring it back to the
optimum temperature.
It
is not recommended to make spark plug changes at the same time as
another engine alterations, such as carburetion or timing.
Performing multiple changes at one time will lead to misleading and
inaccurate conclusions if any issues occur.
Figure 3 (below).
A
12/50 Case Study
This
concerns a 12/50 (in fact a 1924 SA 12/40 that has been converted to
OHV 12/50 specifications). The history of this vehicle is not known,
though it has an early block with recessed side cover, a cylinder
head bearing a 1926 casting date, is fitted with a M.L. Magneto and
30mm Solex MOV carburettor.
For
some time it has suffered a number of issues, starting off with a
case of overheating. Once this had been attended to it appeared to
run well, but soon developed issues with loss of power, rough running
with associated misfiring and back-firing through the carburettor.
The ignition timing was checked and re-set, and new plugs installed.
Initially this appeared to offer some improvement but after a while
the same symptoms started to re-develop. Finally, a second set of new
plugs were installed together with a substitute magneto to eliminate
the possibility of a defective capacitor in the magneto.
However,
the vehicle still spent more time on the side of the road than
actually driving. Again, timing was checked and re-checked, the
magneto points were cleaned and re-set, carburettor jets were
checked, the fuel filter cleaned, valve clearances checked, all to no
avail. After every enforced stop it would run better for a while, but
after a period of either high-speed or high-load running it would
lose power dramatically with associated violent backfiring through
the carburettor.
In every instance of these problems occurring, not once were the
spark plugs considered as they were “new plugs of the correct
type”.
On
its final outing it’s performance deteriorated to such an extent
that it had to complete the last 100 kilometres or so on the back of
a recovery vehicle.
SO, WHAT
WAS WRONG?
Firstly,
even though the cause of the problems were almost certainly ignition
related, the carburettor was comprehensively checked, and found to be
fitted with appropriate choke, jets and float of the correct weight,
the filter was clean, and there were no leaks in the induction
manifold, so the fuel system was ruled out. However, the interior of
the carburettor was coated with black soot, this provided the first
clue.
Secondly,
the ignition timing was set at 42° BTDC. The Alvis handbook for the
SA 12/40 and SA 12/50 specifies an ignition timing figure of 28°
BTDC, fully advanced. Bear in mind that was the factory specification
for a standard engine at the time. The engine in this car is not
standard, and in view of its slightly raised compression ratio with
consequent faster combustion time, this degree of advance (42° BTDC)
is probably somewhat excessive. Nevertheless, it would almost
certainly benefit from some advance over the factory setting.
Thirdly,
the spark plugs were of an inappropriate heat range. When the
symptoms first started to appear Champion D16 spark plugs were in
use. These are an 18mm ½” reach plug toward the upper end of the
heat range. In no way do they resemble the Champion 16 specified for
early Alvis engines, which was in fact a cold plug in the Champion
18mm pre-war range.
Finally,
when new plugs were installed, they were Champion D23’s. These are
the hottest 18mm plug available from Champion. The advice given was
that these were cooler plugs, this may have been caused by confusion
with the NGK numbering system which goes the other way!
This
photo is of the plug removed from #3 cylinder, and quite plainly
shows all the signs of severe overheating. The insulator is
blistered, the centre electrode is very eroded bearing in mind the
very short time the plug had been in service, and the earth electrode
shows
signs of severe
overheating.
The
other three plugs had also been overheating, but not quite to the
same extent, so it would appear that the problem was mainly confined
to one cylinder. Interestingly #3-cylinder inlet valve spring was
broken.
CONCLUSION
It is
likely that all the problems this 12/50 experienced were due to
pre-ignition caused by a combination of the use of spark plugs with
too high a heat range together with excessively advanced ignition
timing. Either of these factors in isolation would probably not have
caused these symptoms to appear, but once over advanced timing heated
an already hot spark plug electrode to over 850°C,
pre-ignition would start. Initially, as the other three cylinders
were still running normally, this would manifest itself only as a
loss of power with associated rough-running (which indeed was the
case). Continued pre-ignition would then further raise the
temperature of that spark plug enough to ignite the incoming charge
on the inlet stroke while the valve was still open. This would cause
the backfiring through the carburettor and would explain the soot on
its inner surfaces. It could also explain the broken inlet valve
spring on that cylinder, as combustion taking place with the valve
open would cause it to be violently opened even further until the
spring became coil bound and ultimately fractured.
As
already mentioned, after the enforced roadside stops during which
time everything bar the spark plugs were examined or adjusted, it
would appear to run better
for a while, though the symptoms soon re-appeared. In reality what
was happening was the engine was simply given time to cool down.
The
cure for the problem was quite simple. After installing a replacement
valve spring, spark plugs of an appropriate heat range were
installed, and the ignition advance was re-set to a more realistic
figure. The car is now fitted with NGK AB6 plugs with an ignition
advance of 35°
and is running just as a 12/50 should! It is extremely fortunate that
it does not seem to have suffered from any engine damage.
Editor’s
Note: Although
this article was written for Alvis vintage and pre-war models with
compression ratios in the range 5.1 to 6.5:1, (the TA’s compression
ratio is 7.5:1) the principles are not dissimilar. As is implied in
the text, spark plugs are rather taken for granted, but after reading
about the functions they have to perform we really ought to view them
in a new light.
The simplicity of T-Types has encouraged their high survival rate, despite the early years of being driven by impoverished students. Numerous rebuilders will have come across some ingenious bodges to mask problems and it’s tempting to give some examples, but the concern that I could be feeding ideas to unprincipled owners overcomes what could be a good tale.
Most
potential problem areas can be sorted out with the good supply of
available spare parts. However, there’s one area that’s
particularly challenging – worn axle eyes that support the king-pins
on the TA/B/Cs. Just looking at the forces on the wheel when
cornering and then realising that such forces are multiplied when
applied to the king-pin, leaves one wondering how it all copes,
especially after some 60 years.
It’s not surprising that some axle eyes have become oval, resulting in a loose king-pin, a potential MOT failure. An oval axle eye can allow the king pin to rock back and forth repeatedly, thereby exaggerating the initial problem with time. So how did the initial problem occur? The answer may come from batches of undersized king-pins. One such king-pin I looked at was over 2 thou. under-sized, and the resultant wear in the axle eye necessitated the eye being bored out and a sleeve fitted. This is an expensive operation and one that weakens the axle eye.
Recently,
whilst replacing some king-pin sets on three beam axles, I discovered
that all the front axle eyes were worn oval, and to compound the
situation the new king-pins were 0.5 thou. undersized. This may not
seem much, but given a worn axle eye, the last thing one needs is an
under-sized king-pin. Ideally the king-pin should be drifted in with
light blows from a plastic headed hammer.
Approaches
to some spares’ stockists failed to convince them that this was a
problem worth pursuing, one suggestion made was that just tightening
up the cotter pin would solve the matter; not so. The cotter pin
being at the fulcrum of the king-pin is unable to prevent it rocking.
The possibility of trying other stockists may not help as many new
king-pin sets seem to be made by just one company.
By
good chance I learnt that Gerry Brown was commissioning some
oversized king-pins from a precision engineering company. We decided
on an initial batch of 5 sets of plus 2 thou. oversized king-pins and
will wait to see how effective these are. However, king-pins need
bushes so I’ve placed an order with the supplier who provided the
last batch that John James and I ordered some time ago.
What
seems to be a general lack of awareness of the problems associated
with worn axle eyes is possibly explained by the fact that some
(many?) TA/TB/TC owners no longer submit their cars to an annual MOT
inspection where such issues would be picked up
This
is concerning, as early detection allows the much simpler remedy of
using over-sized king-pins to be used. The alternative remedies for
badly worn axle eyes are really not worth contemplating as finding
engineering firms willing to undertake such work is becoming
increasingly difficult and expensive.
Given
that there is currently a lack of demand from owners for oversized
king-pins, it is hardly surprising that suppliers don’t stock them.
However, if after reading this article you feel that you would like
to be associated with a case to be put forward to suppliers to stock
them, please let us know.
In
conclusion, I now realise that the main way axle eyes have become
worn was due to the fitting of undersized king-pins. This was brought
home to me whilst comparing the effect of using a 0.5 thou.
undersized king-pin with a “spot on” king-pin in an unworn axle
eye. The correctly sized king-pin was a reassuringly tight fit whilst
the 0.5 thou. undersized king-pin not only fell through the axle eye,
but was able to rock significantly when held in the axle eye.
Undersized
king-pins should be rejected
Most
precision engineering workshops should be able to grind the king-pins
to the accuracy required, there’s no valid excuse for undersized
king-pins.
Fitting
undersized king-pins will cause the axle eyes to wear
An
additional issue is finding small engineering concerns willing to
undertake fitting and reaming out king-pin bushes. However, a “garden
shed” model engineer might
be able to help using a technique suggested by Peter Cole (see
photo 1).
A ¾”
reamer is mounted in the chuck of a lathe and the stub axle with new
bushes is slid on to a mandrel mounted in the tail stock. The object
is to slide the stub axle’s king-pin bushes along the mandrel to
meet the rotating reamer in the chuck, thereby assuring alignment.
The reamer is set to rotate slowly and with plenty of lubricant, a
firm gloved hand will be needed to hold the stub axle’s spindle as
the reamer is engaged.
The
rotating force is considerable, so engage the reamer slowly.
Photo
1 – The reaming method suggested by Peter Cole
If
fitting oversized king-pins, the axle eyes and bushes will need an
expanding reamer for the final cut. Reaming the bushes in alignment
needs an expanding reamer with an extension guide shaft.
There
are two types of expanding reamer; the first is a conventional
expanding reamer that has a guide shaft screwed on and uses a sliding
collar whose tapered end locates in the bush at the far end of the
stub axle. The second type has the extended shaft as part of the
reamer body, these are rare and expensive but more accurate.
Photo 2 – Showing how the final oversize ream is accomplished using an adjustable reamer with a guide.
The
cutting blades on expanding reamers are not long enough to engage
both bushes at the same time, so having reamed the first bush using
the sliding collar located in the opposite bush, the reamer needs to
be withdrawn and inserted in the second bush with the sliding collar
engaged in the freshly reamed bush.
Photo 3 – Showing two types of adjustable reamer incorporating a fixed guide and a screw on guide. Both have sliding collars which locate in the king-pin bush at the far end of the stub axle.
Reaming
the bushes needs a sharp expanding reamer to achieve a good finish,
so these ought to be done first as reaming the tough steel axle eye
may dull the edges of the reamer. Adjustment of the expanding reamer
can be painstaking as a light slide fit of the king-pin in the bushes
is aimed for, whilst light blows with a plastic/wooden hammer on the
king-pin is recommended for its fit in the axle eye.
Once
the cotter pin is located and the securing nut tightened, hammer home
the cotter pin before finally tightening the nut. Make sure the
cotter pin is made from tough steel (eg EN24T) and not low carbon
steel such as EN8 as the flat taper surface can “ruck up” when
sliding over the locating flat on the king-pin.
Eric
Worpe
Ed’s note: As mentioned in Eric’s article, he has ordered a quantity of bi-metal (known as ‘wrapped’) king-pin bushes. These are the same as originally fitted when the cars were new. Price to be advised.
Bi-metal ‘wrapped’ king pin bushes – note the oil/grease groove which has a spur take off that feeds lubrication to the thrust faces of the beam axle’s eye.
For those who have this
DVD Video, Keith Meyer offers some advice on using Barrie Jones’
written guide in conjunction with the video itself.
This
article references the Barrie Jones gearbox rebuild video, although
it is also equally pertinent for a general gearbox rebuild.
I have
just completed the second
rebuild of my MGTF gearbox, all within a month and a half. To that
end, I wish to share this experience, pointing out on how to prevent
this unnecessary twofold activity.
It
happened because on the first go round, all I did is watch Barrie
Jones’s excellent MG Car Club T-Register DVD video on the
rebuilding of the TD/TF Gearbox.
Regrettably,
I didn’t follow his in video verbal instructions to use his written
guide in
conjunction
with the video itself.
On the
second go-round I watched his video and followed his written guide at
the same time. Please note that the two are not completely in step
with one another. Therefore, I would strongly recommend to read and
watch, and watch and read, until you understand the proper
progression of parts entering the gearbox and only then perform the
testing tasks.
Why
did I rebuild the gearbox twice?
In the
video, Barrie gets ahead of himself by about two minutes and if you
are following the video, while reading the guide, you will notice
that the presentation becomes out of synch.
If you
are solely following the video, which I did on the initial pass of
the rebuild, you will miss a critical step in the assembly process, a
step that ultimately culminated into a second rebuild!
Now
the problem.
In the
video, at approximately 2:00:39 into the presentation, Barrie goes to
test the operation of the gearbox by moving the selector shafts and
spinning the main shaft to see if each gear is engaging correctly.
This
testing process takes about two minutes.
At
2:02:18, after he completes the testing, he then notices that he has
forgotten to
install the circlip
on the end of the 3rd/4th
selector shaft.
As he
installs the circlip he says something like “that could have been
disastrous”.
WELL,
FOR ME, IT WAS DISASTROUS!
During
the testing phase of the 3rd/4th
selector shaft, I managed to slide the shaft back too far, simply
because there was no circlip on the shaft to stop its travel.
I,
too, had missed the installation of the circlip as presented in the
video. Had I been reading along, while watching, I would have become
aware of this video error because Barrie installs the circlip 5 steps
prior to the testing phase, in
his written guide.
But
I didn’t do that, obviously.
As a
result of the unrestricted over travel of the 3rd/4th
shaft,
the sliding hub violently released all the balls and springs located
between the striking dog and 3rd/4th
sliding hub, littering the inside of the gearbox, the work table and
shop floor!
Prior
to this catastrophe, the gearbox had tested out very well and I was
effectively finished, save for the application of the safety wire and
closing the gearbox up.
I
spent somewhere between four to five hours attempting to get all the
balls and springs back into place – a most counterproductive
effort. This is an impossible task to achieve with all the parts in
place in the gearbox housing.
Accordingly,
I commenced with yet another teardown to remove the sliding
hub/striking dog assembly from the first motion shaft, and the
following:
Dug
out all the silicone sealant in all the locations.
Zip
tied the rear flange to the rear casing so it wouldn’t fall out
and damage the new felt washer.
Removed
the rear casing, destroying the gasket which required replacement.
Dropped
the laygear to the bottom of the casing. Then pushing out the first
motion shaft bearing I damaged it, and the guard behind it. These,
too, had to be replaced.
Pushed
out the main shaft.
Disassembled
the first motion shaft, and spent almost a day reinserting the balls
and springs between the sliding hub and striking dog.
Rebuilt
the first motion shaft.
Reinstalled
the first motion shaft and main shaft. The laygear tabbed washers
would not align with the casing slots.
Removed
the first motion shaft and main shaft a second time.
Realigned
the tabbed washers on the laygear.
Reinstalled
the first motion shaft and main shaft. This time the laygear
dropped in correctly.
Reassembled
everything and when I got to the 3rd/4th
selector shaft I installed the circlip AND ONLY THEN I tested the
gearbox operation.
EUREKA!
After
a lot of cussing and breaks for mental sanity, I now have a rebuilt
and operational gearbox and gained a pretty good idea on how to
rebuild one!
Now,
wasn’t that easy?
Ed’s
note: I
have a rather ancient copy of the video which I can send for a
‘couple of quid’ plus postage, so total cost including UK postage
would be a ‘fiver.’
The
written guide is included in the very useful little book ‘Barrie’s
Notes’, available from the T-Shop.
The
aim of this scheme is to encourage the next generation of classic car
owners by giving younger drivers the use of a classic car for up to a
year. This is made possible due to the generous spirit of car owners
and classic car clubs who have offered the cars to the scheme. The MG
Octagon Car Club has decided to participate in the scheme and full
credit goes to them.
Young enthusiasts, normally 25 years or older may apply for a range of cars that have been donated for loan. There are no hire or loan charges involved but there is a requirement to look after the vehicle as if it were one’s own.
Insurance cover is obviously a key consideration and hence the 25 years or older stipulation, but Peter James Insurance is supporting the scheme and this is helping to partially defray the cost.
The
issue of what will happen to our cars when we are too old to drive
them crops up from time to time and comes under the spotlight when
supply exceeds demand, which seems to currently be the case with
Triple-M models. So, we need schemes like this to help plant the
seeds of future ownership.
In the meantime, do keep taking the ‘Peter Pan pills’! I’d like to be driving my 1933 J2 when it is 100 years old, which would entail me surviving and being fit to drive until I’m 87!
TF MAP LIGHTS
It is surprising how many TF owners, despite references on pages 12 and 56 in the factory Operation Manual (AKD 658A) and on page N.27, Section N.39 of the combined TD/TF Workshop Manual (AKD 580A), seem unaware that two map lights, one over each glove box, were standard equipment. Many are also unaware that they are operated by a second position on the ‘P’ panel light switch. Pulling out the switch operates the three panel lights, turning it to the right and pulling it out again operates the two map lights.
On
becoming aware of this oversight I have been conducting an informal
survey of TFs and their owners, most of whom express surprise when I
have pointed out that the panel light switch has a second position
intended to operate map lights. They have been even more surprised
when, after feeling around underneath the scuttles of their cars, I
have drawn their attention to brackets welded at right angles to the
scuttle and having a 20mm diameter hole into which the sprung map
light bulb holder is inserted.
I
suspect the reason for so many TF owners seemingly being unaware that
their cars should have a couple of map lights is that the various
restoration books, most of which cover the whole ‘T’ type range,
either do not mention them at all, or give them only a cursory
reference, often grouping TDs and TFs together, when covering
electrics. There is no map light facility on TDs. Also, the factory
Service Parts List (AKD 804) rather unhelpfully only mentions them in
Section K under ‘Cables’ and not, as would be more logical, under
‘Lamps’. Another reason may be that replacement wiring looms do
not contain any separate wiring to the map lights. As detailed on
the wiring diagram on page N29 in the Workshop Manual there should be
red with green wires running in parallel from the third terminal on
the panel light switch to each of the two bulb holders. The wire to
the panel lights should be red with white. It should be noted that,
like the panel lights, the map lights will only come on when the
sidelamps are also switched on.
Whilst
most of the TFs I have examined no longer have map lights fitted,
they have all still had the brackets for the bulb holders intact
underneath the scuttle. If owners want to check the position on
their own cars they should run their hand around under the scuttle
about 13 cms to the left of the horn push on the driver’s side
where they should be able to feel the bulb holder bracket unless it
has been removed during a rebuild. The other bracket can be found in
a similar position above the passenger side glove box.
Pressing
the sprung bulb holders into the bracket holes is quite difficult as
they are, as they need to be, a tight fit; and it is easier to do
this if the dash roll is first removed or loosened so that you can
more easily see what you are doing.
The
light from both the panel lights and map lights is pretty poor, some
would say useless, so upgrading the standard 2.2 watt M.E.S.(screw
in) bulbs to LEDs of the correct polarity may be a worthwhile
improvement.
With
thanks to Barrie Jones for expert input on this subject.
MICHAEL
FRIEND
Ed’s
note: To
my great surprise, mine work. However, I did not know they were there
until Michael pointed this out!
Water
Temperature MG TF1500
Nostalgia
seems to play a big part in the cars I have owned over the past 8
years! In 2011 I bought a 1935 2 door Standard 9, mainly because my
first car back in the 60s was the same model. Then in January last
year I acquired a beautiful Post Office red TF because again, in the
1960s, I had owned two MG PAs. Unfinished business you might say.
Although
it had been restored there were still many small finishing works
required. One such was the absence of a wire between the temperature
sender and the gauge, not surprising once I spotted the broken spade
connector on the sender. A new sender and wire between that and the
gauge rectified the problem – at least on short journeys in cold
weather – with a reading of 80 degrees.
On
the way back from Prescott in August the gauge shot through the roof
causing me to pull off the M5 three times. The car seemed to be
running well, no obvious loss of water, no steam, so I gingerly
proceeded home – some 50 miles.
Once
the engine was cold I checked the water level – ok so I suspected a
faulty sensor and bought another new one and a new radiator cap. No
joy, still overheating said the gauge.
I
own a non-contact infra red thermal sensor (they can be bought for 12
pounds on Ebay) which, when pointed at the header tank when hot
showed a reading of 60 degrees, perfectly acceptable. My electrician
had already guessed that the temperature sender and the gauge were
incompatible. Now having this confirmed he placed a 100 ohm resistor
in the connecting wire and BINGO a sensible reading was obtained. In
truth the gauge reads a little on the cool side so I think an 80ohm
resistor would probably be more accurate.
Martin
Gibson
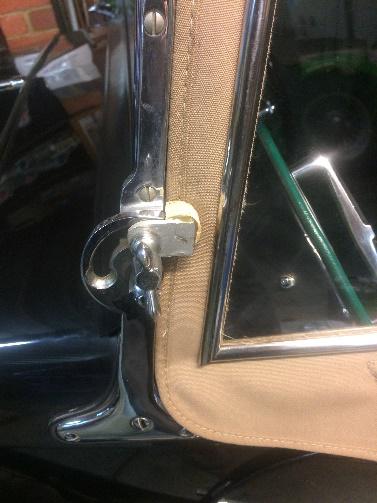
Sidescreens – keeping the draughts
out……
Mike
Sherrell has devised a draught excluder in an effort to impress Rosie
(his partner) with the comfort afforded by a TC in winter.
Christened
‘The Rosie Clamp’, it’s a very simple device consisting of a
small piece of ¼” ali plate with a sectioned wine cork glued to it
with Devcon. A hole is drilled in the plate to slip over the
windscreen wing bolt, which when done up, bears on the sidescreen,
eliminating draughts entirely.
For the dry passenger to exit, merely loosen the wing bolt and rotate it 90º. Photos follow which best illustrate the device.
FOUND IN FRANCE
Erik
Taylor reports……………..
How
about this?
Here,
in France I found these……and there are NO MORE!
Must
have been a big promotion. . . beer PLUS the pint glass which is
embossed and has an octagonal base.
What
a FIND!!!!
Ed’s
note: Yes,
Greene King, who took over Morlands (the original brewers of Old
Speckled Hen) did a couple of promotions. I still have a glass from a
different promotion, which was part of a set. I gave away two of the
glasses from this set; one to a T-Type owner in Canada and one to
Australia.
Chemical
Cleaning of Cylinder Blocks
A
warning to check that the block has been thoroughly flushed after
cleaning – it cost a member dearly!
Fancy ownership of a
Vintage M.G.?
Chris
Keevill, Secretary of the Early M.G. Society, has asked me to include
the following advert:
1929
M.G. 14/40 two-seater for sale. Older restoration in good condition
and running very well.
Lots
of history and many spares included in the sale.
Price
£32500 o.n.o. or would consider exchange for good M.G. TA or TC.
(There
are some more Vintage M.G.s for sale on the Cars For Sale page of the
Early M.G. Society web-site www.earlymgsociety.co.uk)
An
Enquiry regarding ‘Bill ???’, spares supplier in London
Your
editor receives many an enquiry via the website from former owners of
T-Types. One of these was received recently from Les Bailey, who told
me that he is writing his life story and having owned several TCs in
the ‘60s and ‘70s, he wanted to include a few TC details. Here is
an extract from his e-mail:
I
used a great spares supplier based in London, Bill ??? I would like
to know his surname, which I can’t remember. He used to send me
bits and let me pay when I could. I broke down in Penzance once, Bill
sent me a new diff, again, ‘pay when you can’. I don’t think
we would get that service today. Anyway, if you can help, that would
be wonderful.
Of
course, the spares supplier could only be Bill Thomson, so I sent Les
a copy of one of Bill’s advertisements.
Les
then sent me another e-mail in which he told me that as a young man
of 18 his first car was a Rolls Royce 20/25 Sportsman’s Saloon. He
acquired this at a good price as the owner was emigrating and needed
to sell. The fact that the car had been driven through a gateway
which wasn’t wide enough for it and problems with the ‘Petro Vac’
fuel pump didn’t help matters.
However,
no matter how cheap was the purchase, he really couldn’t afford to
run the car and sold it for a TC. Soon after selling the RR (he’s
regretted selling it to this day), he received a letter from a man in
Canada offering to pay twice the price he was asking and also his
fare out to Canada and return to the UK.
The TC purchase in 1964 was to prove unfortunate because about six months into owning it he was ‘run off the road’ by someone unknown who was determined to get past him. In hindsight, both drivers were probably going a bit fast, but Les couldn’t remember anything about the lead-up to the crash, only what he was told later.
The
car hit a concrete lamp post, hence the extensive damage. Les takes
up the story:
I
was left for dead on the verge: obviously not dead, apparently a
groan indicated there was life left in me. The accident was in
Hampton Lane, Solihull, and I was taken to The Cottage Hospital.
By coincidence, the mother of a friend was matron, so I got very good
attention immediately, and excellent aftercare. But then we all
did in those days.
My
shoes were left embedded in the wooden floor, (still there in this
photo, I retrieved them and still have them), hence the leg to hip
damage. Other damagetoo.
I
attribute all my joint problems to that incident. BUT – I’m still
alive and kicking!
Ed’s
note: Quite a story which
evolved from an initial enquiry regarding ‘Bill ????, spares
supplier in London’!
TDs
in AUSTRIA
I
have been exchanging e-mails for some time with Jurgen-Gerrit Gartner
in Austria. Since we began our ‘correspondence’ Gerrit has become
the owner of both a TD and a TC.
During
the course of his searches to buy a T-Type, Gerrit encountered many a
‘spammer’. One of these was a man from Germany who said he was
getting divorced from his Spanish wife and was offering his English
grandfather’s supercharged TC for 18,000 GBP with free delivery to
Austria included in the price. A likely story!
Gerrit’s patience was rewarded when he found a TD to his liking. He acted quickly and travelled to the UK to take a closer look at it. He wasn’t disappointed and purchased TD21523 near Cambridge. Having arranged transport back to Austria, he then encountered problems with the Austrian authorities who wanted exhaust analyses etc. However, some careful tuning of the SU’s did the trick and satisfied them. Here’s a picture of Gerrit’s TD (the one with the UK plate – more about the clipper blue car below).
Gerrit’s
TD21523 with the UK plates alonside TD/C7033.
An
architect by profession, Gerrit’s main work is for the Zotter
Cocolate Company. Some years ago the Company bought a clipper blue
TD, for which he designed a glass garage. The TD, a MKII (TD/C7033
with original engine XPAG/TD/LHX7193)
was the inspiration for one of the Company’s special chocolate
products, known as Mitzi Blue for which a You-Tube video was made.
Here’s a better picture of TD/C7033….
TD13854
ex-USA belongs to a friend of Gerrit‘s with paintwork described as
apearl-gleaming
white/rose shade.
Returning
to the clipper blue MKII, Gerrit found himself as the only one in the
Company who was driving and caring for the car. The more he worked on
and drove it, the more he became fascinated with the T-series, which
led him to buy TD21523.
His
fascination with the T-series has now resulted in the purchase of a
TC needing restoration, from Steve Baker. However, he still has some
work to do on his Series IIA Land Rover, which he found on the
French/German border. He says that this wonderful oily rag vehicle
brought him back some 600 miles to Austria without any problem.
In
addition to the Series IIA Landy
(some
say Landie)
he owns a Series III 109.
He
describes restoration work on old vehicles as Lego
for adults,which
brought a huge smile to my face.
So
there you have it, an expanding little T-Type community in Styria,
the south-eastern part of Austria.
Ed’s note: Gerrit is going to let me have a little article for the next issue on TD MK IIs with some pictures of the main distinguishing features.
Articles are always welcome!
Quite
a challenge for Peter Clarke in New Zealand!
This is what Pete Clarke started with. It’s TD25846. He’s actually come a long way with the car in 2½ years, learning from mistakes as we all should do. I’ll publish the latest pic in the next issue.
Some Rally winning
cars of Betty Haig
The
following from Doug Nixon:
“Please
find some photographs taken in the rain on 9th
May at Brooklands.
Roger Farmer (author of A LIFE BEHIND THE WHEEL – Betty Haig Biography) held a talk on the life and cars of Betty Haig which was brilliant. The pictures show 4 of her Rally winning cars which attended the talk.”
From right to left are the 1946 Alpine AC 16/80, the Berlin Olympics Singer, the Paris-St Raphael/ Innsbruck Singer and Doug’s 1949 Alpine TC flying the flag for our T-Types.
A T-Type Weather
Vane
Here’s a novel idea for a birthday or Christmas present for the T-series owner. Sent to me by Ian Ailes, whose wife bought it for him for Christmas.
Here’s a pleasing colour combination – well it’s pleasing to me and pleasing to its owner! The car was originally green with tan trim. It has since been red, then black and now cream with dark red upholstery.
TF9220 (MSG 495)
Owned since 1967, this home-market TF1500 was acquired by its present owner with help from his aunt. She said that she would give him 300 GBP towards a car on the condition that it had a hard roof, so ‘square riggers’ were out……….until ‘Godiva’ was found!
The hard top is thought to have been purchased new with the car in Scotland. Hard tops were available for TDs (made by Runyan), but I have never heard of them being available for the TF. Anyone know?
David Smith first owned this car in 1966. It was originally green and a non-runner. His father – a Rolls Royce engineer – helped him to rebuild the engine. The 1¼” SU carburettors were replaced with a pair of 1½” and a straight through exhaust was also fitted.
The
car was used as the wedding car for his marriage in Cranborne
(Dorset) but on the way to the honeymoon in Salisbury it blew a core
plug in the cooling system, the only time it ever let him down. A
temporary repair was undertaken by his father, using a penny (the
pre-decimalisation penny!).
The
car has undergone a couple of changes of colour; from green to white
in 1967 and from white to red in 1968 before it was sold in 1969 to
buy a larger family car. It is now black with beige upholstery and is
on the road.
David,
who now lives in Thailand has fond memories of ‘Nel’. He can be
contacted at uptlou(at)gmail.com
1955
TF1500 (Chassis number unknown).
Colin
Lambon owned a TF 1500 in Bulawayo (Rhodesia) in the late 1950s. In
those days he didn’t think of keeping details for posterity. His
TF1500 was purchased second hand from the original owner in approx.
1955/6. It was body colour
green with tan or
green upholstery.
He would really like to find out what happened to it.
Ed’s
note: According
to my copy of Clausager there were no TF1500s exported to (the then)
Rhodesia.
Karen Sutcliffe would like to get in touch with the present keeper of this TA. It was once owned by her dad and the photo shows him sitting in the car.
GMX
420 is on the road, having been totally rebuilt.
An enquiry was made about this car some time back. I now have a picture which hopefully might jog someone’s memory.
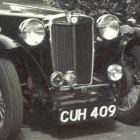
TA???? (1938) DRK 184
From a previous enquiry, it has now been established that the car is now black and living in Scotland, but much work is needed to get it back on the road.
This website uses cookies to improve your experience. We'll assume you're ok with this, but you can opt-out if you wish. Cookie settingsACCEPT
Privacy & Cookies Policy
Privacy Overview
This website uses cookies to improve your experience while you navigate through the website. Out of these cookies, the cookies that are categorized as necessary are stored on your browser as they are essential for the working of basic functionalities of the website. We also use third-party cookies that help us analyze and understand how you use this website. These cookies will be stored in your browser only with your consent. You also have the option to opt-out of these cookies. But opting out of some of these cookies may have an effect on your browsing experience.
Necessary cookies are absolutely essential for the website to function properly. This category only includes cookies that ensures basic functionalities and security features of the website. These cookies do not store any personal information.
Any cookies that may not be particularly necessary for the website to function and is used specifically to collect user personal data via analytics, ads, other embedded contents are termed as non-necessary cookies. It is mandatory to procure user consent prior to running these cookies on your website.