Category Archives: Issue 5 (April 2011)

The Editor

Hello! This issue is just over a week late in coming out, mainly because I have been spending time on my cars. I aim to publish each issue on or about the 15th of the month prior to the cover date of the magazine. So, apologies!

My trusted computer let me down just after Christmas; it had been getting slower and slower and one morning finally “gave up the ghost” and presented me with a black screen. Fortunately, my computer guru happened to be home for a brief interlude between his travels and chose a replacement for me and set everything up, including transferring all the files. How I would have managed without him, I know not as I am a complete computer ‘dummy’.

I was saddened by the news on 3rd March that Bristol Cars had passed into administration. Following the end of World War II, and faced with the problem of how to use its excess capacity and keep its many employees busy (who had previously been building such RAF stalwarts as the Bristol Blenheim and Bristol Beaufighter), the then Bristol Aeroplane Company moved into the luxury car market. In 1960 it was persuaded to join with others to form the British Aircraft Corporation (later British Aerospace). At that time the car division (Bristol Cars Ltd) passed into private hands.

Some of you may not have heard of Bristol Cars; if you go to http://www.bristolcars.co.uk/history.html you can view photographs of all the (hand built) models produced.

I am aware that several subscribers of the now defunct “Totally T-Type” magazine (in fact, a high percentage of them with Internet access) ‘voted with their feet’ and joined up with this magazine. These subscribers will not be aware – presumably because they were never informed via ‘T’ Register publicity – that I was presented with a limited edition print last summer by Register Treasurer, Gillian Smith and TD Registrar, Peter Cole. They kindly invited my wife, Sue and me out to lunch in Hampshire and also presented me with a case of red wine.

I happen to know that Gillian and Peter went to a great deal of trouble to get the print framed and have a brass plaque inscribed and mounted at the bottom of the print, which reads as follows:

“Presented to John James in appreciation of his outstanding contribution to the ‘T Register”

Donations towards the running of this magazine and the website continue to trickle in, for which I am very grateful. There is currently a healthy balance and the only expenses foreseen for the remainder of 2011 are for the ‘hard’ copy costs and postage incurred in sending complimentary copies to article contributors.

Mention of ‘hard’ copies reminds me to state that I now have 36 subscribers. A couple of subscriptions are outstanding, but on the assumption that these come in, we have moved to a break even situation for ‘hard’ copies.

The ttypes.org website continues to go from strength to strength. You can now register for a free site membership which will, over time, offer additional benefits, the first of which has already been added to the site: a technical publications archive, offering free downloads of period technical MG T-Series material. Currently the archive contains five Service Information Sheets relevant to early T-Types and a Lucas parts catalogue for the TC, but that selection will be expanded regularly in the coming days and weeks. We’ve already had kind offers from fellow T-Typers who have publications to add to the archive, so if you have a period technical document you feel that others would find useful, we’d be very grateful if you would get in touch. Meanwhile, we invite you to register for your free site membership at https://ttypes.org/register.php and then browse the MG T-Series period technical publications archive at https://ttypes.org/publications at your leisure.

It would be remiss of me not to mention that 75 years ago, the TA Model appeared on the scene. University Motors proudly announced that “The new M.G. MIDGET SERIES ‘T’ will be available for trial purposes at Stratton House on June 29”. Nobody could surely have foreseen the incredible success story of the ‘T’ Series, which was to result in our cars being exported all around the globe. A great cause for celebration and I’m sure that we custodians of the cars consider ourselves fortunate to be looking after them.

It’s easy to be overtaken by events in editing this magazine. Under the ‘Bits and Pieces!’ collection of articles I said that we are trying to track down the present owner of TB0613. We thought he might be in Oklahoma, but we are fairly sure we have located him in Louisiana. More in next issue!

Finally, my thanks to Matthew Magilton for the excellent front and back cover photos.

Crankshaft Rear Oil Seal

Roger Wilson has written a comprehensive article on the infamous engine leak at the rear of the block in the May 2010 edition of “Totally T-Type”. This excellent article prompted me to look at a spare ‘Gold Seal’ reconditioned engine block, which has revealed an additional problem and also paved the way for trying out an old remedy. In this article, the term “oil scroll housing” is used to describe that part of the “main bearing cap” that surrounds the oil scroll on the crankshaft.

The first step was to make up the setting gauge (Photo 0) detailed by Roger in the September 2010 edition of TTT.

Photo 0 – making up the setting gauge

This revealed that Roger may have been optimistic when he suggested that “The oil scroll housing on the rear main bearing cap will have a uniform clearance all round as it was bored in line with all the main bearing housings”. In this particular block I measured 0.006” clearance on one side, gradually diminishing to less than 0.001” on the other (Photo 1).

Photo 1 – Feeler gauge inserted between housing and setting gauge

My first thought was that the setting gauge was not seating properly, so to eliminate the gauge, the rear main bearing cap was mounted on a mill table and a Dial Test Indicator mounted in the chuck was then used to check the concentricity between the oil scroll housing and the shell bearing housing (Photo 2) This confirmed the 0.006” misalignment.

Photo 2 – checking the housing with a DTI

A magnified inspection of the oil scroll housing’s surface suggested that some rubbing against the crankshaft’s oil scroll had taken place. This leads me to believe that wear in the main bearings could have been considerable, thus allowing the crank’s oil scroll to contact the housing.

But why double the wear on one side compared with the wear on the bottom of the shell bearing?

This might be explained by the tendency of a rotating shaft to climb up the bearing’s side. The location of the excess wear on the near side of the engine seems to support such an idea.

Rather than have the main bearing cap line bored, I chose to machine the oil scroll housing to be concentric with the bearing housing (Photo 3) and set up a uniform gap of between 0.01” and 0.015”.

Photo 3 – Machining the housing

The object of this slightly alarming approach was to make use of a suggestion by the late Ray Sales, some 15 years ago.

He ensured concentricity between the crank’s oil scroll and the housing by wrapping a single layer of sellotape around the crank’s oil scroll and spreading a thin layer of JB Weld on the oil scroll housing. The crank, bearings and bearing housings are then assembled, torqued down and the JB Weld allowed to harden.

On dismantling, the sellotape is removed along with any excess JB Weld. Such an approach should set up a truly concentric gap of about 0.002” (0.05mm). The extra clearance machined on the oil scroll’s housing allows a thicker, more robust layer of JB Weld and to improve adhesion a groove was also machined into the scroll’s housing (Photo 4) with a slitting saw.

Photo 3 – Machining the housing

The slinger cap or oil thrower is the die cast cover plate that sits directly above the crankshaft’s oil scroll and is meant to be located by two 4 mm dowel pins and secured by three M6 screws to the engine block. The dowel pins had been removed, perhaps confirming Roger’s comment about the Morris Engine Division (responsible for the Gold Seal reconditioned engines), having to remove the pins to help correct any misalignment.

Using the gauge, a gap of 0.004” at the top of the slinger cap and a tight fit at the sides was revealed, suggesting a new cap had been installed. A light skim of the cap’s flat edge on some 320 wet and dry (Photo 5) and some judicious scraping (Photo 6) set up a uniform 0.002” clearance with the gauge.

Photo 5 – skimming the cap’s flat edge

As Roger has advised, some semi-hardening sealant either side of the gasket would help fix the cap’s location in the absence of the pins once the cap has been secured by its three screws. The use of some 0.002” shim steel wrapped around the gauge would help true the fixing of the slinger cap to the block.

Photo 6 – scraping the cap’s surface

All the above procedures should secure a uniform 0.002” clearance around the crank’s oil scroll, and whilst some slight leakage may still occur, a well set up oil scroll system should be inherently effective.

My conclusions support Roger’s suggestion that the oil slinger’s dowel pins were not always able to set up the correct clearance and that some individual adjustment is needed with the aid of a setting gauge.

Although the scroll housing should be concentric with the bearing housing, excessive bearing wear can result in increased leakage as the crank’s scroll abrades away the scroll’s housing. This can be rectified by expensive line boring or by reducing the clearance with a film of JB Weld. For good adhesion of this film to the housing, some care in preparation is needed, such as the use of a ‘Dremmel’ to grind away and rough up the surface.

If main bearing wear can result in abrasion between the crank’s oil scroll and the housing, then the crank’s oil scroll diameter needs to be checked and the setting gauge dimension modified to be compatible.

When assembling the shell bearings, the ends should slightly protrude by a few thou. above the housing. This allows a slight degree of “bearing crush” to take place when the housing is torqued down.

I hope this article will give encouragement and the reassurance that paying attention to detail, although time consuming, is worthwhile.

Eric Worpe
e.worpe(at)btinternet.com

Ed’s note: As always, Eric is willing to pass on the fruits of his labours and in doing so enables others to benefit from his experience.

TD Indicator/Sidelight Conversion

I had fitted discreet amber indicator lights under the bumpers on the front of my TD in the interest of safety, but felt that indicators incorporated in the torpedo side lamps would be even more discreet.

Having priced those commercially available I felt that I could make the conversion much cheaper, so I set about finding suitable lampholders and bulbs that could be fitted.

The lampholders I found in Maplins (Stock No. KJ71 @ £1.49 each – four required). The bulbs were from a local motorcycle shop (bayonette fitting 23watt amber [£1.47 ea – two required] and 4watt clear bayonette fitting [49p. each – two required]).

The brackets were made from 3mm (1/8th) flat steel shaped as per diagram (below), with the uprights welded on. I also used two 6mm. nuts and bolts to fix the lamp back to the wing. The nuts were again welded into place to act as captives.

The wiring was soldered to the lamp holders and insulated with ‘shrinkwrap’. The lampholders were attached to the upright with a small BA nut and bolt. The result can be seen in the photograph below.

Altogether a nice little project to work on, during the miserable winter months – and all for under a tenner!

I would advise physically checking the drilling dimensions against your own torpedo lamps before actually drilling. The dimensions I have given applied to mine, which I assume to be original.

Gordon Davies (Wrexham)

Luggage rack for MGTF and a trolley jack to assist TF engine reinstallation

The author’s TF and a Tasmanian locomotive of the same era.

The pictures on this page show a prototype luggage rack that I have built for my TF.

Rear view of the completed rack

It was designed because a conventional rack loaded with a picnic basket or anything else, blocks off the rear view, which is rather inconvenient to say the least. Not only this, but new bought ones are considerably more expensive.

Side view of the completed rack

My rack is made of bits that I had around the place but I had the welding done as I’m not that good. The outer frame is 25 x 6mm, the rear tube is 25mm and the others are 19mm. Another frame could be made lighter, but that is the material I had.

The strop around the centre wheel spinner is small diameter rigging wire sleeved in garden “dripper” hose, as is the strop that goes around the back of the spare wheel.

The legs are bent slightly to sit behind the overriders and they are locked down with short wire strops to the bolts that hold the overriders on, secured with a second nut on each.

A development might be to substitute the wire strop around the spinner with a plate that the spare wheel spinner passes straight through. Whilst it would look neater and the rack couldn’t come off the spare wheel, the rack could not be locked in as firmly as with a wire strop and eyebolts (as shown). The strop behind the spare wheel would therefore be essential, whereas with the set-up as shown, I think that that strop could possibly be dispensed with. The whole centre locking arrangement is hidden from sight anyway when a picnic basket is sitting on the rack.

Obviously if it is intended to be a permanent fixture, the rack would have to be taken off if the spare wheel was needed. However, as the installation is so quick and simple, the rack can be taken on and off as needed (which is what I do).

The rack is now better finished off since the prototype photographs were taken.

Rack off the car showing method of fixing

Changing topics for a moment, I noticed Rob Dunsterville’s February TTT2 comments about having to “tilt and jiggle and sway and gently lower” a TF engine into place. The picture below shows a jack mounted on a home made trolley.

With the trolley jack supporting the gearbox, adjusting and rolling as the engine is being lowered, “jiggling” the engine into place is so much easier!!

David Taylor
Hobart, Tasmania, Australia

TC Steering: Understanding End Assemblies

It’s that time of year where many are working on their cars for the driving days ahead. Most inquiries I get cover the full spectrum of car servicing. However, this past month I have had a surprising number of questions concerning the TC steering rod end assemblies. Specific problems surfaced with: “Can’t get it apart, can’t get it together, what needs to be replaced and most importantly, what is the correct assembly order?” The overall problem is that the end assemblies are confusing. Let’s make it simple!

Identification: There are 4 end assemblies. 3 tie rod end and 1 drag link end (also referred to drop arm end). How do you tell which is which? You must be able to first identify which type of end you are working on, as the assemblies are different.

Quick ID: Tie rod ends (TRE) have a cross slot (X) in the end adjustment plug. The drag link end (DLE) has only a single slot. Simple! One additional quick ID is that the TRE barrel slot is a small figure 8 and the DLE slot is elongated.

Drag link end assembly
Tie rod end assembly

Assembly Order: The drag link end is assembled differently than the tie rod end. To keep it simple: The DLE has the spring on the outside and the TRE has the spring on the inside.

Tie Rod End Assembly: Starting with the inside of the barrel housing the assembly order is: spring, cup (w/ tiered back), TRE ball, and cup/end plug (the end plug is also the cup). Remember the plug has a cross slot (X).

Drag Link End Assembly: From inside out, cup (w/ flat back), drop arm ball (tapered), cup (w/ tiered back), spring, and end plug. Remember this plug has a single slot.

Confusion: So far, this seems simple. However, there are some confusion factors that you need to be aware of:

• The TRE ball has a straight shaft. All 3 TRE balls are alike. The DLE ball has a tapered shaft. Very much distinguishable.

• The TRE inner cup is also the same used in the DLE outer cup. So you will have 4 of these. Visually, it has a tiered back that fits into the spring. The DLE inner cup has a flat back. There is only one on the TC inside the DLE.

• The TRE outer cup is also the end plug. 3 of these on the TC. However, the DLE plug does not have a “cup” side. Only 1 of these on your car.

• TRE housings are threaded differently for the rods. There are 2 left hand threaded barrels for left and 1 right hand threaded for right. Sometimes the barrels are stamped L/H or R/H. If not look at threads.

Help!! “I can’t get the drop arm ball out” (or in): The tapered drop arm ball cannot be assembled by simple putting it in or out of the “figure 8” slot. It has to be slid in through the end of the barrel housing and then out the slot. This is for safety reasons in case a spring breaks and the ball comes loose. It cannot fall out. And what about the springs?

Originality: Here is an interesting finding that has also added to confusion. According to the Factory parts manual, the spring in all 4 end assemblies should be the same (same parts number). However, replacement end assemblies have a longer spring in the TRE compared to the DLE spring. (approx. ¾” vs. ½” tall). A study of some “original?” end assembly barrels show that they often varied in depth when measuring the depth of the machining for the internal components. So a different length spring is required. Therefore, if you cannot get the correct adjustment on the end assembly, be mindful to check to see if a different spring length would be better.

Examples of TRE/DLE springs

Adjustment: The ball adjustment on all ends is the same. Tighten as much as possible and then back out the end plug a half turn and install the split pin (cotter). When you thread the complete end assembly onto the rod shaft, count how many turns. Then do the same number for opposite side. This will keep the adjustment capability equal and preclude wondering why you run out of toe-in adjustment. (Believe it, this has been a reported problem!)

Inspection: Finally, what do you look for when inspecting? The obvious answer is looseness. Jack up your car and give the steering a shake. If there is any sign of end play, it’s time for inspection. Common fail items are broken internal springs. And if you don’t keep it lubricated the balls will wear as in the photos, causing steering issues. Most importantly, DO NOT trust the assembly order from the prior owner. It is not uncommon to find it wrong, which has created many of the problems mentioned above.

Two examples (on the right) of ball joint wear

Wrap Up: The intent of this writing has not been to make you an expert in TC steering but to make you aware of the end piece differences and how to check your car. When the time comes to actually disassemble your car, you can find a “ready reference” for the DLE/TRE assembly in steering section of the catalog at: fromtheframeup.com

Please check your steering this winter.

Doug Pelton
doug(at)fromtheframeup.com

Editor’s comments: The set-up is, of course, the same on the TA and TB, except that the neck of the ball joint which connects with the drag link (drop arm) is a parallel fitting as opposed to a taper fitting on the TC.

One cannot be too careful with the examination of the components which make up the steering assembly. I have heard it said and seen it written, that one way of taking out the wear on the ball of the ball joint is to turn it so that the cup receives an unworn face of the ball. Well, if you want to dice with death for the sake of a few quid, go ahead! Indeed, you might find yourself ‘going ahead’ on a bend in the road with a vehicle coming straight at you in the opposite direction. I exaggerate to shock, but I’m sure you get my drift!

Another useful check if you are disassembling the steering or perhaps doing a rebuild is to have a really good look at the complete tie rod and drag link assemblies. This includes carefully inspecting the barrels (or tubes, if you like) of the assemblies, the importance of which is instanced by the following experience at an MoT test.

Those of you in the UK are well used to sitting in the car and obeying the commands of the Ministry of Transport (MoT) vehicle examiner while he marvels from below at the suspension and steering set-up of your car. He will tell you to rotate the steering wheel hard in each direction to enable him to check for wear in the joints. On one such occasion, a friend of mine was told by the examiner that the drag link end was moving vertically up and down before moving the road wheels. A ‘fail’ certificate was issued and the owner drove the car home slowly.

Upon disassembly it was found that the inner shoulder in the “tube” that supported the cup had worn away allowing the cup to tilt, which in turn moved the tapered peg over at an angle. This caused the slot in the casing to wear away, allowing the ball to protrude through the slot which would have eventually popped out.

The reason why this happened must have been due to a combination of insufficient land width within the “tube” and/or the outside diameter of the cup being too small. This would result in there being inadequate support behind the cup. A serious matter!

One, other examination – check your steering rods for straightness. Recently, when working on my J2 I found all three spare track rods I had were bent!

The Resurrection of TA0844

About 1985, under a pile of old carpet and boxes in the garage of an acquaintance, I found a 1936 MG TA with an MPJG engine. TA0844 was built in September 1936 with engine no. MPJG 1025 and was registered BTG 855. It had an original Registration Book from February 1951 to August 1970. Its state was unchanged from when the owner acquired it, and so I believe (from the registration document) that it was last run in 1967. I eventually bought this car in 1986. The photo above (taken in 1994) shows the car after removal of all chrome parts. Since buying it in 1986 I have been collecting the many missing parts. In 1997 I moved to a house with a bigger garage but as both needed restoration the TA had to wait until 2002. The following is an account of the many problems encountered.

About February 2002 I started with removal of the body. It was obvious that everything except prop shaft tunnel, firewall and scuttle top was scrap. The front valance was missing, the radiator was beyond repair, the dash had very little of the original furniture and the fuel tank was rusted through. The wheels were beyond restoration.

I removed the engine externals including the cylinder head. The engine and gearbox being too heavy to move together had to be separated, but after removal of all bolts nothing would budge. I raised the front and filled the sump with diesel oil, cranking the engine occasionally, hoping the diesel would get to the clutch and thrust bearing. After a week or so, and draining the sump, success! Both engine and gearbox were set aside.

Photo ‘A’

Photo A shows the back end of the chassis; note the telescopic shock absorber conversion and the prop shaft fitted in the wrong place.

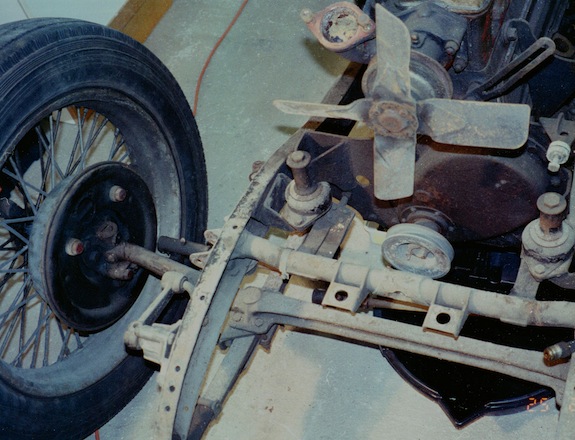
The battery supports were very corroded. The hand brake and gear lever were rusty (Photo B). The handbrake lower pivot was very loose and its cross tube was loose at the ends. The chassis was fitted with small aluminium cased shock absorbers, they were seized solid. The front springs were different sizes and the front axle bent (Photo C).

Photo ‘B’
Photo ‘C’

The brake pedal was seized to its shaft and it was necessary to saw through the shaft to remove it. The front spring trunnion housings were badly worn. One front spring had two more leaves than the other and was half an inch longer. The shock absorber mounting plate was fitted to its underside. The original bottom mounting plate and the two small reinforcing plates were missing. Two rogue plates had been used, one with a spigot was positioned above the spring. I wondered what the steering was like. The rear spring ends were badly worn. A close look revealed that in the past small pieces of spring had been braised in place of the phosphor bronze trunnions. After cleaning off the grease and the brass, the cross tube was found to be undamaged. There were two left-handed rear hubs, one of which fell off the half-shaft on disassembly.

The chassis was found to be geometrically correct (Well, that was a miracle! Ed – however………)

The offside body support bracket over the rear spring mounting was fractured on both sides adjacent to the chassis and was badly corroded. The forward offside prop shaft tunnel bracket was broken off and was found attached to the prop shaft tunnel. The offside front spring mounting pin was loose because of a loose rivet. The offside wing stay bracket was secured with one bolt and one rivet and was loose.

It was obvious that the radiator mounting tube had been rotating around the one rivet and the three retaining bolts had been wearing their way through the chassis. To repair it was necessary to remove the rivet and bolts from both sides and remove the radiator support tube. Once removed its assembly was revealed: the two cast ends were probably heat shrunk on to the tube and were pinned through.

The body support bracket above the rear spring is held in place by bolts and rivets through the bracket, chassis and the cast tube end, but with the cross tube continuing through the chassis. As I was able to weld the fractures and build up the surrounding corroded metal, I left these brackets in place.

One of the front engine mounting brackets had been welded out of square, resulting in an egg-shaped hole through which the mounting pin fits. I had to break the spot welds to re-fettle. After removing the rear axle it was time to sandblast the chassis.

Sandblasting revealed that one half of the gearbox support bracket was fractured. This might have been missed if the chassis had been cleaned by hand.

I was able to source metal to exactly replicate the battery supports. One coat of epoxy paint followed by one coat of shiny black and the basic chassis was complete by July 2002 (see photo, left).

I fitted phosphor bronze bushes to the front spring eyes. The trunnion boxes were built up where the wear extended to the cover holes and bored slightly oversize. Oversized bronze trunnions were then fitted. I had to make new trunnion box covers.

On fitting the rear offside spring I discovered that the front mounting pin was bent, causing the main leaf to be out of centre with the trunnion slot. It is held in place with a pin through the cross tube, not easy to find. I had to make a replacement.

The rear axle casing had the usual mounting hole fractures. On withdrawing the differential I found the near side differential housing was cracked around the inside edge of the threaded portion, making correct crown wheel to pinion mesh impossible. The crown wheel and pinion are from a TC.

By December I had copied the body side irons and obtained a body frame kit. I dunked the ends of all the pieces in wood preservative for a few days before starting assembly.

The body tub taking shape (photo taken in February 2003).

Ed’s notes: Well, I take my hat off to Bob Butson, (the author of this article) for persevering with this restoration when almost at every turn something was found to be either broken, bent or bodged! There is plenty more to come, as with Bob’s agreement, I’m going to serialise his rebuild.

The removal of the rear spring front mounting pin is a real ‘pig’ of a job. As Bob points out, the tapered pin which locks the mounting pin in place is “not easy to find”; I’d say it is virtually impossible to find, having experienced this difficulty on my TC and J2. However, I’m going to try Bob’s method, which is to clean the tube to bare metal for approx. one inch from the chassis. With a fairly low ambient temperature of around 50 degrees F, Bob breathed heavily on the tube, causing a film of fine condensation. The job was left for a few days and on returning it was noted that a thin ring of rust revealed where the pin was, 0.525” from the end of the tube. It was horizontal, tapered, with the thick end towards the rear and was easily knocked out.

Pin removal now solved, Bob renewed both sides.

TC Temperature Gauge Adapter (for less than a quid!)

Around three years ago I fitted a male/male adapter into the radiator of my TC in order to accommodate the sensor of a Jaeger temperature gauge. Three years later, I came to remove the adapter, only to find that it had corroded away so badly that I literally could pull it out after just a couple of turns of the spanner.

On thinking back, I remember being surprised that the item was made of steel rather than brass but assumed that it was probably stainless and would therefore be OK. As the adapter was supplied by one of the usual specialist parts suppliers, I phoned for a replacement and added the £16 charge to my already over-burdened credit card.

On receiving the replacement adaptor, again still manufactured in steel, rather than brass or stainless, I decided to see if I could source something better. I took it to my local “Plumb City” where a nice man sold me a 3/8 inch “Nipple” for the princely sum of 93 pence!! In brass!!!

As can be seen from the photograph, there are a couple of differences from the original part. The major one is that the internal diameter is slightly smaller and will not accommodate the temperature gauge sensor. However, if you have the use of a lathe, this can be easily sorted as there is more than enough sidewall thickness to widen the internal diameter to fit the sensor. (Initially, I thought of using a drill to widen out the centre but holding the part securely presents a problem. I then tried filing with a rat-tail file but soon gave up and decided to phone my friend with the lathe!!)

A second difference is the lack of a hexagon area for a spanner to locate on to. All this means is that you use a Mole wrench or plumbers “dogs” to tighten it into the radiator, having first wrapped both threads in PTFE tape. Job done – for 93 pence! …………… and in brass!!

Steve Ashworth (TC3448)

“Dave’s Doughnuts” (Donuts) (No you can’t eat ‘em!)

If your TA/B/C rear hubs ‘clunk click every trip’ then you could try “Dave’s Doughnuts”. The rubber foam doughnut fills the space between the brake drum and the wheel hub. As the spinner is tightened the foam is squashed between, locating on the half nuts and the spoke nipples, stopping the wheel from turning on the spline. Mine are still working after six months and will probably last for years.

You can cut your own with a sharp knife out of the foam rubber supplied. Two squares for you to cut out are £6 including postage and packing (order from John James via the ttypes.org Contact Form).

FIXING INSTRUCTIONS

• Mark out the rubber with concentric circles.

Outside diameter: 145mm Inside diameter: 75mm

• Using a sharp narrow blade hobby knife, cut the rubber into a ring. This is fairly difficult, but accuracy is not too important.

• With the rear wheel off the car slide the doughnut onto the hub and up to the brake drum. Replace the wheel. The spinner will probably not pick up without a good push. If you can’t get the spinner to start try trimming the rubber a little.

• Tighten the spinner in the usual way. The rubber will probably not show if the outside diameter is fairly neat.

• The rubber is intended for use with standard brake drum half nuts.

It is advisable to periodically check your spinners for tightness.

David Heath

TD and TF Rear Axle Oil Seal

There has been some past debate concerning the above subject; it has been said that this is a never ending problem, but why?

The MGTD/TF does not have a flange gasket on its two mating surfaces, which also carries the oil seal in a bearing cap; this cap has to be machined to exact standards in order to control the oil flow, particularly at the two mating flanges which must be absolutely flat (and many are not) – so let us look at some of the reasons.

Firstly, the axle bearing must protrude when fully home exactly ½” from the axle flange; likewise the bearing cap recess for the bearing must also be the same measurement and the tolerance should be -0.000”+0.005”. I know this is technical to some, but it is to ensure minimum movement of the ball bearing race, hence less oil loss and also to the flange mating faces.

Now, the bearing and oil seal cap has a very thin flange and can easily become distorted and damaged on removal and on reassembly, so check before assembly that the flange surface is absolutely flat and free from surface damage; also check with a straight edge of a rule as the flange can be bowed due to the bolts being pulled up unevenly when the cap is tightened down over the bearing. If the cap is bowed then this has to be rectified by machining in a lathe, removing only the minimum amount of metal to achieve a perfectly flat surface. This is a difficult operation to set up in a lathe and is probably best left to a skilled engineer.

Using a dial indicator clock on the lathe to set the bearing cap up, the following format should be adopted; the clock has to be set up at the centre part of the flange, near the bearing recess as this is the only part of the bearing cap which is not damaged and is perfectly flat, so that the clock reads that the surface is truly flat as you turn over the lathe by hand (indicated by the clock hand being stationary on “0”).

The cutting tool used on the lathe should also be set at this point on the bearing cap with a feeler gauge size 2 thousands of an inch between bearing face and cutting tool. Again, turning the lathe by hand, wind out the cutting tool, start up the lathe to remove any metal (which will be very small), finish off by setting the cutting tool at the centre point of the bearing cap so that the cutting tool barely touches the surface; wind out the cutting tool, start the lathe, moving the cutting tool to the centre – you will only be taking off 2 thousandths of an inch of metal and nothing at the centre of the bearing cap. Now you end up with a bearing cap surface which is perfectly flat and the bearing race recess remains correct in depth; you have only machined away the imperfections of the cap surface.

Before you assemble the bearing cap in place you should check the axle collar, on which the oil seal runs, is also perfect (no ridges etc) and is a good fit to the axle shaft (no play). It will also pay you to check the collar angle against the angle on the brake drum (or wire wheel hub if fitting new components). There could be a very slight difference, which has to be rectified because these two angles have got to match and there is no room for error.

What I do is to apply a very small amount of engineer’s blue to one part of the taper cone the complete length of the taper, then insert the cone into the drum or wire wheel hub and rotate with a little pressure back and forwards; remove to see if the blue has transferred on to the drum or wheel hub in a uniform way and for the complete length of the taper.

If this is not the case then what you have to do is to apply a very small amount of fine grinding paste with grease to the cone taper and rotate the cone in the drum or wheel hub taper angle; you will see the dull finish it leaves on the cone angles, which again, must be uniform. Remove all traces of grinding paste from both components, including the slots on the cone body and try again with the engineer’s blue. If the results are good, then all is well. If not, you will need to get out the grinding paste and start all over again!

When you are satisfied that you have got it right you can fix the taper collar in place on the axle shaft, which must be tapped right up to the roller bearing face – this is important. Assembly of the bearing cap with a new oil seal, to which low melting point grease has been added (to the seal internally over the protruding bearing race) is best done with longer bolts, which will then line up all the axle holes correctly. At this point, put around the outer diameter of the ball bearing race an application of RTV sealant and also to the axle flange. Put on the brake back plate, insert the original bolts very tightly and you will see that the sealant is now showing on the bearing flanges, being squeezed out under pressure.

You put a very, very small amount of grease on the taper part of the cone – this is to create a sliding effect on the cone. Place the brake drum or wire wheel hub on the axle shaft and torque the central nut up to 125 to 150 ft lbs (a considerable torque, which will need and extension bar to achieve it). Finally insert the split pin in the castellated nut. Hopefully, it will line up, but more often than not it won’t and you’ll need some thin shims to help.

I have tried to write this technical article in layman’s language – I hope I have succeeded!

Alan Atkins alan.atkins903(at)hotmail.co.uk

MG TD “All Clear” – Redux

Following publication of the above named article in the February issue of TTT 2, the author (Alan Atkins) received a number of expressions of interest from far and wide. Most wanted further information and more photos, so Alan has obliged with some more photos and will be happy to answer any additional queries from interested parties (his e-mail address is alan.atkins903(at)hotmail.co.uk – substitute @ for ‘at’ in the address).

The photos follow:


Practical M.G.TD: Maintenance Update and Innovation

Jonathan Goddard’s book, titled as above, has sold nearly 400 copies worldwide to date. Nearly 100 of these have been purchased from the ttypes.org ‘T-Shop’. In these days of automated everything, ‘T-Shop’ customers receive a personal e-mail, acknowledging their order and telling them that their copy has been dispatched (along with the obligatory automated one!).

The book costs £6.99 with postage costs being £0.81 (UK), £2.25 (EU) and £3.75 (Rest of World). The book can be ordered using the following link: The T-Shop

Postage costs are set to rise steeply from April, but we will hold the pre-tariff increase rates for as long as possible.