
In the June issue of TTT 2 I mentioned that Norman Verona had contacted me to say that he had found the TTT 2 website and that he had registered his newly acquired TC on the T-Database. He promised that he would send regular updates of a total restoration which he intended carrying out himself. The first update was published in the August issue of TTT 2 and the second in the October issue. This is Norman’s third update.
We left the last report at the point where I couldn’t get the brake drum on the near side rear. Turned out that the bolt that holds the clip on the shoe was on the wrong way round and the end of the bolt, protruding past the nut, was stopping the expander from closing. Turned it round and the drum went on a treat. I have ordered a new cable for the off side as it’s frayed. In the mean time I fitted all the brake pipes and the master cylinder. I had to file flats on the large thread of the master cylinder to get it to fit in the oblong hole in the chassis bracket.
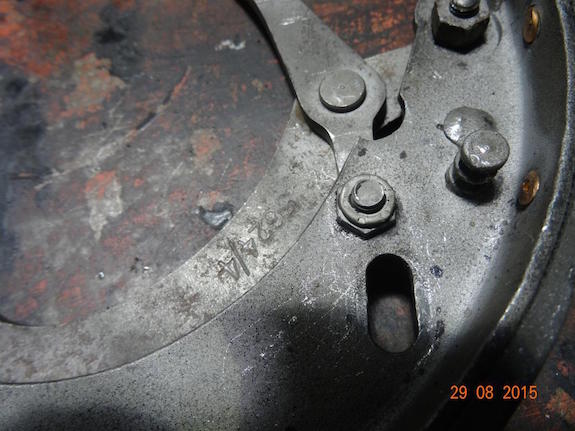
This is the errant bolt. The thread bit beyond the nut was stopping the expander lever from closing when the bolt was the other way around.

All pipes on and master cylinder. A rolling chassis at last! (minus off side h/brake cable).
The new off side cable (ordered to replace the frayed one) arrived and I struggled to fit it and, when I did I had the same problem with the expander not closing. The cable has the wrong end on it, it’s too large, so the expander, which is supposed to hook on, keeps falling out and the ferrule will not retract behind the shoe. I sent it back and ordered one from another supplier.

Can you spot the deliberate error?
I had to wait a few weeks but when it came it had the correct end on it. However, I still have the problem with the expander not fully closing – more on this later.
I got all the panels out to put in the van that we’re going to Portsmouth in to meet my daughter and son-in-law who will be collecting the new ash frame (tub) from Lancashire on Bank Holiday Monday (31st August).
You may be wondering why I’m taking the panels in the van. Reason is that we return at 1500 on Tuesday (1st September) and I want to get the tub and panels to the bodyshop that night. It’s three hours from Ouistrham to the bodyshop so I’ll take them with me, which will save time on the return. I can drive straight there. They close at 1900 so I should catch them. It will save a day’s van hire.
The front wings are already at the bodyshop and I saw a chap working on them yesterday. He had made up new flitch plates for the leading inner edge of the wing tip and had soldered the holes where the wing mirrors were. He’s also panel beaten the few dings and dents in the wings. Looked good!
I got two emails from TABC group members. Dirk Dondorp pointed out that I had the rear brake pipe going across the axle through the rebound hoops. I had meant to route these correctly three times but every time something else was more important. It’s done now. The second was from Duncan MacKellar, who had noticed my temporary plastic core plug with a spike on it on the left hand rear shock absorber. You will of course know that the core plug is metal (Lynne asked me to explain this ………………..women!) I explained that due to my medical condition, I get very tired and when I’m tired my eyesight gets extremely poor. I had miss hit the core plug when fitting the new one and had now got some more from Roger Furneaux and will replace the plastic plug before the body goes on.
I was going to refit the right hand rear brake shoes and then take them off to fit the new handbrake cable when it arrives. However, I resisted and the parts are safely in a box to be fitted with the new cable.
This morning I’m going to seal the petrol tank, pour the resin mix in and “roll” the tank around, end over end to spread the resin inside the tank.

All the panels laid out prior to loading in the van.

The new tub after the first coat of primer. Green primer. I gave it a second coat next day followed by two coats of black top coat.
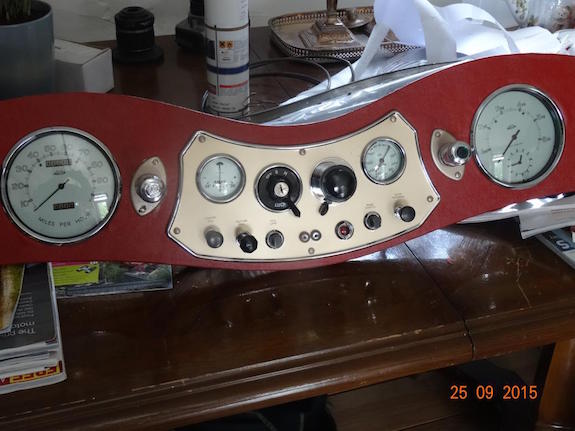
The completed dash, apart from the chrome surround strips, to be screwed and tacked on.
Waiting for the new handbrake cable to arrive, I just couldn’t get going. There are other bits and pieces I can get on with but I’d rather finish the job I’m doing before starting another. Therefore I had about 10 days off.
On the 20th September I got all the radiator parts together. I sealed up the top and bottom hose outlets (after cutting the top hose off) and filled the rad with a mixture of phosphate and hot water. The mixture ran out of three holes in the core! I rolled the rad around the field and then drained and flushed it.
I sprayed the grille slats with the correct shade of red and the radiator with shiny black chassis paint. I spilled a drop of black paint when I poured some in a plastic bowl only to find the bowl was split. Having given the slats 3 coats of red I fitted them to the chrome case. Looked good!
I then laid the bubble wrap on the floor and put the shell on it. Only problem was that I laid the grille down, on the spilt black paint. I wiped it off and used the last of the red paint to cover the black smudges. The paint bubbled up so will need rubbing down and repainting. Another tin ordered from Moss Paris but will take 6 weeks to arrive as they are out of stock. OK, we can’t all be perfect all the time.

The shell with red slats. It’s not fully screwed down yet hence one of the centre slats and both outside slats have fallen out. It’s all screwed down now and attached to the radiator.

The bonnet catches after cleaning in the blast cabinet and the wire wheel.
Now, let me tell you a story, are you sitting comfortably?
Whilst cleaning one of the catches with the spring attached, the catch caught in the wheel and was dragged in. It smashed against my hand, badly cutting the middle finger and smaller cuts on two others. Lynne dressed them and wanted to take me to hospital. The following day I agreed to go to the hospital as it was still bleeding. The doctor told me off as she couldn’t stitch it so long after it was cut; 6 hours is the limit. She had it x-ray’d and this showed no fracture. She then stuck a red hot needle through the nail to relieve the pressure (reason it was bleeding). Lynne said that I left the bed when she got this red hot needle through the nail. The doctor then asked if we wanted a nurse to visit daily to change the dressing. We both said, at the same time that Lynne would do it.
So I now have to have another few days off as it’s difficult working with one hand.
Yesterday I was looking for the four new bonnet handles (to go with the catches) but could only find two. This morning I cleared a space on the blanket and laid out all the new parts along with the re-chromed parts. I found the two missing handles in minutes. I then had a big clear up outside. Loaded all the wet and rotting cardboard on the roof of the Fiat, and found a huge wasps nest. Then put all the rubbish bags which were outside the workshop in the back of the Land Rover.

It’s a rubbish car!

All the new and re-chromed parts laid out.
You can see the whole TC rebuild blog at www.frenchblat.com MG TC and then choose a month.
Now for the engine strip down!
On a day off at the end Of September (seems like yesterday) I finished the dash. I made one small mistake and in a moment of stupidity (they increase at the same rate as age) I fitted the grab handle in two new holes rather than drill out the holes in the handle. I then took it off, drilled the holes to size and made little patches to fit under the handle to cover the two small holes I had made.

See, you cannot see the two patches….. Actually, you can only see them when really close up.
On 1st October I painted the wiper motor with black wrinkle paint, only problem is, it didn’t wrinkle. The massed brains of the TABC members suggested I heat the paint and motor then it will just be right, wrinkly, like me. I have yet to do this.
I then had a nightmare with the new handbrake cable and the shoes. I couldn’t get the shoe to close. The shoes must have come off and back on at least a dozen times before I noticed the small clip where the short end of the horizontal expander arm goes in was twisted. I removed it and the shoes retracted and the drum went on.

The twisted clip. (sounds like the latest Agatha Christie novel)
The chassis has now gone to the bodyshop and I have the new clip here. I will be making a visit to the bodyshop soon to fit it and do a few other small jobs I didn’t get a chance to finish before the chassis left.
When I refitted the shock absorbers I had two rubber bushes left to install in the arms. The problem was the inside of the arm sockets were so pitted the bushes were catching and twisting in the tube. So I bought some 25mm nylon bar and turned it down to 22mm and drilled a hole in it and fitted those instead. Much easier!

Nylon bushes in the shock absorber arm.
On the 6th October, I borrowed the flatbed from the bodyshop and returned with the chassis on the back. I wanted to get it to them as I wanted the space to strip the engine.

Chassis on a flatbed. Lynne took over 90 pictures of this operation. They are on YouTube as a “video” see it here The loading
When I got back I started stripping the engine.

An engine with the rocker shaft removed.

This is the state of the block with the thermostat housing removed. It cleaned up OK.

And this is the sludge in the bottom of the sump. The shiny line just above the pickup is where I ran a finger. It’s about ¼” thick!

The bore. It’s mainly staining and cleaned up well. I’ll not rebore it as it was rebored at 80,000 and has only done 18,000 miles since.

The inside of the block after a good clean with petrol and degreaser. I have since cleaned it some more and scraped all the gasket off.

The cylinder head, spark plug side, after cleaning.
The head is unpainted so I asked the TABC group what should be painted. It started an avalanche of emails about what colours were used. I know the colour, dark red (maroon). In the end I established the head should be painted and so should the water pump and thermostat housing.

The crankshaft with an oil gallery cleaner in one of the oil ways. Can you see it?……..

…. No, I didn’t think you would so here’s a close up.

Four pushrods cleaned, four to go.

Another half done. Notice the glove. It’s not for protection, just to cover the bandage on the middle finger which this machine ate a few days ago.

Nice and shiny flywheel.
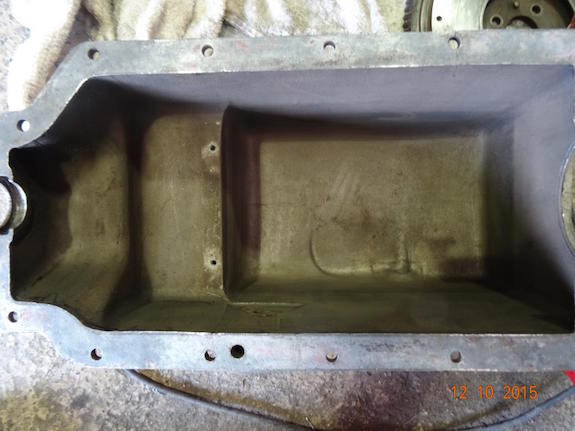
And a clean sump.
When I first drew the pistons I thought they were OK. But on cleaning I found this…

……… deep scores on all four. Two pistons had broken rings so that wouldn’t have helped.
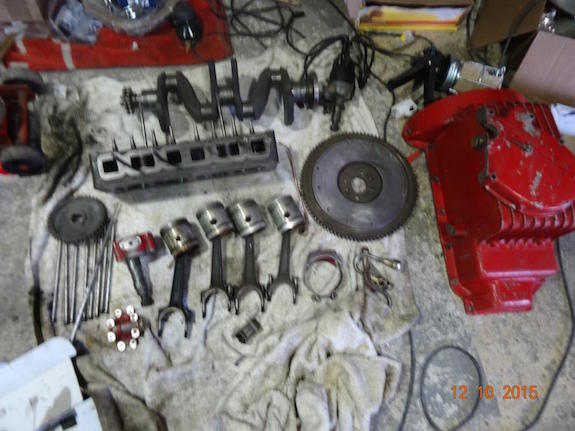
The cleaned parts laying on a towel (from the Grosvenor-only the best for my engine).
Whilst I’ve been waiting for parts I’ve been doing some work on a friends TC. I won’t go into that here but you can read all about it on www.frenchblat.com, MG TC, and select October.
Norman Verona
