Category Archives: Issue 47 (April 2018)

The Editor

Welcome to Issue 47, April 2018!

Spring is just around the corner here in the UK. Thank goodness! we say, having endured some freezing conditions brought about by what the media dubbed “The beast from the east” (extreme weather conditions from Siberia). Fortunately, the cold weather only lasted a few days, but was sufficient to cause chaos with the shops bereft of supplies due to transport seizing up.

I failed to meet my self-imposed deadline (reminds me of work!) of 31st January to send out the entry forms for The Tour of The Cotswolds. However, they did go out by the middle of February and most of the completed forms have now come back. If you think you should have had an entry form, but didn’t get one, please contact me without delay. As previously advised, the tour is fully booked, but to register an interest for the reserve list please contact me jj(at)ttypes.org {substitute @ for (at)}.

The subject of electric cars keeps popping up here and there. I read some interesting facts recently in the Motoring section of The Daily Telegraph. Did you know that the first production electric car dates back to 1884 and was offered in London by inventor, Thomas Parker? By 1897 electric taxis began to appear on the streets of New York and The Pope Manufacturing Company of Indianapolis became the first large-scale producer of electric vehicles. By 1900, a third of all vehicles on the road in America were powered by electricity.

However, the advent of Henry Ford’s Model T (1908) had a huge impact on electric car sales as motorists turned to petrol power. By 1920, the electric car was no longer viable as the internal combustion engine produced more power and could travel further.

Fast forward to 2018 and Jaguar has just unveiled its new electric IPACE SUV. A five-seat sports car, it has a range of 298 miles, can be charged in 45 minutes and accelerates from 0 to 60mph in 4.5 seconds.

Perhaps though, the Luddite in me rejoices when I read that ‘Flippy’ the burger-flipping robot has been rested from its duties in the Caliburger restaurant in Pasadena, California, because it was too slow and could not keep up with demand. Apparently though, it’s not the fault of the robot, it is all down to the humans who have flocked to the restaurant to see it in action, thereby inflating demand.

Seriously though, the whole issue of artificial intelligence (AI) is quite worrying, for when they get ‘Flippy’ working faster and perhaps bring in another ‘Flippy’ that will be a few humans less that will be needed.

In the previous issue I gave an update of where we were with DVLA on the vexed question of seeking details of previous owners of one’s MG. I said that I had written to DVLA asking them to explain why the Agency was unable to let me have details of previous owners of my car and yet they had recently agreed to forward a letter to a previous owner of a Triple-M car for historical purposes, thereby in contravention of their own recently expressed policy that this would override the rights of the previous keeper.

I wrote to the Head of Data Protection Policy but didn’t receive a reply from him. Instead, I received a response from a person in the Central Casework Group (this is the section I deal with frequently in my role as DVLA representative for the MG Octagon Car Club in supporting requests for re-claimed and age-related registration marks). I may be old-fashioned, but I maintain that if I write to the Head of Data Protection on a matter which concerns data protection, then I expect to receive a reply from him, or at least one from somebody in a position of authority who tells me that he is replying on behalf the Head of Data Protection.

I intend to take this matter up with my Member of Parliament shortly. I remain to be convinced that the reason for refusing to provide a service on previous ownership details which, until relatively recently, has always been provided, is down to data protection and I want this clarified once and for all.

In particular, I’d like to know how the general General Data Protection Regulation, due to become effective on 25th May differs from existing legislation (if in fact, this is the reason for DVLA’s change of policy).

I’m aware that the Federation of British Historic Vehicle Clubs (FBHVC) has published the DVLA’s response on this, but this organisation has not challenged it.

Following a Freedom of Information request, the DVLA’s internal memo dated 17th August regarding the cessation of the details of previous ownership service has been obtained and I have retyped this (because the print in the original memo is very small) and included it under the ‘Bits and Pieces’ section later in this issue. Interestingly, it contains the sentence As we discussed, there is no reason why we can’t provide the history of a vehicle ……

As we grow older, we are reminded that we can’t live forever by the number of funerals we attend of our loved ones. I shall shortly be attending the funeral on the Isle of Wight of Graham Ash, a dear friend of mine and Sue’s. Graham owned several MGs including a TA, YA, TD and MGA, also a VA Tourer (his first MG) which went to Australia. Graham worked on vintage Bentley’s at one stage of his varied life and was the sort of chap who would help anybody. R. I. P. Graham.

JOHN JAMES


DISCLAIMER BY THE EDITOR

Totally T-Type 2

is produced totally on a voluntary basis and is available on the website www.ttypes.org on a totally FREE basis. Its primary purpose is to help T-Type owners through articles of a technical nature and point them in the direction of recommended service and spares suppliers. Articles are published in good faith but I cannot accept responsibility or legal liability and in respect of contents, liability is expressly disclaimed.


Fitting an XPAW engine in a TA

One big fault with the MPJG engine is the cylinder head. The siamesed central exhaust port can cause the head to crack athwartships in this area, especially if the engine has been thrashed.

Of my five TAs I am lucky that only one has a cracked head…. and it would be my Tickford!

What happens then is oil from the rockers gets ingested into the cooling system. An easy fix you say. Not so. I do not know anyone who has succeeded in making a permanent repair.

To fix the problem I decided to fit an XPAW engine from a Wolseley 4/44. The XPAW is the final rendition of the XPA engines similar to that fitted to the MG TF and YB. These engines are easy to get but will not fit into a TA without some changes. They have the later 8 inch dry clutch, which fortunately the MG YB is fitted. The YB also has a sump of similar shape to the TA and the YB clutch housing was just what I needed as I wanted to use the TA gearbox.

Both these items Tony Slattery was able to supply. Other essential items needed are a TC front mounting plate and TC intake and exhaust manifolds. These were supplied by Barry Walker.

I planned to use the TA dynamo and carbs so I could use the TA air inlet manifold and air cleaner.

One major job was matching the TA gearbox input shaft to the XPAW clutch. The Wolseley gearbox input shaft was cut off as was the TA gearbox input shaft. Then the Wolseley shaft was welded onto the TA ‘box shaft. This needed careful measuring but it worked. The other thing was the clutch release mechanism. I had a spare VA clutch cross shaft and fork etc. This was a stronger affair than the YB shaft. I had it extended on the off side to align with the TA clutch pedal. Also, bigger shaft bearings were fitted.

All this went together nicely and fitted exactly into the TA engine bay using the TA clutch release rod etc. I had to change the rev counter drive gearbox on the rear of the dynamo for one with a shorter drive to clear the distributor. There is not much spare room around these items as the Wolseley distributor has a vacuum advance which gets in the way

Another problem was the bonnet bulge to clear the dynamo. On the XPAW the dynamo is lower than on the TA engine but you can’t just lower the bulge because of the bonnet catch being in the way. We ended up turning the bulge vertical. Looks a bit odd. The TC has a much smaller bulge but how it clears the dynamo when at full stretch beats me.

The TA carbs need distance pieces fitted so the float chambers will clear the manifold studs. This works OK as with a slight bend you can still use the TA rad stay. Also, the fuel pipe from the pump to the carbs is a bit short. You need a 14″ pipe. The other big problem was connecting the XPAW thermostat housing outlet to the radiator. As I wished to use the modern thermostat I had a new 1.5″ top tank outlet fitted as far to the near side as possible. I had the old 2.25″ outlet sealed off but still there. Then a rad hose with a 90ª bend made the connection. Simple.

Other items needed are a TC front exhaust pipe and a TC steering box chassis bracket. NTG supplied both these. I was disappointed with the exhaust pipe flange stud holes. At both ends they were not quite correctly drilled and needed a lot of filing The other thing needed is a solenoid to operate the starter, preferably with a pushbutton. I had a couple of Wolseley 18/85 pushbuttons and fitted one in the TA dash panel in lieu of the old starter cable. So now I have virtually a TB Tickford with a more modern engine than the original TB had.

Going back to the steering box bracket, I found the TC one of no use. It was just a heavier version of the TA bracket and the mounting holes were different.

Above and below the TC steering box bracket (silver) and the TA bracket (pictures by kind permission of Stewart Penfound).

I decided to modify the TA bracket by bolting two extension pieces to the offside of each box mounting lug. This moved the box up, forward and to the right so the column would clear the starter and clutch housing.

Things are so tight in this area it was necessary to assemble the bracket onto the box before mounting the whole lot onto the chassis. I had to remove the plate where the column goes through the bulkhead as the raised column fouled this when mounted on the under-dash bracket. Just as well the Tickford has adjustable steering wheel splines.

I have fitted TC/TD carb needles and am using NGK BR5ES plugs. Both the fuel hose and carb needles supplied by Pete at MG Octagon CC.

Two other items I should mention are moving the dipstick to the offside of the engine and fitting a TC tappet cover and breather pipe. There is a flat provided for the dipstick on the offside. It may be possible to use the Wolseley tappet cover but the breather location and attachment may need looking at.

I have now had the car on the road and the installation appears to be working OK.

This paragraph is for Mike Sherrell. This is how I prime the oil pump and expel air from an engine before initial start-up. I use an old garden weed sprayer. Put 3 or 4 pints of running-in oil into the sprayer and connect the tube onto the oil gallery via a suitable plug hole and various fittings. Pump up the pressure and go and have a cup of tea. Come back, pump up the pressure again and give the engine a few turns with the crank-handle. Fill the sump with oil via the rocker cover to the correct level. Then disconnect the sprayer, carefully replace the gallery plug, leap behind the wheel and fire up. Instant oil pressure. I have done all my new engines like this and never had a failure.

Gary Wall, Martinborough, New Zealand

Ed’s note: I corresponded with Stewart Penfound on the subject of the steering box bracket and with his agreement I’m publishing what he said:

I initially thought using a TC steering bracket was the answer but as you can see, one of the mounting holes is spaced differently, which means it would have to be drilled to fit. Even then, it wouldn’t bring the steering column far enough forward and upwards to enable it to miss the starter motor. The holes in the TC chassis are, I think, further forward than on the TA, so if a TC bracket was used, three holes would have to be drilled through the chassis (and reinforcing on the inside) and strengthening tubes inserted and welded.

I think the inner reinforcing on the TA chassis didn’t allow for three holes anyway, but my memory is hazy on that one.

I was fortunate to have acquired a home-made bracket that supposedly enabled the column to miss the starter motor, but, as you can see, (pics 03 and 04) I ended up having it extended (and reinforced) to not only get it positioned correctly with regard to the starter motor, but to be able to use the correct holes in the chassis. Even then, I had to fine tune it by inserting an aluminium spacer (about 1mm thick) between the bracket and chassis to give clearance between the bonnet side and the head of the bolt holding the column to the bracket.

In its final position, the steering wheel ended up slightly closer to the dashboard and, because it is now at a slightly different angle, the column fouled the hole in the clamping plate in the foot ramp, making it impossible to fit the rubber gaiter. A new plate was the answer, as you can see (pic05).

I might have over-engineered it, but when I researched it I found that although hundreds of TAs have XPAG engines fitted, no-one had ever written down how they overcame the problem!

I have heard of people using TC brackets but the torque from turning the steering wheel is so great that if the chassis wasn’t reinforced it would flex so much it would be positively dangerous. (When I first fitted my reconstructed bracket, it bent noticeably when turning the steering wheel, which prompted me to have a reinforcing web welded on). Another solution I’ve seen is to cut a slot in the back of the steering column’s outer sleeve where it touches the starter motor, and I’ve also seen one where the TA bracket was retained and the column was jammed so tightly against the starter motor that the engine couldn’t move at all on its front mountings.”

(Pics 06 and 07 show the final fitting)

Pics 03 & 04 – Stewart’s acquired home-made bracket, which he modified and strengthened.

Pic 05 – new and old clamping plate.

Pics 06 & 07 showing final fitting.

Ed’s further note: Perhaps this is an opportune moment to remind readers that when modifications to the standard arrangement have been carried out, it is most definitely advisable to notify your insurance provider with full details of the modification(s).

Modifying a Three Brush Dynamo System to Solid State Regulation

Jim Thomas has recently modified the charging system on his TA. He describes the benefits and how he went about the task.

I chose to modify the original three brush dynamo and cut-out charge regulator to a modern solid state system for improved functionality and reliability (no point in using a 2 or 3 bobbin mechanical regulator). Why do this modification?

  • Can use LED bulbs and other electronics safely without trying to find a compromise 3rd brush adjustment for each load

  • No sticking cut-out points, dynamo damage or fire risk

  • Longer battery life and less topping up (no overcharging)

  • Can use any type of lead acid battery

I chose the DVR3 regulator from ‘Dynamo Regulators Ltd’, but before I could purchase this I had to check that the field resistance of the C45 NV 3-brush dynamo on my TA was greater than 2.5 ohms – it was 3.7 ohms, therefore safe to proceed. The DVR3 regulator allows one to choose the current limit of the dynamo. The original is capable of a maximum output of 13 amps but I chose an 11 amps limit as I intend to fit LED bulbs and rarely go out in the rain at night. For a few pounds it is possible to purchase a regulator with a custom current limit.

I wanted to hide the regulator and any new wiring and that proved easy to do. I also kept the car positive earth as I quite like the quaintness of this. The DVR3 fits snugly in the back of the CJR3 cut-out once the field resistors are removed. It is simple to return the system to a relay cut-out too. The instructions that come with the DVR3 are very clear and should be used with the notes below that cover the specific modification for the MG TA CRJ3 cut-out. These wiring modifications are quite simple and can be completed in a few hours with the dynamo and cut-out left mounted on the car:

Modify the dynamo for 2-brush operation:

  • Disconnect the battery

  • Loosen the dynamo mountings, remove the fan belt and open the inspection cover

  • Remove the 3rd brush (small thin one) and spring

  • Add a link from the 3rd brush where the field wire is terminated to the ground connection on the grounded main brush (see photo 1) – both had screw connections on my dynamo.

Photo 1 – Dynamo being modified for 2-brush operation.

Modify the CJR3 cut-out unit:

  • Remove the two machine screws and nuts holding the unit to the bulkhead

  • Remove the field resistors with their terminal screws, asbestos and the perforated screen

  • Disconnect the cut-out. I could de-solder one wire and this disconnected both the ‘shunt’ and ‘series’ coils in the cut-out. Other cut-outs have screwed connections that can be isolated

  • Remove the wires from the F1 and F2 terminals that go to the ignition switch on the dash and insulate the open ends. Leave the yellow ‘D’ wire connected to drive the warning light

  • Move the dynamo field wire from F2 to F1 (this is to allow the original dynamo field fuse to become the new fuse that protects the regulator)

  • Add a link from F2 to A1 (where the supply to the car wiring originates)

  • Replace the old field fuse with one that is a little larger than the rated maximum output of the DVR3 regulator – I used a 13 amp domestic fuse to test the system but have now soldered some 15 amp fuse wire into the original glass fuse

  • Mount the DVR3 regulator on the bulkhead. I used the sticky pad that comes with the unit to locate it as I pushed the CJR3 cut-out back on its original mounts. For a better mounting, I threaded the holes in the DVR3 unit and drilled two small holes in the bulkhead and machine screw mounted the unit firmly with heat paste between the top and the bulkhead

  • Wire up the unit as shown in the diagram – also see photo 2

  • Insulate the bare tracks (use a piece of plastic). Re-fit the CJR3 thus concealing the DVR3

  • Replace the fuse and cut-out lids (even put back the lead seal that was originally wired around the spring clip holding the cut-out lid)

  • Reconnect the battery and switch on. The charge warning light should come on. Start the engine and see what smooth and well-regulated current looks like on the ammeter! The voltages look good too thus enabling the battery to fully charge rapidly for this first time. There is positive charge almost at tick-over, the lights are brighter and the starter sounds a bit more powerful.

A really worthwhile, simple, non-intrusive modification I believe. Jim Thomas

Photo 2 – showing the wiring (see also wiring diagram).

Photo 3 – Job done!

Ed’s note: This article was published in the February issue of the MG OCTAGON CAR CLUB’s ‘Bulletin’.

Dynamo Regulators Ltd 75 Titchfield Park Rd,Fareham PO15 5RN Telephone 01489 880552.

http://dynamoregulators.com

Classic Dynamo and Regulator Conversions Ltd CDRC Ltd Unit 4a, Rear of Bridge Street Garage, Bridge Street, Saxilby, LINCOLN LN1 2PZ Telephone 01522 703422

http://www.dynamoregulatorconversions.com

Paint your wagon

Whether at the culmination of a lengthy restoration, or when the realisation dawns that time has finally taken its toll, and the old dear is looking decidedly shabby, the moment inevitably arrives to turn to the thought of paint.

Some may consider doing the job themselves; for others, this is a task for a professional.

Either way, an understanding of the materials and hence the choices to be made, is essential. Much information is available on the ‘net’ on the mechanics (technique, procedures, etc.) of painting a vehicle, but very little in digestible form on the practicalities, pros and cons, on the decisions to be made long before the lid is taken off a can of paint; specifically, on material selection. Even if you chose the professional route, you will still have to specify what you require. You will still need to talk to the people doing the job, and decide between a bewildering number of options.

The early T-Series cars originally left the factory resplendent in cellulose paint. This has to be qualified in that I have seen sources claiming that whilst the body was painted in cellulose, the wings were finished in enamel, for abrasion resistance. The complication is that other sources refer to cellulose enamel, which confuses the picture somewhat.

For the purposes of this article I have not considered synthetic, oil-based enamels, nor traditional brushing enamels, which are sometimes used for vehicle refinishing. Neither were deemed practical for my needs. Nor have I considered metallic finishes, as although metallics were available in the period, the vast majority of T-Series cars were painted in a solid colour.

The material choice in practice is between traditional cellulose and modern two-part acrylic.

Cellulose paint is still available for work on classic vehicles. Wonderful for originality fetishists, and relatively DIY friendly should you chose to do the work yourself. It is also relatively inexpensive. Cellulose dries by evaporation of the solvent – of which there is a good deal – as for application, cellulose paint is mixed almost one to one with thinners.

The downside of cellulose is unquestionably a (comparatively) woeful abrasion resistance. Stone chipping is inevitable if you intend to drive the car. Some would argue that cellulose never really hardens in the modern sense. It is certainly nowhere near as abrasion resistant as more modern materials. Cellulose also requires significantly more work after the paint is applied – rubbing down between layers and reapplying. This represents a chore for a DIY-er – but significant expense if you are paying someone else.

In the professional vehicle refinishing world, cellulose was replaced several decades ago by two-part epoxy paints. As the name suggests, these comprise the paint itself and the associated hardener – hence the generic description, two-pack or 2K.

2K paint dries by the chemical reaction between the paint and the hardener. In a professional environment, it will normally be baked in an oven immediately after application, but even without baking, it will dry to a very hard finish – very much harder than cellulose. The greater abrasion resistance of 2k materials is something to celebrate by anyone who has chipped a cellulose painted panel during assembly, and the direct-from-the-gun gloss is a revelation for those used to the hours of hard rubbing down & polishing toil inevitable with cellulose.

Two-part paints may conveniently be further sub-divided into what are known (in the UK at least) as direct gloss and clear over base. Most modern cars, whether metallic or a solid colour, are finished (or refinished) in clear over base. A colour base coat, which may either be water or solvent based, solid or metallic, is first applied. This base coat, has a dull, satin appearance and very little abrasion resistance. It must be overlaid (without further preparation) with several coats of clear lacquer, which is normally solvent based. The result is a very high gloss, wet look finish. This high gloss is very popular with restorers of classic cars in the United States. Tastes differ, and whilst I like a shiny car, I find the ultra-high gloss produced looks both incongruous and utterly ridiculous on a seventy year old British classic car. The phrase “over restored”, springs to mind. Your choice!

An alternative may be found in direct gloss 2K. Again, this is two-pack paint, but it is applied without a covering of clear coat. Produces a good gloss finish straight from the gun, but, can also be polished to a very high gloss finish – or not!

Purists will still quibble over the high gloss level of 2K when compared to cellulose. All is not lost, as 2K can be made to closely resemble the appearance of cellulose in one of two ways; either by adding a very small quantity of matting agent to the mixed paint prior to spraying in order to take the edge off the shine, or, (concours folk should look away now) by simply driving the car around a little and letting the inevitable scuffs and polishing scratches dull the shine slightly.

On a car with so much of the underside exposed to both view and road debris, consideration has to be given to the use of stone chip. A high gloss finish on the underside of wings looks good (and original) but will not stay pristine for long if the car is driven. A possible solution is stone chip coating. This is a slightly rubbery paint, which is applied over primer then over coated with colour coats. On a T-Series, it might be used under the front and rear wings. Non-original, yes, but then neither is the acne-effect of touched up stone chips.

Used neat through a proprietary gun, stone chip will produce a stippled, lightly textured finish, but if diluted, and applied though a normal spray gun (with a larger nozzle), it produces an almost flat surface, which looks close to original when over painted with gloss, but also helps to shrug off damage from road debris.

Is painting your TC yourself a practical proposition? As far as cellulose is concerned, it is feasible. A mask and sensible precautions on handling are required but repainting a car at home is feasible – always assuming that you can live with the limitations of cellulose. 

2K is very different.

Any mention of ‘elf-‘n’-safety in our cotton wool swathed times has yawns developing and eyes rolling. The downside of this is that genuine concerns tend to get brushed aside with the fatuous. Health concerns surrounding the use of 2k paint are far from fatuous. The hardener contains isocyanates, which are known to cause asthma. The spray mist is dangerous by both inhalation and skin absorption.

As to the practicalities, a disposable suit and an air fed mask are absolutely vital (ignore anyone who tries to tell you otherwise). The mask will consume a great deal of compressed air. My 3hp, 15 CFm model which is about the largest that can be run from a domestic, single phase supply, will not run the mask and a spray gun simultaneously.

Most important is the selection of somewhere to spray the vehicle, as you have to consider not only your own safety, but that of those around you who may come into contact with the spray mist.

What did I do? Quotations for painting my (dismantled) TC varied between £4,000 and £12,000, and the quality of the finished work, I will put politely, varied widely, and not always in relation to the price paid.

I elected to paint the vehicle myself; partly because a DIY job would help with logistics. A TC has to be painted in a dismantled state; chipping a panel during reassembly necessitating repainting would be inevitable. Painting it myself would make this easier. And so it was to be…!

HSE information on the use of 2K paints here: http://www.hse.gov.uk/mvr/bodyshop/isocyanates.htm

Martin Holloway

Ed’s note: Martin sent me a selection of photos taken prior to final assembly/panel adjustments, some of which are shown here.

As for technical information: the car was stripped to bare metal, remedial panel work done, epoxy primed, followed by three coats of primer/filler (both 2K), underbody stone chip, and four coats of direct gloss two-pack top coat. It has not been polished up to a mirror shine, deliberately, in order to resemble a cellulose finish.

Total cost of the respray (excluding sundries) from his receipts was £420.


Manchester XPAG Tests Fuel and Tuning – Part 1: Fuel

Introduction

Thank you to everybody for your positive comments on the articles so far. Their aim has been to help owners understand the fundamental issues behind the problems caused by modern petrol, better equipping them to put in place measures to mitigate the symptoms. The next three articles summarise my suggestions on possible solutions. The main thing to remember is that our cars are not the same, differences have accumulated with the passage of time as various owners have made tweaks and mods to make them run better. The severity of the problems experienced by owners varies immensely, even between the same models of car. A solution that may work well for one car may not resolve the same problems in another. The suggestions in these articles should be taken just as that, suggestions for people to try; they are not intended as solutions to be blindly adopted.

Owners mainly experience two problems when using modern petrol, 1) the engine spluttering to a stop in slow moving or stop-start traffic, particularly on hot days, 2) The hot restart problem where a hot engine cannot be restarted after it has been switched off for about 5 minutes. Some owners also experience burnt exhaust valves and cracked heads, problems also related to the use of modern petrol.

The Cause? A larger fraction of modern petrol is volatile at temperatures below 50°C. compared with classic petrol. Ultimately, this leads to the Weak Running problem described previously. The Manchester XPAG tests also identified a second problem, Slow Combustion, this appears to be at its worst at normal road driving speeds. It increases the temperature of the cylinder head, the exhaust manifold and the under-bonnet temperature (hence the burnt valves and cracked cylinder heads) and it makes the Weak Running problem worse.

These problems do not affect modern cars. Firstly, their computer-controlled fuel injection systems provide a more accurate, finely atomised and better mixed charge of fuel. Secondly, petrol is circulated from the petrol tank to the injectors under pressure which increases the petrol’s boiling point. Unused petrol is circulated back to the tank to cool down.

In this, the first of the three articles which suggest possible solutions, I discuss basic steps that can be taken to help avoid fuel vaporisation. The later articles will cover re-tuning the engine to help reduce the severity of the potentially more damaging Slow Combustion problem.

Petrol Volatility

Petrol is not a single substance, it consists of many different hydrocarbons, each with a different boiling point. If you heat modern petrol, some components will start to evaporate or boil at relatively low temperatures, whilst others will still be liquid at temperatures well above the boiling point of water. Unfortunately, at typical under bonnet engine temperatures of around 50°C, a significant volume of modern petrol can evaporate. This leads to vapour forming in the fuel system, particularly problematic, when it is in the carburettor jet, which makes the mixture very weak causing the engine to falter and stop.

The most effective way to address this problem, is to use a fuel that is less volatile at low temperatures. Easier said than done! The table and graph show the list of fuels that were tested at Manchester and the percentage by volume that evaporated when the temperature reached 50°C (hot running) and 75°C (a temperature possibly reached in stop start traffic). Those on the left hand side of the graph with a lower volume evaporating are the best fuels to use.

Fuel

% Evaporated
at 50
°C

% Evaporated
at 75
°C

Avgas

3%

22%

50% Toluene

4%

24%

Sunoco Optima 98

5%

22%

1960 Petrol

9%

28%

Branded 95 Octane with 10% kerosene

15%

36%

Branded Super Grade with ethanol

17%

36%

E10

18%

46%

Branded 95 Octane (Batch 2)

20%

46%

Unfortunately, with the exception of Sunoco Optima 98, the top four performing fuels are either not available or not legal for road use. For the first of these three fuels, less than 5% evaporated at 50°C and, if used on the road, they would not suffer from the Weak Running problem.

In contrast, at this temperature, nearly 20% of a well-known brand of 95 Octane petrol (Brand 1) evaporated, increasing to 46% at 75°C. Certainly, sufficient to cause the Weak Running problem. Indeed, it was this fuel that showed this problem during our tests.

In defence of this petrol, the tests at Manchester were run in March and it is highly probable that it was a more volatile winter grade. It is also worth noting that adding 10% kerosene to this petrol reduced the volatility by 5% at 50°C and 10% at 75°C, not a cure, but a significant improvement.

Unfortunately, in practice you do not know what petrol you are filling your car with. This was demonstrated at Manchester where two batches of the same, well-known, brand of 95 octane petrol, bought from a filling station close to the University within days of each other, proved to be very different. One contained ethanol, the other did not and the XPAG ran very differently on each of these batches.

Again, unfortunately, other than avoiding winter grade fuel, adding kerosene or using a bespoke fuel such as Anglo American Oil Sunoco Optima 98, there is little that can be done to ensure you are using a low volatility petrol. However, if you do suffer from volatility problems, it is worth trying a different brand, grade or filling station.

Keep the Petrol Cool

One means of avoiding the Weak Running problem is to keep the petrol under the bonnet as cool as possible.

Needless to say, the engine cooling system should be working efficiently. Once every two years or so, flush the engine and radiator with clean water. If fitted, ensure the thermostat is working properly. Wetting agents in the cooling water are also claimed to help reduce temperatures.

At Manchester we only experienced the hot restart problem, not the slow moving or stop-start traffic problem. During the tests, the temperature measurements taken from the carburettors were not sufficiently high to indicate vaporisation would have caused a problem during normal running.

The tests suggested the hot restart problem was mainly caused by hot gases from the inlet manifold raising the temperature of the carburettors. When you stop a 4-cylinder engine such as the XPAG, one cylinder will have its inlet valve open allowing residual hot gases to leave the cylinder and flow back into the inlet manifold. With no air flowing through the engine bay coupled with heat soak from the engine, it is sufficient to raise the temperature of the fuel, such that a significant percentage will boil in the carburettor jet.

This has a double negative effect. Firstly, it blows liquid fuel out of the jet which runs down the inlet manifold; secondly, it prevents the carburettor from delivering the correct mixture. Try to start the engine, it briefly coughs into life, running rich as the liquid fuel in the inlet manifold enters the cylinder, then it stops because of the weak mixture. Sometimes, it is possible to restart the engine using the choke and after a few coughs and splutters, normal running returns as cold petrol fills the float chambers.

One possible solution when stopping the engine for a short period is to blip the throttle, turn off the ignition while the engine is still revving and open the throttle. This will let cold air enter the cylinders before the engine stops, but at the risk of having it run on.

The cause of the stop-start traffic problem is different. Even though the engine is lightly loaded and not generating a lot of heat, there is little airflow under the bonnet, allowing temperatures to increase. At the same time the flow of fuel through the petrol pump, petrol hoses and float chambers is low, giving more time for it to heat up and start to vaporise. This is typical of the problems seen by owners, their cars run without problems in moving traffic and only start to misfire and stop when the traffic flow drops to a near standstill.

The best way to address this is to ensure the minimum volume of petrol is held under the bonnet. Keep hoses short and avoid “reservoirs” such as large fuel filters, etc. Ensure the fuel hoses, the air inlet and components holding petrol, are placed away from hot parts of the engine and, if possible, in the cooler air flow.

Use ducts or baffles to direct cold air onto the fuel system components, heat shields to prevent radiant heat reaching them. Only insulate parts of the fuel system as a last measure. Insulation does not stop the heat flow, it only slows it down; so when the engine stops, the heat will soak in and it will then take longer to cool down, possibly making the hot restart problem worse.

Insulate hot parts of the engine, e.g. exhaust manifold and exhaust down pipe as it will help reduce under bonnet temperatures as well as preventing heat reaching critical parts of the fuel system.

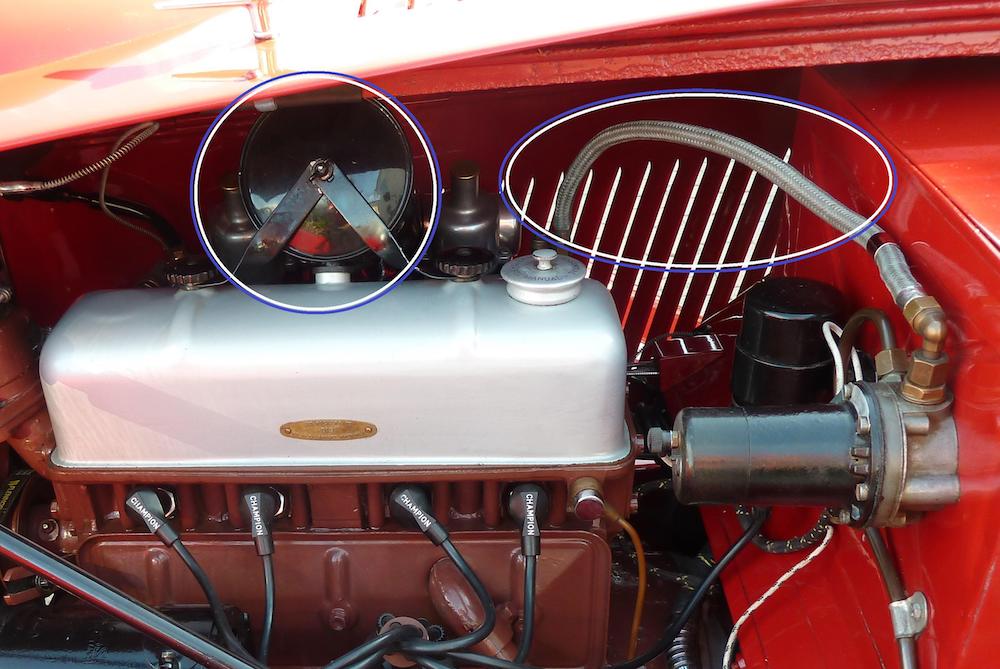
Unfortunately, on the standard MG TC, the petrol pump, cross pipe from the petrol pump to the carburettors and air intake are in the hot air at the top of the engine, not the best place (see previous photo). For example, although not original, pancake filters fitted directly to the carburettor inlet that draw colder air from the slits in the bonnet would be better.

Although I do not suffer from the hot restart problem, when switching on the ignition after a short stop, the petrol pump will sometimes continue to click as it tries to pump against the petrol vapour in the fuel pipes or cannot suck vapour from the feed pipe. This shows the potential dangers of running petrol hoses through the hotter parts of the engine bay.

Early in its production, the fuel pump in the original MG TF was changed from a low pressure pump fitted under the bonnet to a high pressure pump fitted at the rear of the car. The reason for doing this is not clear. However, when pumping a liquid it is always better to push it rather than suck it as this avoids cavitation and bubbles. In older cars, where the petrol pump is fitted under the bonnet, it may be worth considering following the example of the TF. Not only will this reduce the problem of cavitation and bubbles in the petrol, the pressure in the fuel lines between the pump and carburettors will be around 50% higher reducing the volume of fuel evaporating at under bonnet temperatures.

A warning – if you do re-route the fuel lines between the tank and carburettors, ensure that at least one part of the circuit is above the top of the petrol tank otherwise you may find petrol syphoning out of a parked car.

Ironically, in slow moving traffic, electric fans may make matters worse. They will switch on as the water in the cooling system gets hot, probably around 90°C and blow this hot air under the bonnet, further heating the fuel system. If an electric fan is fitted, it should be placed so as not to blow hot air onto the fuel system components. It is also recommended that it is fitted with a run-on so it continues to operate, blowing colder air, after the engine has stopped.

One clear message from the Manchester tests was that it was not obvious which parts of the fuel system get hot. For example, the thermal camera images showed the float chambers to be relatively cool, even though they were close to the inlet manifold whilst the choke levers were surprisingly hot.

If you are planning to investigate ways to keep your fuel system cool, it is worth buying an infrared thermometer.

Information can be found at:

https://www.google.co.uk/search?q=infrared+thermometer) and also, a multi-meter with a thermocouple https://www.google.co.uk/search?q=multimeter+with+thermocouple). These will allow you to look to identify hot spots in the fuel system after the car has stopped. By extending the thermocouple wire into the cockpit, the multi-meter can be used to monitor spot temperatures on-the-move.

Driving Style

When I learned to drive, the instructor impressed on me the need to use the gears. Modern cars with their variable cam timing, turbo chargers and computer managed fuel injected engines are very flexible and will run and accelerate in virtually any gear. While the long stroke XPAG is a very flexible engine, it does not run as efficiently over the rev range as it may appear.

A petrol engine, such as the XPAG typically only converts about 1/3 of the heat energy in the petrol into power, the remaining 2/3 of the heat goes into heating the engine, exhaust and cooling system. By driving the car such that the engine runs most efficiently, it not only saves petrol, but also helps reduce under bonnet temperatures, avoiding petrol vaporisation problems.

At Manchester, the height of the suction piston in the carburettor provided a measure of the volume of petrol entering the engine, the dynamometer measured the power output. Dividing the power output by the height of the suction piston, for each of the throttle settings and engine revs, gives a relative measure of the percentage of energy in the petrol that is being converted into power. The higher the percentage, the better. This is shown in the graph below for the 95 octane petrol.

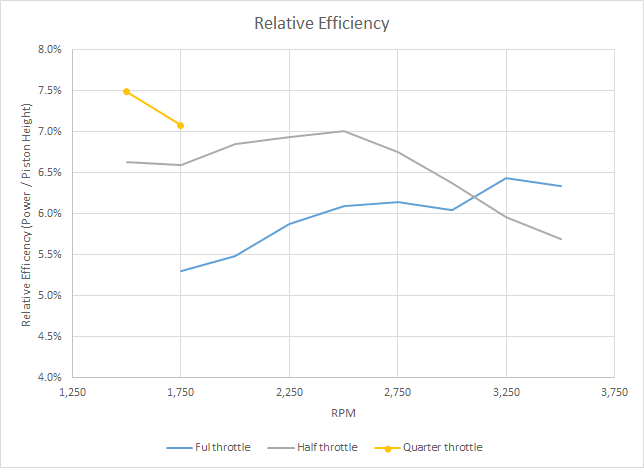
This shows how much less efficient the XPAG is below 3000 rpm running on full throttle compared to half throttle. An indication of the Slow Combustion problem. It also shows how the efficiency at half throttle starts to drop above 2500 rpm, dipping below that of full throttle above 3100 rpm. This is caused by the throttle butterfly restricting the airflow into the engine.

As my driving instructor advised, when driving your car, use your gears. Avoid the use of full throttle below 3000 rpm, change down, and do not let the engine rev on part throttle, change up!

Conclusion

The volatility of modern petrol at relatively low temperatures is the ultimate cause of classic cars stopping in slow moving traffic, especially on hot days, and the hot restart problem. This article has suggested a number of steps that can be taken to help mitigate these problems.

Because of the variations in forecourt petrol, choosing a specific brand or grade does not provide a reliable solution. For low mileage cars, Sunoco Optima 98 is a good choice. This is an ethanol free fuel with a long storage life and which is less volatile than pump fuel at typical under bonnet temperatures.

Sunoco Optima 98 is available from Anglo American Oil Company Ltd. a specialist supplier of a wide range of both leaded and unleaded petrol. All fuels are available in 25lt drums with a selection available in larger sizes. Delivery can be made throughout the UK, using a hazardous freight carrier. In addition, they stock a range of oils with high ZDDP content blended with classic cars in mind.

Orders can be made direct with Anglo American Oil Company via their web shop (www.aaoil.co.uk) or by telephone on 01929 551557, where you can also talk to their technical team about your individual requirements.

NOTE: The law limits the amount of petrol that can be stored in a garage, or anywhere within six metres of a dwelling. Households are allowed to store up to 30 litres of petrol for private use without informing your local Petroleum Enforcement Authority (PEA). That comprises up to 20 litres in two ten-litre metal containers plus up to 10 litres in two five-litre plastic containers.

An alternative is to add between 5% – 10% kerosene (paraffin or heating oil) to the petrol as this reduces the low temperature volatility. If you live in the UK remember, you can do this legally for cars produced before 1956, but you will need to apply to HM Customs and Excise for a Concession. Write to:

Mr John Loughney, Excise, Stamps and Money Businesses

HM Revenue & Customs

3rd Floor West

Ralli Quays

3 Stanley Street

Salford

M60 9LA

………requesting a “General Licence to mix hydrocarbon oils under Regulation 43 of the Hydrocarbon Oil Regulations 1973 (SI 1973/1311)” giving your name, address, model and dates of production of the model of your vehicle.

However, adding kerosene reduces the octane rating of the fuel. At the 5% to 10% level, especially if a super grade petrol is used, this appears not to cause pinking problems with a standard XPAG. The possible effect on higher compression engines is discussed in the last article.

The second problem, Slow Burning is potentially more damaging to an engine because it overheats the valves and cylinder head. Hot valves may also contribute to pinking in higher compression engines. Furthermore, this problem appears at it worse during normal road driving when the extra heat generated by the engine can contribute to the Weak Running problem.

The next two articles discuss the effect of different fuels and how the carburettors and ignition system can be tuned to reduce the Slow Burning problem.

Paul Ireland

Whilst we are on the subject of petrol, this yellowed parchment filtered to the top of my “must keep” pile of “useless information which should be binned” (according to Mrs J!).

Never throw anything away I say, you never know when it will come in handy. Well, forty years later it has indeed come in handy to fill some space between Paul Ireland’s fuel article (so, very relevant) and Don Walker’s TF restoration article.

It probably dates from 1977, since there is a reference to “the last two years” and the last of the prices is December 1975.

Current price for ‘four star’ in the UK is around £5.52 per gallon. It reached its highest ever level in April 2012 when it cost an eye-watering £6.45 per gallon – phew!

My MG TF Story

It was just before Christmas 2010 when I was looking at ads in the Victorian MG club ‘for sale’ notices.

One took my eye, it read “1954 MG TF in pieces, not running”.

I rang on the off chance it hadn’t been ‘snapped up’ as the price was very attractive.

As it turned out, I bought the car over the ‘phone, sight unseen and arranged to pick it up on the 27th, just after the festivities of Christmas.

We left Adelaide just before 6am expecting to get there, pack it on the trailer and leave by about 5pm, hah, we left at around 7.30pm which meant an overnight stay just out of Melbourne.

Jeanette washed the car on the way back and we left 39 years of dust and droppings in the wash bay, but it looked much better.

My daughter’s partner helped me take it off the trailer, as it took about six of us to push it on I thought it would be hard to get off my tilt trailer….but, on the way back I put air in the tyres.

“Release the handbrake” I called out, and ‘whoosh’, the tilt trailer tilted, the TF, now having air in its tyres, took off down my drive way and was only stopped by some bushes about 50 metres down.

Don with his new purchase ….. which turned out to be pretty complete.

At the time I was living in the Adelaide hills, known for its beautiful “English” gardens, but it was cold and damp. One day when it only reached 5 deg C. I decide enough!

The partly completed TF departed down to the beachside town of Goolwa, about 90kms from Adelaide.

I bought a 40′ x 20′ shed with a large 4 bedroom house attached.

Eighteen months after moving I retired (at 71) and decided to get on with the TF and it was completed just on its 7th year with me.

It now resides with my 1946 TC, the hardest part – which one do I choose?

Would I do it again? Of course, and the 1936 MG SA Tickford I now have is another story for a different group.

Ed’s note: Don sent me lots of photos of the rebuild. Some of these follow next. The first of these was work stated on stripping down prior to Don’s move.

Ed’s further note: After reviewing the photos he sent, Don was concerned that some of the photos (particularly the one above) show the paintwork as flat. Don says that it is shiny but for some reason it doesn’t look like it!

Don Walker

TC Accessories in Australia

If look carefully at some of the images in Mike’s book “TCs Forever More” you will see many of the TCs are fitted with accessories that are unique to Australia and were not available in the UK or North America at the time.

Most of these accessories were made in Melbourne by Monaro Motors. Monaro Motors was Melbourne’s original MG Specialist.

Jack Ould ran Monaro Motors, which commenced business at Malvern Road, Malvern, before moving to Spencer Street, Melbourne and finally Elizabeth Street. Monaro Motors was an authorised MG & Morris dealer; later, when the Healey 4 was introduced, Austin Healey Dealer as well.

Monaro Motors made and sold, various performance and racing components, such as inlet manifolds, special aluminum bodied oil filters designed to take a cost effective replaceable oil filter cartridge, alloy brake drum cooling fins, MG embossed aero screens, passenger grab handles etc. They imported Brooklands steering wheels, usually with the ‘brown rim’ were also available.

Jack at the time, also operated Automotive Carburettor Co. and was the sole distributor for SUs, and agents for Wade superchargers in Australia.

This one was fitted to my TC race car, the Patterson/Brydon Special TC/4134, shown page 23 of Mike’s book.

The most popular accessory fitted to TCs in Australia, now and the past, is still the full tonneau cover. This is because most TC owners drive here in Australia with the hood down due to our usually favourable weather conditions. Driving visibility is also greatly improved and more importantly, the car is faster with the hood down and half the cockpit covered.

This advertisement for Monaro Motors was taken from the March 1951 edition of “Australian Motor Sports” magazine and shows the comprehensive range of parts and special services that were provided.

These images show some of the original Monaro Motors accessories fitted to my TC/9507 (now TC 9507, previously OWO 032), that is shown on pages 134-135 of Mike’s book.

Richard Townley TC/9507 my road car TC/4134 my race car

Sports aero screen, adjustable, fitted with safety glass and embossed with two M.G. emblems £10/15/- per pair, in 1951

Smaller centre fitting mirrors, 11/6 each, in 1951

Brooklands steering wheels for MG TC £10/17/6 in 1951.

Chromium plated instrument panel grab handles, embossed with M.G. emblem and designed to match M.G factory fittings, £1/2/6 in 1951.

Jaeger oil and water temperature thermometers, dashboard mounting with capillary and bulb, to match your original M.G. instruments £6/15/- each, in 1951.

Oil filters for TB, TC, TD, Y and Morris 10, 1939-48. Special type with aluminium body and bronze cap, filter complete £5/5/-, replacement cartridge 17/6/. Fits same as original filter.

This one was fitted to my TC race car, the Patterson/Brydon Special TC/4134, shown page 23 of Mike’s book.

The most popular accessory fitted to TCs in Australia, now and the past, is still the full tonneau cover. This is because most TC owners drive here in Australia with the hood down due to our usually favourable weather conditions. Driving visibility is also greatly improved and more importantly, the car is faster with the hood down and half the cockpit covered.

Ed’s note: A big ‘thank you’ to Richard for sharing the details of these period accessories with us. I wonder if readers noticed the “FIRST WITH THE LATEST”. “Accessories for the new M.G. TD” part of the advert (towards the bottom)?

Richard’s road car TC9057 will grace the front cover of the June issue of TTT 2 along with a supporting article.

Concern over the Tomkins modification to the BC box

In a recent TTT 2 article advocating the use of the Tomkins modification on a rebuilt Bishops Cam steering box, an addendum by the editor warned of possible safety consequences.

It seems that there is a need to clarify why the Tomkins modification places an increased stress on the sector shaft arm that would not have been considered in the original design.

A particular feature of the Bishop’s Cam box’s design is the tapered peg running in a compatible tapered groove machined in the worm gear. This feature enables the mesh between the peg and the groove to be adjusted by placing shims between the box body and the top plate. The total shim thickness is selected to give a minimum running clearance between the gears in the straight ahead position as defined by a slight “pinch effect” when turning the steering wheel.

The tapered peg’s profile has the undesirable effect of creating an upward thrust as the peg tries to climb out of engagement with the worm’s groove during either rotation of the worm gear whilst steering, or deflection of the tyre hitting a pot hole, for example. This upward force on the peg is transferred to the top of the sector arm directly above the peg and countered by the top plate.

The contact between the sector arm and the top plate is a significant source of friction, which was intended to be overcome by the use of a needle roller thrust bearing in the Tomkins modification.

The needle roller bearing can only be positioned on the axis of the sector shaft, and due to the limitations of the surrounding housing, the bearing cannot extend to cover the sector arm directly above the arc of the peg. The result is a bending moment on the sector arm (Fig.1).

In the specific case shown in the photo below, the bending moment introduced by the Tomkins modification has caused the sector shaft to fail.

A Tomkins modified 70 year old Bishops Cam box may be unsafe if the original sector shaft is retained. If you choose to use the Tomkins modification, then you should at least replace the sector shaft with a modern high quality, steel alloy version, which may be capable of resisting the bending moment.

To repeat, the additional force introduced by the Tomkins modification has caused the sector arm to fracture away from the shaft as shown in the above photo. A Tomkins modified, 70 year old Bishops Cam box is a potential liability. If you insist on continuing to use the Tomkins modification, then one should at least replace the sector shaft with a modern, high quality steel alloy version.

Eric Worpe

Lost and Found

TC4875 (LXR 50)

Not strictly a ‘Lost & Found’ item, but owner, Steve Sabine knows its history from new and gives details of useful websites of which some of you may not be aware. Over to Steve…….

“I acquired this TC in 1972. It was built late February 1948, but it was not registered until 1951. I’m lucky to have all the original old-style log books which show it was exported new to South Africa in 1948 but did not have the Customs stamps for its return. London County Council taxation department sent the log book back to Southampton docks to be correctly stamped.

The car spent its early life mostly in London SW3 at some ‘posh’ addresses; to export and return and run a car like this in post-war Britain, it obviously had some privileged owners including Alfred Marks Bureau in Soho W1.

The registration system must have been vastly different in the 50s before cherished numbers had a value. Many of you may have read the excellent book by Graham Robson, The T-Series MGs a Collector’s Guide. On page 99 there is a publicity shot of a 1962 MGA with the registration LXR 4 some 11years after LXR 50 was issued, was this number owned by the MG Car Company?

County Council Issued number plates.

Typically, the last two letters of the number indicated the issuing Council, a guide used to be found in the back of the Observers Book of Automobiles, those were the days!

You can now find them on this link with some added history as well for pre-1973 plates

http://www.oldclassiccar.co.uk/registrations/reg-letters.htm

Just left click on the blue highlighted two letters of your registration number.

http://www.oldclassiccar.co.uk/

This link has lots of useful information regarding classic cars.

Many of you will have heard of the Kithead Trust which has many early vehicle registration details as well http://kitheadtrust.org.uk/ The Trust has a location list and also the County Council office addresses which may have some remaining records.”

TC4780 (KFF 420)

Owner, Helen Lobb-Jones is trying to trace the history of her car. It was bought by her father in Germiston, South Africa in 1973 and restored by him over a three-year period. When her parents decided to return to the UK in 1976 the car came with them.

From documents she has acquired, Helen has details of the car’s owners dating back to 1965 – these are as follows:

  1. dated 27.04.1970 Form 1&3 Transvaal Province Application for Registration of motor vehicle. Name on this form is Andries Lourens Marais who acquired the TC in 1965.

2. 10.05.1971 car was acquired by Hermanus Louis de Villiers who was the chief safety officer at Kinross Mines Ltd. There were other dates noted within this document something happened on 21.08.1970 when A L Marais owed the TC but the document is in Afrikaans.

3. 23.06.1971 Mr I.D.Oberholzer of Germiston sold the TC for R450.00 to Mr H J E Maritz of R T Panelbeaters.

4. 08.03.1973 her father M W Lobb purchased the TC for R1200.00 in Germiston.

Encouraged by the success of Roger Bateman in tracing his car’s history, which had been exported from new to South Africa (story told in the previous issue), Helen has recently redoubled her efforts and has been busy sending e-mails to South Africa over the last few weeks. Nothing concrete has turned up so far, but she has been told that TC4786 is alive and well in South Africa, having been exported there from new.

It seems likely that TC4780 would have been exported to South Africa shortly after its build date in February 1948, so all hopes are pinned on any further information that might be forthcoming from that country.

TD/C29792 (TPH 383) and TC 3867 (JNA 362)

Barry Lomas owns TD/C29792 (TPH 383) and used to own TC 3867 (JNA 362).

The TD MKII is the last but one Home market model and Barry says that as it has the necessary fittings for rallying in the 50s and 60s, he wondered if anyone remembered it.

The TC used to be raced by Barry in the 1970s and he has photos of it in competition then. If the current owner is interested and contacts him he’d be glad to supply copies.

lomasbarry(at)hotmail.com (please substitute @ for [at}]).

TC0552 (DBL 54)

Terry Midwood has owned his TC since 1965. Being an early car, it would have been painted black, but it was clipper blue when Terry purchased it. Terry would be interested to learn of any pre-1965 history of his TC.

Any leads via the editor, please.

TA 1581(EBH 151)

Tony Bremner-Milne owns this very smart looking TA with original engine (MPJG 1872) registered on 19th July 1937. No known history or previous owners prior to Tony’s ownership, so he’d be really pleased if anybody out there can supply any information to help.

bremner_milne(at)btinternet.com {please substitute @ for (at)} Also, please note that there is an underscore between bremner and milne.

TC2689 (HTD 169) – ex Lancashire Police

Brian Kelly from the US sent me this very fine photo of TC2689. Brian wondered if the car is still about. It comes up on a DVLA enquiry search as “Not taxed for road use”. From enquiries I have made it seems that this TC only exists as a log book, albeit it must be on a V5C, so unless anybody knows something to the contrary, the car is RIP.

Just to round of this section, here’s an aerial photo of 50 TFs at a meet at the Werribee Mansion, Victoria, Australia. (Thanks to David Padgett for the correction)

Bits and Pieces

Andy Denton Supplier of MG T-Type Ash Frames (including Timber Parts)

The services provided by Andy Denton, were featured in TTT 2 Issue 43. There was also a ‘thumbs up’ for his work from a satisfied customer published in Issue 45. Andy has recently been in touch to advise that his website is now up and running. You can find it at www.mgashframes.co.uk

It’s well worth a look – I think it’s wonderful to see a craftsman at work.

Finishing Touch’ bodyshop

Weston-Super-Mare

Here’s another recommendation – this time, from me! Proprietor, Adrian Moore painted my J2 with which I was well pleased. Adrian has restored quite a few classics and has experience of T-Types. One of his current projects is a complete rebuild of Rick Haidon’s TC, which I hope to mention in despatches in future issues.

Adrian has just finished a re-paint on John Lansford’s TC. The job entailed quite a lot of work on the body which was expertly carried out by Paul, one of Adrian’s employees.

John Lansford’s TC1955

Have a look at the varied selection of restorations at https://www.facebook.com/Finishing-Touch-Body-Shop-WSM-1553537641628733

Marc Tipping P & T Repairs, Byfleet, Surrey

Michael Friend sent the following to me:-

“I can recommend Marc Tipping of P & T Repairs, Unit 1, Dorset Way, Byfleet, Surrey, KT14 7LB (www.ptrepairs.co.uk). He is nearing the end of a chassis up rebuild of my TF which has been taking place since last summer.

Although essentially a high-class paint shop and coach works, he undertakes and oversees the complete rebuild of many makes of classic car (I have seen E-Type Jaguars, Aston Martins etc in his workshop) with a particular experience of re-building T-Types for several well-known MGCC and MGOCC members. Indeed, he was recommended to me by one of them. He has also rebuilt a TF of his own. Although just around the corner from me in Surrey, I confess that I had never heard of him before because he doesn’t advertise. He appears to have plenty of work and tells me that he exists primarily on recommendations. Always a good sign I feel. He is also a nice, helpful and knowledgeable chap, who is very easy to get on with”. 

CLASSIC & RETRO AUTOMOTIVE WORKS

John Bakewell has used this company for the restoration of his TC and has not been disappointed. Classic & Retro worked on the Ford Mexico and Transit van for the Channel 4 programme For the Love of Cars. Some of their projects (which includes John’s TC) can be viewed at http://www.classicandretro.sale/projects/index

Fitting TA pistons

Gordon Norman offers the following advice:

“I had to refit the pistons in my MPJG engine with the crank shaft still in place recently because although the big end bearings had to be re-metaled, the journals on the crank shaft were still ok. After scraping in the new big ends, I found I couldn’t get a normal ring compressor in past the crankshaft – it just isn’t possible. So, I made up some tubes just bigger than the pistons from a strip of aluminium 1.1/2″ wide and stuck the tubes together with Araldite. I formed them around the bottom of the pistons and clamped them with small clamps until the glue went off, I left them for 24 hours. I then fitted the sleeves to the pistons, compressing the rings on the bench, liberally applying plenty of oil and leaving just about 1/8″ of piston above the aluminium sleeve to act as a lead for the liners. The pistons, with a bit of juggling and moving the crankshaft to gain space would then go past it ok. All I then had to do was to locate the top of the piston in the bore and with a firm push they just slipped in. Then I cut the rings with some tin snips and removed them around the con rods, it worked a treat.

I hope this note may help someone else with the same problem.”

Ed’s note:

The aluminium strip was 22BSWG which is 0.028” The strips were cut from a fire place cover from the back of an old gas fire!! 

Dave’s ‘Doughnuts’

These were featured in the December 2017 issue. They are a ‘fix’ (which seems to last) for the clunk experienced if your rear wheel splines are worn.

Simply, it’s a foam rubber ring which fits between the brake drum and the wheel. As you tighten the spinner, the ring is squashed tightly in the space. The rubber forms around the drum 1/2 nuts on one side and the spoke nipples on the other, stopping the wheel moving to and fro.

Do they work? – well, they certainly work on David Heath’s TA and have lasted for years.

Following the article in the December issue, the ‘doughnuts’ were sent to various owners, including a pair to Tasmania, to Belgium and within the UK.

Renaud de Villeneuve from Belgium reports that after a test run, “It seems the klonk has disappeared”.

Cost of the ‘doughnuts’ is £15 per pair inclusive of UK postage. Please order via The Editor jj(at)ttypes.org

{please substitute @ for (at)}.

They can be sent worldwide for a relatively small additional postage cost.

Facebook page for TD enthusiasts

For information, there is a Facebook page for MG TD enthusiasts with over 1100 members and which I created when I bought my MG TD 1953 8 years ago.

https://www.facebook.com/groups/157334069474/

Regards

Mogens Jensen, DK

Lucas Ammeters

I promised in the editorial of the previous issue that I would publish some useful information received from Jim Waltrip on Lucas ammeters. Over to Jim….

“I know there is always lots of confusion on what are the correct gauges for T-Series. Concerning ammeters, here is a list of Lucas numbers that are taken directly out of multiple Lucas catalogs I have, going back in the 1930s and later.

MG TC original number 369269, 0-20-0. The only script is ‘amps’. Lucas shows this number being correct for 1946-1950 TC. Also fits MG 1 1/4 Tourer, 1947-1950.

369269 at some point gets superseded to 36153, 0-30-0. 36153 is also the number listed for TD, 1951-1953.

Number 36181 listed for TF, 1954-1955.

This number also listed as the superseded number for the MG 1 1/4 Saloon, 1947-1951. Original number being 36028.

In your information about ammeters you show one, post war, without any lettering other than ‘amps’, which is the 369269. The case number on that particular ammeter you show is 36174 which is the original and correct number for numerous other British cars, Peerless, Swallow/Doretti and most common Triumph TR2/3 to 1959.”

MGTC – Registration mark MG 7404 (TC4555)

This item should really have been included under ‘LOST & FOUND’, but it came in very late, so it’s included here in the hope that it will still be seen. Steve Long has just e-mailed to ask if the owner of this TC (thought to be in the US) could get in touch with him, please.

The car was given to Steve’s father (who is in his late eighties) by his grandfather as a 21st birthday present. Interestingly, the car was purchased from Donald Campbell (it was his wife’s car).

If you can help, please contact Steve at:

Home(at)the-longs.co.uk {please substitute @ for (at).

Steve’s dad would be delighted to hear from you.

DVLA Internal Memo

Mention of this was made in the editorial. The text is as follows:

From: (left blank)

Sent 17 August 2017 12.03

To: (left blank)

Subject: Full keeper/previous keeper history requests.

Please find attached the agreed amendments to the MIS546 booklet in relation to the current keeper or previous keeper requesting information about former keepers. One thing I have noticed the MIS546 version you sent me is not the most up to date version published on Gov.uk.

As we discussed, there is no reason why we can’t provide the history of a vehicle but details of the previous keeper(s) (name(s) and address(s) should not be provided unless the reasonable cause provision can be met.

We can commence rejecting applications where reasonable cause is not met in relation to these requests and I have attached a suitable reject letter for the purpose.

(A thick black line follows, obviously to obliterate names)

I trust this clarifies the situation with regards to these applications.

If there is anything else please let me know.

Regards,

Data Protection Policy

Strategy, Policy and Communications Directorate I D16 I DVLA I Swansea I SA6 7JL

Ed’s note: The reasonable cause provision has been explained in a previous issue, as follows:

“Reasonable cause” criteria include tracing the registered keeper of an abandoned vehicle, or one parked on private land, or details of ownership for court proceedings, or road traffic accidents.